Welcome to the 182nd two-week challenge for Cardz 4 Galz! Our host this time, Doreen, chose shades of blue for our theme. When you finish here, I hope you will hop over to the challenge site to see the projects from the rest of the design team members. We’d love to have you play along with us for this color challenge!
Here’s my shades of blue card:
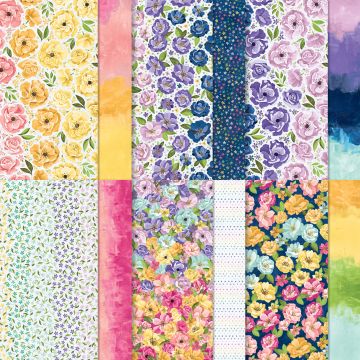
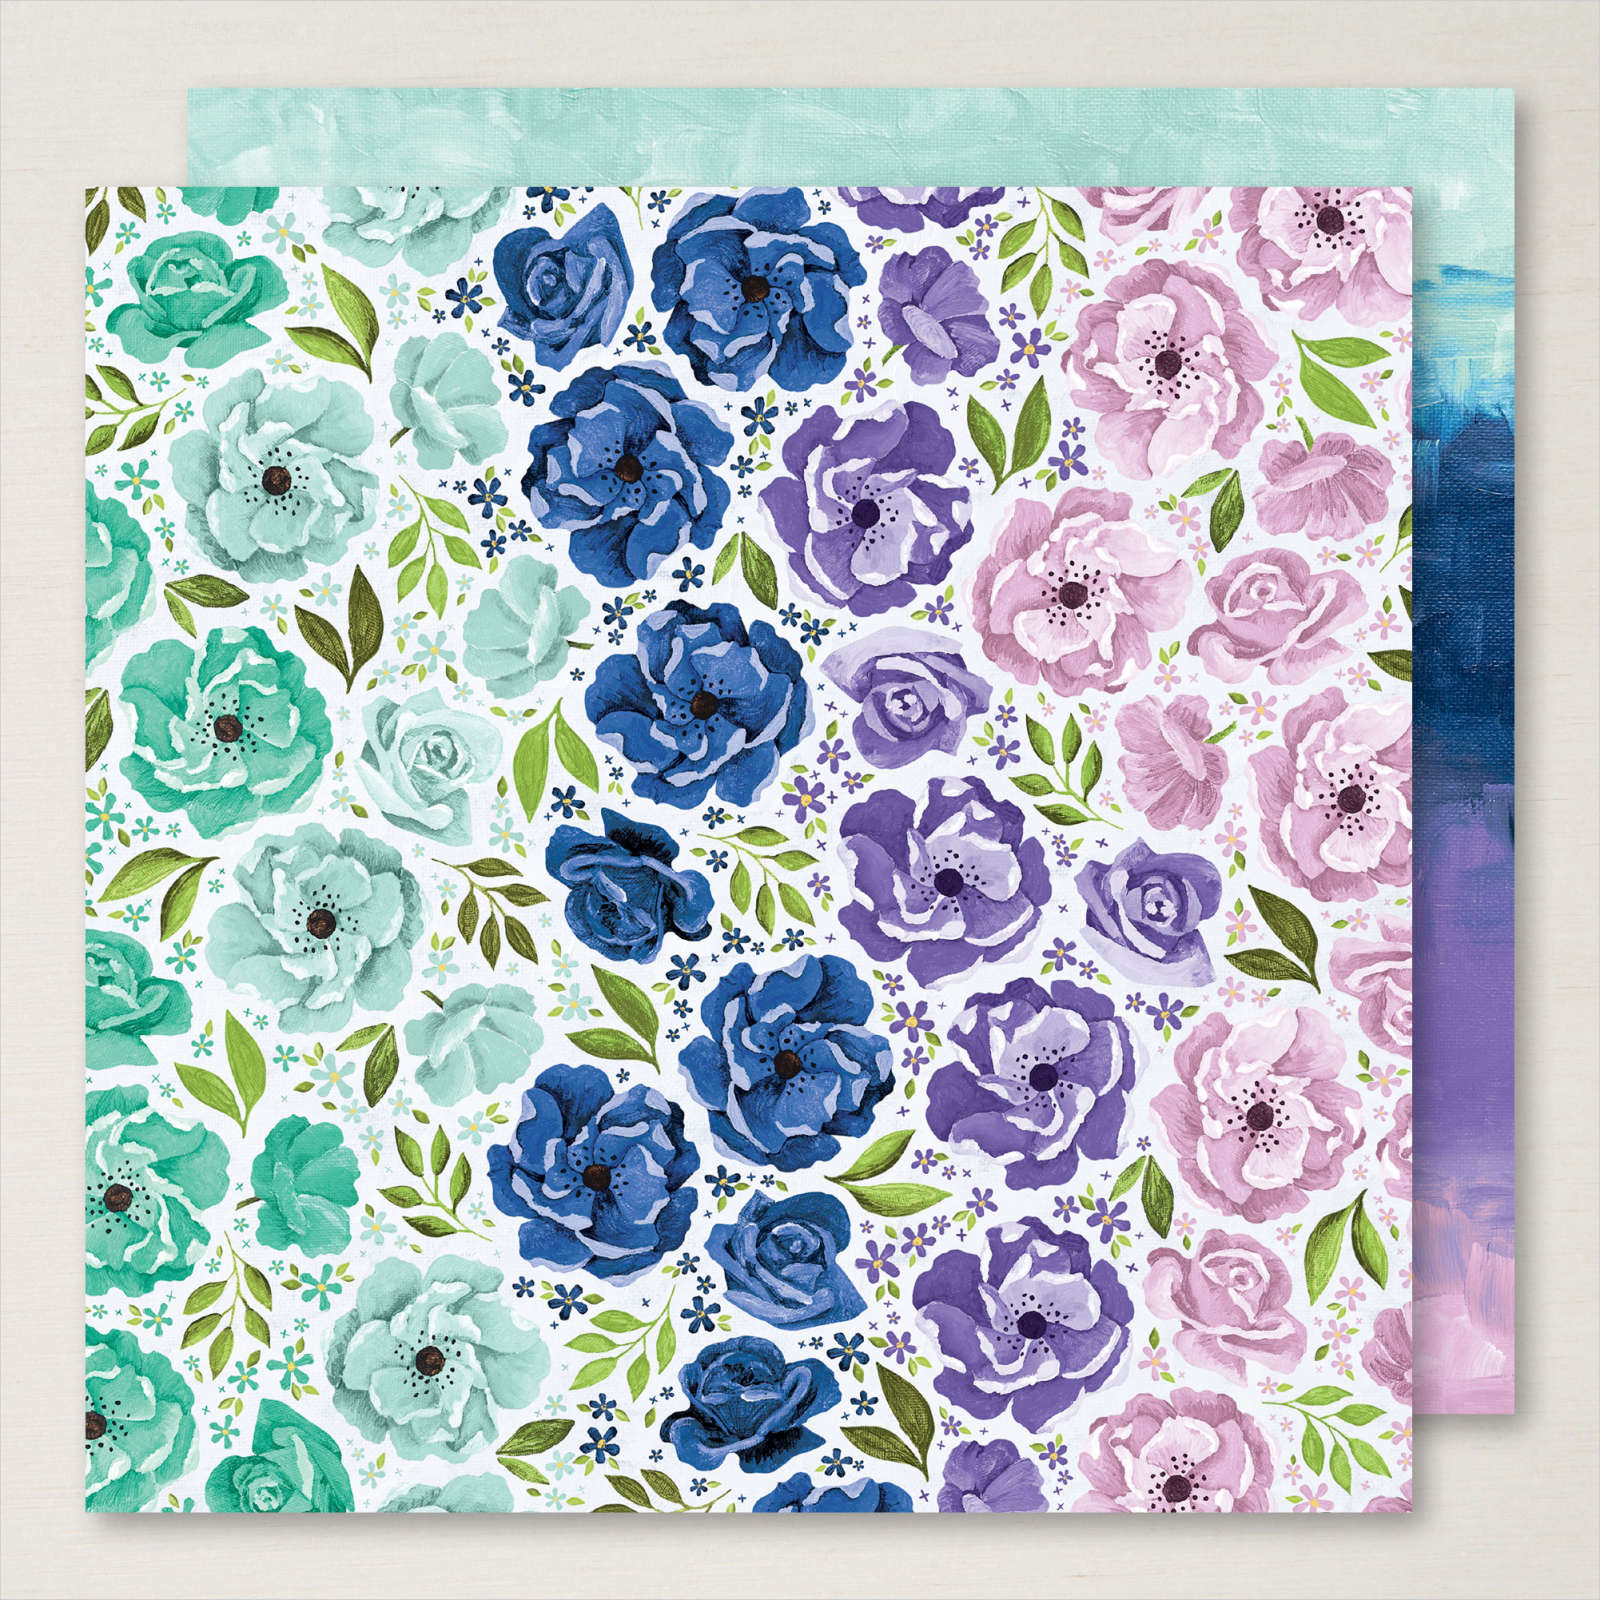
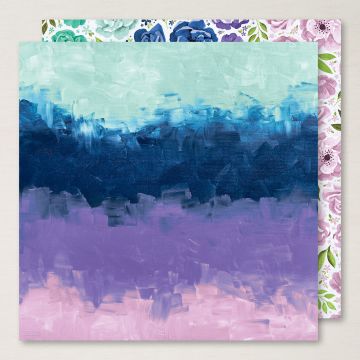
This absolutely stunning DSP (designer series paper) comes from the Hues of Happiness DSP pack. Just take a look at all the gorgeous colors! There’s truly something for everyone.
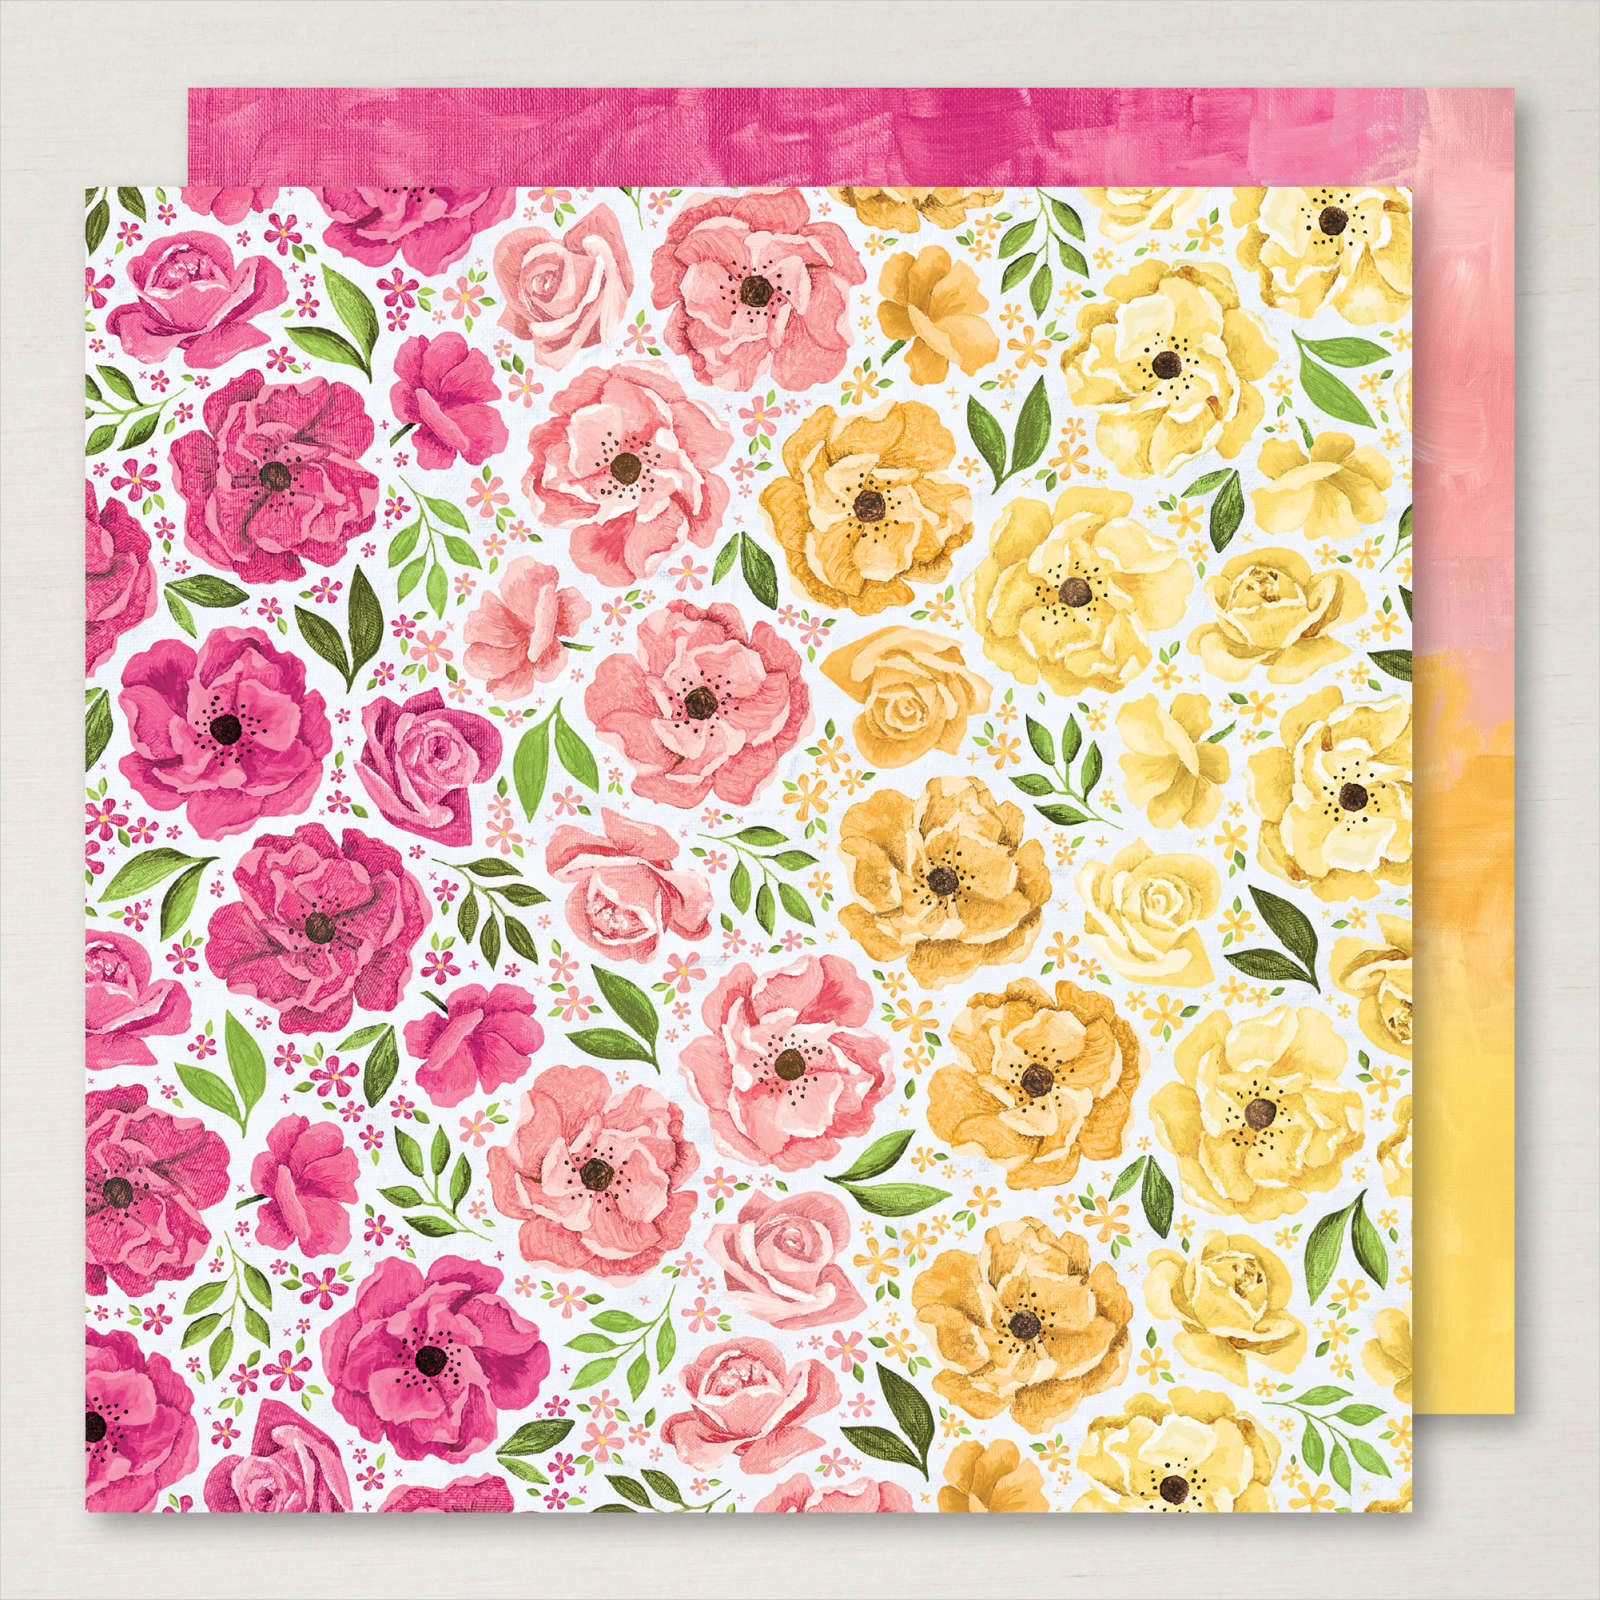
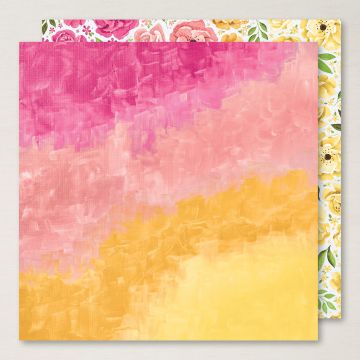
For my card, I used the floral and the textured paper from the last two photos. Gorgeous colors and stunning paper!
Clean and Simple:
The Night of Navy base measures 4-1/4 by 11 inches, scored at 5-1/2 inches to create a tent card.
I trimmed a piece of the painted textured DSP to 4-1/8 by 5-3/8 inches.
Next, I trimmed a 6 inch by 2-1/2 inch piece of the floral DSP for the envelope flap. I also punched a 1-inch circle of the DSP for the painted texture envelope seal.
The strips of floral DSP started out at 5-3/8 by 1-1/8 inches. I trimmed it down to three strips, the first of which is 5-3/8 by 1/2 inches. Then, I cut the remaining piece in half lengthwise.
I trimmed a piece of white cardstock for the inside of the card to 5-1/4 inches by 4 inches.
The two stamps used for the outside and the inside sentiments come from the Fond of Autumn stamp set. After stamping the front sentiment in Night of Navy ink on a piece of scrap white cardstock, I cropped it using the banner from Stylish Shapes dies and popped it up on dimensionals. The inside sentiment, I’m so fond of you, is also stamped in Night of Navy.
After adhering the strips to the painted texture DSP using multipurpose, I tied a piece of Pool Party sheer ribbon around the DSP and tied it in a bow. The ribbon is thin enough that I could adhere the DSP panel to the Night of Navy base using multipurpose glue as well.
I popped the sentiment on the front and glued the inside white cardstock using multipurpose glue as well.
With that, this clean and simple coordinated card, envelope, and envelope seal was complete.
The sign-up days for this kit started on September 11, 2022 and run through October 10, 2022. Some of Santa’s elves let it slip that this October kit will coordinate with the November Ho Ho Ho tag kit!
If you live in the U.S. and don’t already have a demonstrator, I’d be honored to work with you.
Do You Want to Place an Order?
Of course you do, especially since you can earn FREE products with a qualifying purchase!
If you are ordering less than $150.00, please use the host code shown. If you are ordering more than $150.00, please contact me first so you an get your stamping rewards! Any order over $50 will earn a little surprise from me.
The HOST CODE through September 30, 2022 is W9GCXFZ6.
Once again, thank you for stopping by my blog today! I hope you will take another minute and leave a comment.
Welcome to the latest Cardz 4 Galz challenge two-week challenge. Our host for this challenge #181, Dawn, picked baby girl as the theme. As always, when you finish here, I hope you will hop over to the the challenge site to see what the other design team members have created. It’s always inspirational, and I hope you get inspired to play along with us. I’m looking forward to seeing all kinds of baby girl cards because they are so stinking cute!
I used the Happy Forest Suite for my card:
I got this layout from Try Stamping on Tuesday, even though the challenge ended before I could add this card to that gallery. Here’s the banner for that layout:
What I Did:
The So Saffron base measures 8-1/2 by 5-1/2 inches, scored at 4-1/4 inches.
Both the DSP patterns come from the Happy Friends 12 x 12 inch DSP. The Calypso Coral DSP (designer series paper) measures 4-1/8 by 5-3/8 inches. I outlined it using a Crumb Cake marker. I also trimmed a piece of this DSP to 6 inches by 2-1/2 inches for the envelope flap.
The tree DSP measures 3-3/8 by 4-1/2 inches. I outlined this piece using a Calypso Coral marker. Then, I punched a 1 inch circle from this DSP for the envelope seal.
Next came the stamping. After stamping the bear in Crumb Cake, I used an almost dry blending brush to blend color starting at the bottom of the bear. The base of the tree trunk is also stamped in Crumb Cake.
I stamped the fox in Calypso Coral.
Then, I stamped the owl in Smoky Slate.
I used a Calypso Coral marker to add the owl’s beak and the bear’s inner ears.
Finally, I stamped the sentiment in Calypso Coral.
All the stamped elements were cropped using dies from the Happy Friends die set. So cute!
After adding dimensionals underneath the cropped pieces, I adhered them to the DSP.
Finally, I added a piece of Old Olive ribbon and baker’s twine to the sentiment.
With that, I’d finished this coordinated card, envelope, and envelope seal set.
Precut pieces (No prep work! Get right to crafting). Including printed die-cut sheets: sticker adhesive sheets & non-adhesive sheets
Makes 12 cards of 1 design
Gold foil accents
Folded card size: 5-1/2″ x 4-1/4″ (14 x 10.8 cm)
12 preprinted envelopes
Enough adhesive to complete projects
Linen thread
A 9-7/8″ x 6-1/2″ x 2-3/4″ (25.1 x 16.5 x 7 cm) printed designer box for storage or crafting on the go
Product colors: Cajun Craze, Early Espresso, Evening Evergreen, Garden Green, Poppy Parade, Pumpkin Pie
If you live in the U.S. and don’t already have a demonstrator, I’d be honored to work with you.
Do You Want to Place an Order?
Of course you do, especially since you can earn FREE products with a qualifying purchase!
If you are ordering less than $150.00, please use the host code shown. If you are ordering more than $150.00, please contact me first so you an get your stamping rewards! Any order over $50 will earn a little surprise from me.
The HOST CODE through September 30, 2022 is W9GCXFZ6.
Once again, thank you for stopping by my blog today! I hope you will take another minute and leave a comment.
Welcome to the Cardz 4 Galz biweekly challenge #180. Our host this time, Claudia, chose using 3 of anything for the theme. When you are finished here, I hope you will visit the challenge site to see what the rest of the design team created. I’m looking forward to seeing our creations in our gallery.
Here’s my card:
I really went with the theme of using 3 of anything for this card. There are three DSP (designer series paper) patterns, all from the soon-to-be retiring FREE Sale-a-Bration Rings of Love DSP set. The trees DSP rectangle contains three threes, two of which are partially covered by the birds DSP pattern. In addition, there are three rectangles, three sentiments (two on the inside) and three elements from the embellishments section of the annual catalog.
Measurements:
The Night of Navy base measures 5-1/2 by 8-1/2 inches, scored at 4-1/4 inches.
The DSP splatter pattern measures 4-1/8 by 5-3/8 inches.
Next, I trimmed a piece of the trees DSP pattern to 5-1/8 by 2-7/8 inches.
Then, I trimmed a piece of the birds DSP to 2-1/2 by 4-3/8 inches and added dimensionals underneath it.
I also trimmed a piece of the birds DSP to 6 inches by 2-1/2 inches for the envelope flap.
The white cardstock for the inside measures 4 inches by 5-1.4 inches.
Finally, I punched a 1 inch circle from the trees DSP for the envelope seal.
What I Did:
First, I used multipurpose liquid glue to adhere the splatter and trees DSP to the front of the card.
Then, I stamped the front sentiment, which comes from the Hello Ladybug stamp set, in Soft suede on a piece of scrap white cardstock. I cropped it using a Tailor Made Tags die and trimmed it down.
Next, I wrapped a piece of Mint Macaron ribbon around the birds DSP and pushed it through the hole in the tag. After tying it in a knot, I added a piece of braided linen thread to it and tied it in another note.
I popped the tag up on dimensionals and adhered it to the DSP. Then, I added the DSP to the front of the card.
The last step for the front was to add a Crushed Curry dot to the tag.
I stamped both sentiments for the inside using Soft Suede ink and two sentiments from the Peaceful Moments stamp set. I adhered it to the inside of the card using multipurpose liquid glue.
With that, I’d finished this coordinated card, envelope, and envelope seal set.
Precut pieces (No prep work! Get right to crafting). Including printed die-cut sheets: sticker adhesive sheets & non-adhesive sheets
Makes 12 cards of 1 design
Gold foil accents
Folded card size: 5-1/2″ x 4-1/4″ (14 x 10.8 cm)
12 preprinted envelopes
Enough adhesive to complete projects
Linen thread
A 9-7/8″ x 6-1/2″ x 2-3/4″ (25.1 x 16.5 x 7 cm) printed designer box for storage or crafting on the go
Product colors: Cajun Craze, Early Espresso, Evening Evergreen, Garden Green, Poppy Parade, Pumpkin Pie
Sale-a-Bration is in full swing for SEVEN MORE DAYS!!
Sale-a-Bration runs until August 31, 2022. This means you can earn FREE products for two more weeks! Take a look at these Sale-a-Bration products!!
FREE WITH A QUALIFYING $50 ORDER:
NEW ITEMS HAVE BEEN ADDED TO THE PRODUCTS WHICH ARE FREE WITH A QUALIFYING $100 ORDER:
If you live in the U.S. and don’t already have a demonstrator, I’d be honored to work with you.
Do You Want to Place an Order?
Of course you do, especially since you can earn FREE products with a qualifying purchase!
If you are ordering less than $150.00, please use the host code shown. If you are ordering more than $150.00, please contact me first so you an get your stamping rewards! Any order over $50 will earn a little surprise from me.
The HOST CODE through August 31, 2022 is W4Q23RT4.
Once again, thank you for stopping by my blog today! I hope you will take another minute and leave a comment.
Welcome to the latest Cardz 4 Galz two-week challenge. Our host for # 180, Helen, chose the theme of using checks somewhere on a project. As always, the finished cards created by the whole design team are varied and awesome. I hope you are inspired to play along with us. When you are finished here, I hope you check out the challenge website and then join in the challenge.
Here’s my checked card:
While it is a bit early for Halloween, my it’s my daughter’s favorite holiday and she doesn’t think it’s ever too early to start decorating. Since this card came together relatively quickly, I’d call it an easy-peasy card.
Measurements:
The black base measures 8-1/2 by 5-1/2 inches, scored at 4-1/4 inches.
I used a Pumpkin Pie mat and trimmed it to 4-1/8 by 5-3/8 inches.
The Gingham DSP (designer series paper) on the front of the card measures 4 by 5-1/4 inches. I also trimmed a piece of this DSP to 6 inches by 2-1/2 inches for the envelope flap. This fabulous 12 by 12 inch pack can be found on page 59 of the current mini-catalog. Take a look at all the fun colors in this paper:
Since I used the Old Olive blends on the pumpkin leaves, I wanted to incorporate it on the card. Therefore, I used a (retired) piece of the Regals Old Olive 6 x 6 inch DSP and cropped a circle using the largest Stylish Shapes circle die. I also punched a 1-inch circle of Old Olive DSP for the envelope seal.
Then I cropped black cardstock swirl directly behind the pumpkins using one of the Painted Labels dies.
Stamping, Coloring, Finishing Up:
I stamped the pumpkins (from the Pretty Pumpkins stamp ) the sentiment ( from the Cutest Halloween stamp set) using Momento Tuxedo Black ink. The cute faces on the pumpkins come from the Cutest Halloween stamp set. Word of warning with these tiny photopolymer stamps – it’s really easy to lose them. Believe me, I may or may not have misplaced two of these little, tiny cuties. Just saying.
I used the Old Olive, Crumb Cake, and Pumpkin Pie blends combos to color in the pumpkins. Then, I fussy cut them out and popped them up on dimensionals.
Next, I cropped the sentiment banner using one of the banner dies from the Stylish Shapes die set. Here’s a couple of pictures showing how I made the tag half size:
The little piece of tape is Post-it tape, which you can find on A,mazon. It’s tremendously helpful! I also added dimensionals to the back of the sentiment banner.
I wrapped a length of the black and white checked ribbon around the DSP on the front of the card and tied it in a bow.
Then, I added the cropped circle and swirl using multipurpose liquid glue under the ribbon.
Next, I adhered the pumpkins and the sentiment banner.
Finally, I stamped a sentiment on the inside panel and adhered it to the inside of the card.
With that, I’d finished this coordinated card envelope, and envelope seal set.
The new Holiday Mini-Catalog and Sale-a-Bration are in full swing!!
Sale-a-Bration runs from July 1 to August 31, 2022. This means you can earn FREE products for two months! Take a look at these Sale-a-Bration products!!
FREE WITH A QUALIFYING $50 ORDER:
NEW ITEMS HAVE BEEN ADDED TO THE PRODUCTS WHICH ARE FREE WITH A QUALIFYING $100 ORDER:
Here’s a link to the new Holiday Mini-Catalog, which runs through January 4, 2023.
Click on the following image to open the catalog:
If you live in the U.S. and don’t already have a demonstrator, I’d be honored to work with you.
Do You Want to Place an Order?
Of course you do, especially since you can earn FREE products with a qualifying purchase!
If you are ordering less than $150.00, please use the host code shown. If you are ordering more than $150.00, please contact me first so you an get your stamping rewards! Any order over $50 will earn a little surprise from me.
The HOST CODE through August 31, 2022 is W4Q23RT4.
Again, thank you for stopping by my blog today! I appreciate your comments and your time.
Welcome to Cardz 4 Galz challenge #178. It’s my turn to host, and I chose the theme of black and white plus 1. Any color you choose, which leaves it wide open to your imagination! When you finish here, I hope you will check out the projects from the rest of the design team! I can’t wait to see what you create and post to the gallery.
Here’s my card, in the classic black, white, and Real Red color combination:
I’ve gone back to the Hello Ladybug stamp set and punch for this card! I just love those cute little bugs, and the googly eyes make me smile. I got the googly eyes on Amazon. I picked the following set because it came with over 1.200 googly eyes and a cute little box to hold them. You can find them here. The best part about these little things is that they are self-adhesive. Score!
Measurements:
The Real Red base measures 11 by 4-1/4 inches, scored at 5-1/2 inches.
Next, I trimmed the checked DSP, from the Gingham Cottage DSP (designer series paper) found in the current mini-catalog. I trimmed one piece to 4-1/8 by 5-3/8 inches. Then, I trimmed the second piece to 6 inches by 2-1/2 inches for the envelope flap.
The white cardstock on the inside measures 4 by 5-1/4 inches.
I was able to punch the ladybugs and sentiment labels from my “leftovers” stash. In order to help the Real Red wings stand out, I also punched two white sets of wings.
That’s it for the measurements.
What I Did:
I punched the ladybugs from black cardstock.
Next, I stamped the dots in black ink on Real Red cardstock. Then, I punched the red wings and the extra set of white wings.
The sentiment comes from the Hello Ladybug stamp set, and seemed perfect for the card and the intended recipient. I cropped both the white sentiment panel and the Real Red mat using the Stylish Shapes dies.
Next, I wrapped a length of Real Red sheer ribbon around the checked DSP and tied it in a bow. I added a glue dot under the bow to hold it in place and tied.
I glued the red wings to a set of white wings and adhered them to the ladybugs using multupurpose liquid glue. Then I added dimensionals under the ladybugs.
After adding the googly eyes, I realized that I’d need something extra on the ladybugs to make them stand out. Therefore, I outlined these cuties with clear Wink of Stella. This added just a bit of bling and they do stand out from the DSP.
Next, I adhered the sentiment on the white cardstock to the Real Red mat using multipurpose liquid glue. I added dimensionals under the sentiment and adhered it to the front of the card.
Finally, I trimmed the DSP on the envelope flap and punched a Real Red DSP 1 inch circle for the envelope seal.
With that, I’d finished this coordinated card, envelope, and envelope seal set..
It’s July, 2022 ~ do you know what that means? The new Holiday Mini-Catalog and Sale-a-Bration are in full swing!!
Sale-a-Bration runs from July 1 to August 31, 2022. This means you can earn FREE products for two months! Take a look at these Sale-a-Bration products!!
Here’s a link to the new Holiday Mini-Catalog, which runs through January 4, 2023. Click on the following image to open the catalog:
If you live in the U.S. and don’t already have a demonstrator, I’d be honored to work with you.
Do You Want to Place an Order?
Of course you do, especially since you can earn FREE products with a qualifying purchase!
If you are ordering less than $150.00, please use the host code shown. If you are ordering more than $150.00, please contact me first so you an get your stamping rewards! Any order over $50 will earn a little surprise from me.
The HOST CODE through July 31, 2022 is UKDVYZSG.
Again, thank you for stopping by my blog today! I appreciate your comments and your time.
Welcome to the latest Cardz 4 Galz two week challenge! Our host, Caz, picked Get Inky for the theme of #177. When you finish here, I hope you will visit the challenge website to see the creations of the rest of the design team members.
Here’s my Get Inky card:
, I know the picture is cut off but I gave this card to my great-niece on Monday for her 6th birthday so I can’t take another one.
My great-niece is currently obsessed with rainbows and unicorns. Her 6th birthday present is a pastel pink and purple unicorn hooded bathrobe. Therefore, I went with a rainbow birthday card.
Measurements:
The Gorgeous Grape base measures 5-1/2 by 8-1/2 inches, scored at 4-1/4 inches.
I used a black cardstock mat, and it measures 5-3/8 by 4-1/8 inches.
I started with a piece of white cardstock measuring 5-1/2 by 4-1/4 inches. After I had finished creating the rainbow, I trimmed it down to 5-1/4 by 4 inches. Then, I trimmed another piece of white cardstock for the inside to 4 by 5-1/4 inches.
Since I stamped a series of rainbow colors on the envelope flap, that’s about it for measurements.
Getting Inky:
I didn’t take pictures of the process of creating the rainbow colored clouds, but I do have pictures from a previous post using the same technique in Bermuda Bay.
I used a piece of window sheet film and cropped it with the cloud looking die from the basic borders die set. Then, I used the window sheet clouds as a stencil. Here are photos of this process using the stencil, a blender brush, and Bermuda Bay ink:
I did move the “clouds” as I worked my way up the white cardstock. I also blended very light areas using the dry blender brush.
The colors I used are Real Red, Pumpkin Pie, Daffodil Delight, Garden Green, Pacific Point, Starry Sky, and Gorgeous Grape.
Here’s my rainbow of clouds before I added anything else:
Happy Birthday:
I stamped the sentiment from Artfully Layered in Momento Tuxedo Black ink on white cardstock. Then I cropped it using one of the Tailored Made Tags dies. The hole punched with this die was exactly what I needed for the balloon strings.
I used my balloon punch and started punching 2021-2023 In Color Vellum and shimmery white cardstock.
Then, I started dry-fitting the balloons together. When I figured out the placement, I added white baker’s twine and dimensionals under some of the balloons.
I pulled all the twine strands through the hole in the sentiment tag and just tied a knot.
After I had it all adhered, I used just a couple of drops of white craft ink to add highlights to the balloons.
Next, I used the shadow stamp from Wildlife Wonder to stamp the rainbow colors on the envelope flap.
Finally, I punched a 1 inch circle of Gorgeous Grape DSP for the envelope seal.
With that, I’d finished this coordinated card, envelope, and envelope seal set.
It’s July, 2022 ~ do you know what that means? The new Holiday Mini-Catalog and Sale-a-Bration are in full swing!!
Sale-a-Bration runs from July 1 to August 31, 2022. This means you can earn FREE products for two months! Take a look at these Sale-a-Bration products!!
Here’s a link to the new Holiday Mini-Catalog, which runs through January 4, 2023. Click on the following image to open the catalog:
If you live in the U.S. and don’t already have a demonstrator, I’d be honored to work with you.
Do You Want to Place an Order?
Of course you do, especially since you can earn FREE products with a qualifying purchase!
If you are ordering less than $150.00, please use the host code shown. If you are ordering more than $150.00, please contact me first so you an get your stamping rewards! Any order over $50 will earn a little surprise from me.
The HOST CODE through July 31, 2022 is UKDVYZSG.
Again, thank you for stopping by my blog today! I appreciate your comments and your time.
Welcome to Just Peachy Stamping by Sue Jackson: an independent Stampin' Up demonstrator.
Through Stampin' Up!, I happily share my love of papercrafting through sales, classes, small stamping group meet-ups and workshops. I think that being a teacher in my "real life", I have a unique approach to sharing my fantastic hobby. I look forward to connecting with you!