Welcome to the newest Cardz 4 Galz bi-weekly challenge! Our host for #201, Lynda, chose using dies or punches. When you finish here, I hope you will visit the challenge site and are inspired by the rest of the design team to play along with us! We love looking at your creations in our gallery, so please join us.
Here’s my card:
I’ve already posted ladybug cards using the black, red, and white color combination. You can see two of them those cards here and here. However, this time, I added a little “Wobble” underneath each ladybug. Here’s a video (sorry it’s such a massive size) to show you how they work:
The Wobbles can be found on Amazon by clicking the link here.
The googly eyes I used can also be found on Amazon here. I like this 750 piece set because it comes in a container with separate sections for each size eyes. In addition, they are self-adhesive and I don’t think I will ever run out. 750 pieces is a bunch of googly eyes!
Creating the Card:
Trim a piece of Real Red cardstock to 8-1/2 by 5-1/2 inches and score at 4-1/4 inches.
Trim a piece of DSP (designer series paper – this particular design is from a retired pack) to 3-1/8 by 4-3/8 inches for inside the scalloped border.
Trim a coordinating piece of DSP to 6 x 2-1/2 inches for the envelope flap.
After adding the DSP to the scalloped border, add a piece of Real Red ribbon, weaving it through the scallops and tie in a square knot on the front.
Punch a 2-inch diameter circle of vellum.
Crop the scalloped border using the largest die in the Scalloped Contours die set.
Punch two black ladybugs, 2 red wings, and 2 white wings.
Stamp the black dots from the Hello Ladybug stamp set on the red wings.
Layer the red wings slightly offset from the white wings and adhere with multipurpose liquid glue.
Adhere the wings to the ladybugs using the liquid glue.
Use your embossing buddy on a scrap of Real Red and Basic Black cardstock.
Stamp the sentiments from the Hello Ladybug stamp set using VersaMark.
Cover the sentiments with white embossing powder and heat set.
After cropping the two sentiments using the Stylish Shapes dies, trim the banner die to size.
Add two matte black dots to the end of the banner.
Add dimensionals under the Real Red banner and attach to the card.
Adhere the black circle with the sentiment to the vellum using liquid glue.
HINT: If you use a craft sponge, you can add a light layer of liquid glue to the back of the vellum to adhere it to the DSP. As long as you lightly cover the whole piece of vellum, you won’t see the glue through the vellum. I keep two make-up sponges in an air-tight container so they are always ready to use.
Add the Wobbles to the back of the ladybugs and adhere to the card. The Wobbles have two-sided adhesive for the piece attaching to the card and the piece attaching to the ladybug. Just peel off the cover as you would a dimensional, googly eye, or tear and tape adhesive.
Trim a piece of white cardstock to 5-1/4 by 4 inches for the inside. I haven’t stamped a sentiment yet on the inside so I used my (favorite!) removable tape to adhere the inside panel so it doesn’t get separated. Here’s the link on Amazon.
After punching a 1-inch circle using coordinating DSP for the envelope seal, I’d finished this coordinated card, envelope, and envelope seal set.
Thanks for stopping by today!
Have a Peachy Day!
Sue
Colors Used:
Supplies Used:
JUNE is a Wonderful Month in the Stampin’ Up! World!
Select DSP is on sale this month! It’s your chance to stock up! Click on the link below to be taken to the DSP sale flyer.
When new team members purchase their Starter Kit, they will be able to redeem $155 USD of Starter Kit eligible products for just $99 USD! No commitment required beyond the starter kit!
Again, thank you for stopping by today. I’d love to hear your comments. Sue
Welcome to the 200th Cardz 4 Galz challenge! Amazing! Our host for #200, Billie A., chose slimline birthday cards as our theme. When you are finished here, I hope you will pop over to the challenge site to see what the rest of the design team members created. I thoroughly enjoy watching the projects get posted on the challenge admin site, and I am sure you will be inspired to play along. Don’t forget to enter your project into our challenge. I’m that person – the one who creates a card for a challenge and then forgets to post it to the challenge sites. Not tonight!
At first, I wasn’t sold on the new In Colors for 2023 – 2025, but they are quickly growing on me. My card for this challenge uses Boho Blue, Copper Clay, the Fresh as a Daisy DSP (designer series paper) and the Fresh as a Daisy Suite Collection (page 110 – 111 in the annual catalog).
Here’s my card
Isn’t the Copper Clay gorgeous with the Boho Blue? Stunning!
Measurements and Such:
The Copper Clay base measures 9 by 8 inches, scored at 4 inches.
Trim a piece of the Fresh as a Daisy DSP to 4-3/8 by 3-7/8 inches.
Crop the daisy pieces and centers from white and Copper Clay cardstock.
Stamp the greeting using VersaMark on a scrap of Copper Clay cardstock.
Cover the greeting with white embossing powder and heat set.
Crop with the banner die from the Cheerful Daisies die set.
Wrap a length of white baker’s twine around the DSP 3 times and secure the ends on the back of the DSP using tear-&-tape.
Adhere the DSP to the cardstock using multipurpose liquid adhesive.
Use white baker’s twine to tie a double bow around the baker’s twine.
Add dimensionals to the back of the sentiment and daisies. Make sure you put the dimensionals on the greeting banner so they straddle the baker’s twine.
Adhere the daisies and greeting banner to the DSP.
Trim a piece of white cardstock to 4-14 by 3-3/4 inches for the inside of the card.
Stamp the greeting and adhere the white cardstock to the inside panel.
Use a legal size envelope for this slimline card. The ones I have ae 4-1/8 by 9-1/2 inches.
That’s it. This card came together pretty quickly because the DSP does all the work.
Welcome to the Cardz 4 Galz two-week challenge. I am the host for #198 and chose Flowers for a Friend or Flowers for Mother’s Day, which is in a couple of weeks in the U.S. When you finish here, I hope you will visit the challenge site to see the cards from the rest of the design team. I’m always fascinated by the variety of projects created by my fellow design team members. I look forward to seeing what you create and upload to our challenge gallery!
I’ve made my card for a dear friend who is having surgery next week. She’s much more of a clean and simple person, so this card is perfect for her.
Here’s my card:
Clean and Simple:
I used the Dainty Delight stamp and die set for this card. The DSP was the coordinating paper from the Sale-a-Bration in the beginning of this year. It’s beautiful and I need to use it more often.
The Rich Razzleberry base measures 4-1/4 by 11 inches, scored at 5-1./2 inches to create a tent fold card.
The DSP background measures 4-1/8 by 5-3/8 inches.
Trim a piece of DSP to 6 by 2-1/2 inches for the envelope flap.
Punch a 1-inch circle from coordinating DSP for the envelope seal.
After stamping the floral spray using Momento Tuxedo Black ink on white cardstock, I cropped it using one of the Dainty Delight dies.
Stamp the sentiment in black ink on white cardstock. Crop it using one of the deckled rectangle dies.
Trim a piece of white cardstock to 4 by 5-1/4 inches for the inside panel.
Stamp the sentiment on the inside.
Add a floral spray to the bottom left side of the white panel and color.
I also cropped the curved branch and leaves piece from the die set from Old Olive cardstock..
Color the floral spray using the blends combos for Old Olive, Rich Razzleberry, Daffodil Delight, and Petal Pink.
Tie a length of Old Olive ribbon around the DSP.
Adhere the DSP, using dimensionals.
Adhere the floral spray and branch using multipurpose liquid glue.
Add dimensionals under the sentiment and adhere under the ribbon.
Adhere the inside panel to the base using multipurpose liquid adhesive.
With that, I’d finished this coordinated set of the card, envelope, and envelope seal.
Welcome to the latest two-week Cardz 4 Galz challenge. Our theme for challenge #197 is cocktails. When you finish here, I hope you will visit the challenge site. There’s loads of inspiration from the rest of the design team. We all are looking forward to seeing your creations in our gallery.
I went with bold and bright colors for my card, using Starry Sky, Parakeet Party, and Sweet Sorbet.
Here’s my card:
Measurements:
The Starry Sky base measures 5-1./2 by 8-1/2 inches, scored at 4-1/4 inches.
The Parakeet Party 6 x 6 DSP (designer series paper) for the front measures 4-1/8 by 5-3/8 inches.
The Starry Sky DSP for the envelope flap measures 6 by 2-1./2 inches. I punched a 1-inch circle from the Parakeet Party DSP for the envelope seal.
Trim a piece of white cardstock to by 5-1/4 inches.
I used a piece of white cardstock measuring 5-1/2 by 4-1/4 inches for the sentiment banners and cocktails.
Stamping, etc:
First, crop the Parakeet Party DSP using one of the Split Textures dies.
Tie white bakers’ twine around the left side of the DSP.
Adhere the cropped DSP to the base using multipurpose liquid glue.
Stamp the two front sentiments in Starry Sky on the white cardstock.making sure that you will be able to crop the sentiments using 2 banner dies from Stylish Shapes.
Punch small holes using a hole punch in the sentiment banners. Thread a piece of the Starry Sky ribbon through the holes and tie in a knot.
The cocktails require two-step stamping. I stamped the cocktail outline using Momento Tuxedo Black ink.
Next, stamp the cocktail/ice cubes stamp in Sweet Sorbet on the cocktail outlines.
Then, stamp the lemon (which probably should have been a lime) using Daffodil Delight.
I stamped the cocktail umbrella using Starry Sky.
Crop the cocktails. using the Love You More Than dies, which are on the last chance product list for $18.
Add dimensionals under the sentiment banners and three of the cocktail glasses.
Adhere to the front of the card.
Next, stamp the inside sentiment on the white cardstock using Starry Sky ink.
Use multipurpose liquid glue to adhere the white cardstock to the base and the cocktail to the white cardstock.
With that, I’d finished this coordinated card, envelope, and envelope seal set.
If you are placing an order under $150, please use the host code above.
If you are placing an order over $150, please contact me so you can get credit for your STAMPIN’ REWARDS, which are good for additional products on your order.
Any order over $50 gets a special something from me.
n Colors 2023-2025:
It seems so strange to be writing 2025 as the ending year of the new In Colors!
One of the things I love about new colors is the NEW IN COLOR PAPER PUMPKIN KIT! It always comes out the month of the new In Color rollout, and this year is no different.
Just the photo of the box is wonderful! I can’t imagine what the inside kit will look like!
Again, thank you for stopping by today. I would love to hear from you, so if you have a couple of minutes to leave a comment, that would be wonderful.
Welcome to the newest two week Cardz 4 Galz challenge! Our host for this time, Caz, chose creating an easel card as the theme. There are so many different kinds of easel card tutorials and styles of which the creations of my fellow design team members are just a few examples. When you finish here, I hope you will visit the challenge site to get inspired to create your own easel card. Please remember to post it to our gallery so we can all enjoy your creation!
Here’s my easel card creation:
You might remember that I posted a similar easel fold for the April Sparkles Christmas Buddy challenge. You can see that post here. Once again, I used the video posted by Connie Stewart from Simply Simple Stamping because this one post had two options for a very similar easel card. You can see the very talented card set created by Connie here. Her directions are all-encompassing and easy to follow.
I embossed all the sentiments on this card using my Versamark ink pad, gold embossing powder, and my heat tool to set. The addition of the adhesive backed gold swirls helps to bring out the gold.
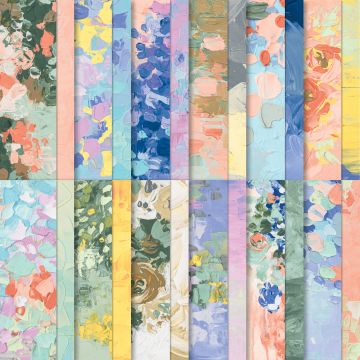
I used the Fancy Flora DSP, which can be found in the current mini-catalog. This paper is stunning, gorgeous, fabulously textured in design, and just plain wonderful. Take a look:
I used the paper pattern on the top, left-hand corner. Beautiful!
There are new and returning colors coming with the new catalog! Sadly, there are also colors that will be retiring. One that makes me sad is Mango Melody, mainly because I’ve recently started really playing with it.
Take a look at this SU! video with the new, returning, and retiring colors:
\
LAST CHANCE up to 60% OFF ITEMS from the CURRENT and MINI Catalogs
Just take a look at these LAST CHANCE lists! I know they are small, but click on the images to download or enlarge them. I’m always sad to see what’s retiring, but then I think of all I can sell when the current catalog ends so I can get new goodies!
Welcome to the newest Cardz 4 Galz two-week challenge. Our host for this challenge, Lynda, chose flowers for the theme. The sky’s the limit, as long as you include flowers. When you finish here, I hope you will visit the challenge site to see the projects from the rest of the design team members. There’s so much inspiration to be found on the challenge site, and I can’t wait to see what you create and upload to our gallery.
Here’s my card:
As you already know, I enjoy watching JanB’s videos on YouTube. I saw this card and, after watching the video, I wanted to recreate this fold. Jan’s card turned out larger than I wanted because I wanted to use a medium Stampin’ Up! envelope. Therefore, I worked out the measurements for a card to fit. You can find JanB’s video here. I did make a slight adjustment to the inside of the card. In hindsight, I probably should have used DSP pattern 1 and DSP pattern 2 for the inside.
Measurements:
The Sweet Sorbet base measures 4-1/4 by 11 inches, scored at 2-1/4 and 5-1/2 inches.
DSP (designer series paper) pattern 1 needs three pieces.
Piece 1 needs to be trimmed to 6 by 2-1/2 inches for the envelope flap.
Trim the inside piece of pattern 1 DSP to 4 by 5-3/8 inches..
For the front DSP, trim it to 2-7/8 inches by 4 inches.
NOTE: If I changed to two pieces of DSP on the inside, pattern 1 needs to be trimmed to 3 by 4 inches. The pattern 2 piece would be 2 inches by 4 inches. Here’s a picture of the inside of my prototype:
To recreate the card I pictures above, the DSP pattern 2 needs 1 piece trimmed to 2-7/8 by 4 inches.
You need two pieces of white cardstock measuring 2-5/8 by 2-5/8 inches.
Trim the Mango Melody cardstock mats to the following measurements:
Two mats trimmed to 3 by 4-1/8 inches.
One mat trimmed to 4-1/8 by 5-3/8
Two mats trimmed to 2-7/8 by 2-7/8 inches
Putting It Together:
As I started typing the directions to put this card together, I realized that pictures are worth 1,000 words. Therefore, I would highly recommend going to JanB’s video. If you follow this link, I’ve got it ready to start after all the pieces have been cut.
Please note that the triangle cut into the base of the card ne a diagonal cut. It goes from the center of the end of the cardstock base to the outside of the score line at 2-1/8 inches.
I used multipurpose liquid glue to adhere all the pieces, except for the little Mango Melody bird on the front of the card. I placed dimensionals under that bird.
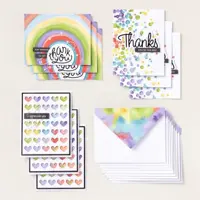
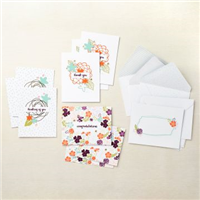
Stampin’ Up! has a numbe of all-inclusive kits available! If you have ever thought that you just couldn’t create cards, these kits are for you! Each kit comes with everything you will need, except for a stamp block in the stamping kits.
Here are just four of the kits available:
Just click on the image to see a larger picture of the kit!
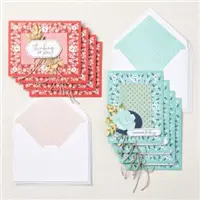
Non-Stamping Kits!
These kits are fabulous because you don’t even need an acrylic block!
My very favorite kit is now available! If you don’t know what to get for your mother for Mother’s Day, or just a gift for yourself, these card organizer kits are FABULOUS!
I have such a hard time shopping for my mom and my aunt for holidays, birthdays, etc. So, for this past Christmas, I got two of these card organizer kits, and put them together. I also included other cards from card kits and some I had created in bulk to split between the two gifts. All total, they received a completed organizer and more than 25 cards for all different occassions. I was so proud to give each one of them this beautiful combination of cards and the love that went into each part of them.
Take a look at just a few of these other non-stamping kits:
Welcome to Just Peachy Stamping by Sue Jackson: an independent Stampin' Up demonstrator.
Through Stampin' Up!, I happily share my love of papercrafting through sales, classes, small stamping group meet-ups and workshops. I think that being a teacher in my "real life", I have a unique approach to sharing my fantastic hobby. I look forward to connecting with you!


 \
\