
Welcome back to the monthly Stampin’ UP! Demonstrators Fun Fold Blog Hop. If you love fun folds, you’ve come to a hop filled with really great projects by some very talented fellow demonstrators. When you finish here, I hope you will hop along with the rest of the demos using the links below.
It’s just a given that fun fold cards also post to the Creative Creases challenge. Debbie Mageed at Secret Stamper coordinates both this hop and the challenge. Hopefully, you will be inspired to upload your own fun fold project to the challenge!

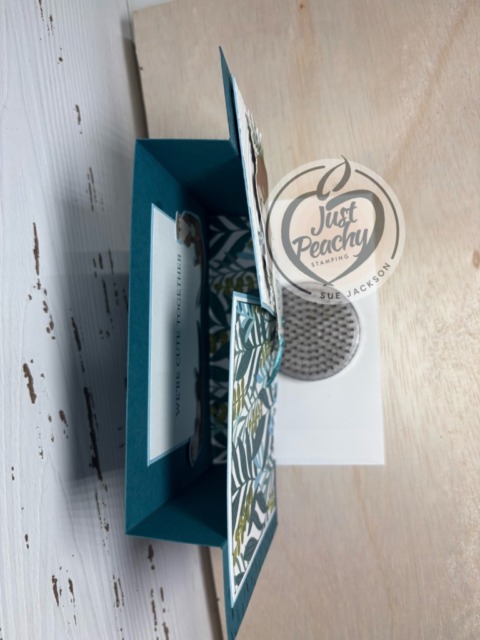
Here’s my Otterly Amazing fun fold card:


This past week I was on Spring Break and found this fun fold tutorial by Terri Gaines with Create with Terri Gaines and went just a tad overboard creating cards using this fold. Today’s card is one of six I’ve made in the past 3 or 4 days. Once you have figured out what papers and such that you will be using, you’ve already spent more time than it takes to create this fun fold. This is definitely a card for beginners because all you need to know is how to score and trim paper according to directions. Terry included a free PDF for the card on the video, but I went with my favorite and created a template to use.
Here’s my template, which includes all the scoring and trimming measurements:


What I Did:
One of the best things about this card is that the Otterly Amazing die set crops images from the DSP (designer series paper)! Therefore, I didn’t need to color anything!
- Trim a piece of DSP (designer series paper) to 6 by 2-1/2 inches for the envelope
- Punch a 1-inch circle of coordinating DSP and run it through your XYRON create-a-sticker for the envelope seal
- Stamp the sentiments, found in the Otterly Amazing stamp set, in Pretty Peacock on white cardstock
- Using the school of fish stamp, randomly stamp just the outside folded front pieces, as shown in the picture, in Pretty Peacock
- Adhere the 3 panel layers according the template
- Crop the otter images from the DSP using the Otterly Amazing die set
- Adhere the single otters to the inside part of the card base
- Add dimensionals to the back of the otters on the front and adhere to the panel #2
- Crop the sentiment and add the ribbon
- Carefully adhere dimensionals to the back of the sentiment banner so that they won’t show outside of panel #2 when opened
- Slide the front sentiment under the the otters as shown
- Add three irregular river pebbles on the front of the card
With that, I’d finished this coordinated card, envelope, and envelope seal set.
Back to the SU! Demos’ Fun Fold Blog Hop:
We all hope you will follow the links below and hop along with us. There’s so much inspiration to be found here. We’d love to see what inspires you to create a fun fold as well. Don’t forget to upload it to the Creative Creases challenge!
Line-up:
- Karen Finkle
- Lisa Ann Bernard
- Debbie Mageed
- Su Mohr
- Kathi Ondus
- Mary Deatherage
- Sue Jackson <<<—YOU ARE HERE!
- Tara Carpenter
- Beth McCullough
- Maria Mench
Thank you for stopping by today!
Have a Peachy Day!
Sue
Colors Used:
Supplies Used:
If you like the idea of quick and easy cards but don’t know where to start, try our KITS COLLECTION!
Here are three examples of the all-inclusive kits available now!
First, this PAINTED WISHES KIT retails for $14.00 (USD) and contains enough supplies to create NINE cards!
The second kit I’m showcasing is the ALPINE AIR KIT which retails for $22.00 (USD) and it also contains enough supplies for NINE cards! I’ve already posted some cards I’ve made using this kit, which you can see here.
Finally, this BY YOUR SIDE KIT retails for $22.00 (USD) and contains enough supplies for EIGHT cards. I love this kit and have posted cards using it which you can see here, here and here.


loving this super cute fun fold!
Your card is otterly adorable!
What a great card, Sue! Love the otters suite and the texture is such a great background. Thanks for joining the blog hop this month.
Darling otter card, Sue! Love it!