
Welcome to InKing Royalty’s July Blog Hop! During this year’s blog hops, we are enjoying a year of celebrations. This month’s projects celebrate Christmas in July. Demonstrators have been able to order new products from the upcoming August-December Mini Catalog, so prepare yourself for a gorgeous mix of new products, products available in the Annual Catalog and returning favorites. What fun! We are excited to share our creations with you today! After you read my post, I hope you’ll hop over to the next person on the list at the base of this post.
When I firt started working on my blog post cards, I thought I would definitely use the Feels Like Frost DSP. For some reason, I wound up creating three cards using the same DSP pattern in three different layouts.
Here are my cards:

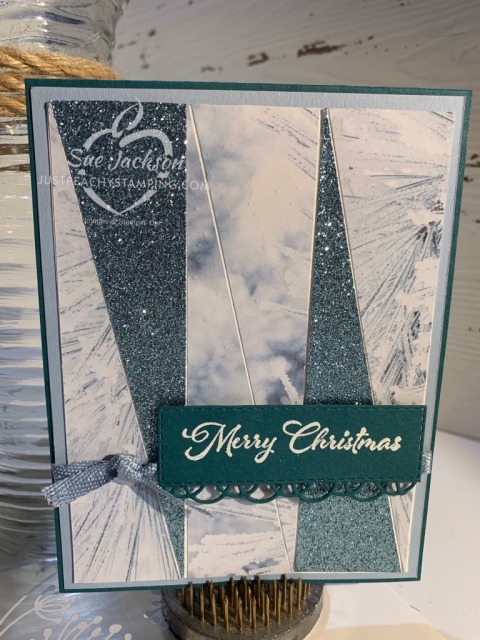


Why Glitter? Why Three Cards?
Believe me, I am not usually a fan of glitter. It gets everywhere, even when it’s been pieces of specialty designer paper. However, this Balmy Blue glitter paper doesn’t shed at all. As you can see, I used my trimmer on the glitter paper. Happily, I didn’t have any stray little pieces of glitter anywhere. Score!
If you did not get the Feels Like Frost DSP last year, you are in luck this year! This paper is one of my all-time favorite DSP collections and I think it’s just stunning! The coordinating colors are: Balmy Blue, Blushing Bride, Highland Heather, Night of Navy, Pretty Peacock, Purple Posy, Rococo Rose, Seaside Spray, Smoky Slate, and Whisper White. Click on the following picture to get a closer look at this DSP:

After I finished the first card, I had leftover pieces and thought that I could do something else with the strips and the leftover glitter paper. Then, after I finished the scrappy technique card I thought I should create something that would allow the DSP to do all the work. That’s why I created three cards.
First, the Commonalities
All three cards have the basics in common. First, all have a Pretty Peacock base cut to 4-1/4 inches by 11 inches, scored at 5-11/2 inches. Second, all have a Seaside Spray mat cut to 4-1/8 inches by 5-3/8 inches. Third, all have a Whisper White piece of cardstock for the inside cut to 4 inches by 5-1/4 inches. I also put a 3/4 inch by 4 inch scrap piece of matching DSP on the bottom of the inside white piece. Just as on the outside sentiment, all three have the same sentiment on the inside. I used the Cherish the Season stamp set from the mini-catalog for the sentiments.
I used my Stamparatus to stamp the “Merry Christmas” sentiment on Pretty Peacock using VersaMark ink. Remember to wipe down the cardstock with your embossing buddy first Since I didn’t have to worry about trying to line everything up perfectly, I could stamp it multiple times. Then, I covered each sentiment with white embossing powder and heat set it.
The Seaside Spray metallic ribbon is just as beautiful as the DSP. I am so glad it carried over! Last Christmas, I went through a roll and a half of it. I have already ordered two rolls from this year’s annual catalog. Beautiful!
This sentiment fits perfectly in the stitched rectangle die. I wanted something additional for the sentiment, so I cropped two of the trim for each sentiment. I did have to overlap the trim pieces to get the length I needed, then trimmed it down. The sentiments on the scrappy and the DSP card are rasied on dimensionals.
Differences Explained
First Card
The first card has a 1-1/4 inch by 4 inch piece of the Balmy Blue glitter paper on the left side. I trimmed the DSP to 3-1/2 inches by taking 1-1/4 inch off each side, which allowed for a 1/4 inch overlap under the glitter paper. Next, I wrapped the Seaside Spray around the front so that it covers the border between the two papers. I slid the sentiment under the ribbon right up against the glitter paper and used liquid adhesive to attach it.
Second Card
When I finished the first card, I had two 1-1/4 inch strips of the DSP and a 6 inch by 1-1/4 inch piece of glitter paper. Therefore, I thought I would try to use the leftovers for a scrappy card. I trimmed each of the leftover strips diagonally. Since the pieces were shorter than the Seaside Spray mat for this card, I decided to use a piece of white cardstock under my diagonal cuts. I trimmed the white cardstock to 3-3/8 inches by 5-1/8 inches. This gave me just enough room to have a very thin white line showing between the DSP and the glitter. Once again, I wrapped the Seaside Spray ribbon but horizontally this time and tied it in a square knot. The sentiment is straddling the ribbon using dimensionals.
Third Card
This DSP deserves to be the focal point of a clean card, and that’s what I did for the third card. I trimmed the DSP to 4 inches by 5-1/4 inches and centered it on the Seaside Spray mat. Once again, I wrapped the ribbon around the bottom of the card, where it wouldn’t interfere with the DSP. The sentiment block is straddling the ribbon and popped up on dimensionals. Using the rule of threes, I knew that I needed something to balance the card on the top of it. Therefore, I used three of the new clear Elegant Faceted Dots on the top, right-hand corner.
Back to the InKing Royalty Blog Hop
Thank you for stopping by today. I hope you’ll hop along to the next stop on the blog hop, Brian King at Stamp with Brian. There’s lots of inspiration to be found in this group – and you don’t want to miss it!
Thank you for hopping along with us. If you get stuck during the Blog Hop, please use this line-up as a guide:
- Brian King at Stamp with Brian
- Ann Murray at Murray Stamps Ink
- Janneke Dijkstra-de Jong at Happy Stampin
- Candy Ford at Stamp Candy
- Linda Krueger at The Stamp Coach
- Shawn de Oliveira at Shawn Stamps
- Pam Morris at Tap Tap Stamp
- Julie DiMatteo at The Paper Pixie
- Joanne Brown at Stamping with JoJo
- Lynn Kolcun at Avery’s Owlery
- Jennifer Spiller at Westside Paper Creations
- Jackie Beers at Blue Line Stamping
- Sheryl Sharp at Sharp Notes by Sheryl
- Sue Jackson at Just Peachy Stamping
As always, thank you so much for stopping by my blog today. I’d also love to hear what you think, and greatly appreciate every comment.
Have a Peachy Day!
Sue
Colors Used:
Supplies Used:
I’m now on Instagram for just my SU! creations! Finally, right? Follow me at @justpeachystamping or scan the photo below:

Guess What’s Going On Now!
Bonus Days! Earn a $5 coupon for every $50 in product for the month of July.

Do You Want to Place an Order?
Of course you do! Even more so because of the products in the NEW catalog. This NEW catalog is FABULOUS!! Wait until you see the new MINI-CATALOG!! Stay tuned for sneak peeks of those items! I’ll be using some new mini-catalog items for the InKing Royalty blog hop on Wednesday!
If you are ordering less than $150.00, please use the host code shown. If you are ordering more than $150.00, please contact me first so you can get your stamping rewards! Any order over $50 will earn a gift from me.


这个不错耶,我喜欢!
Thank you.
These are great. That paper doesn’t need a lot of help for a beautiful card.
Thanks, Jackie. This paper is fabulous, especially when making a boatload of holiday cards. I’ve used a couple of the patterns for sympathy cards as well.
Such a great trio of cards, Sue, and a wonderful write-up to explain them. Love! I’m so happy this paper is coming back – and you’ve made me even more excited about it. I’m so happy you hopped with us today!
Thanks, Brian! I love the hop and am thankful you put it together every month.
Perfect showcase for the returning paper. Nice to know about the Balmy Blue Glitter Paper (no shed).
Thank you, Ann. I am happy about the glitter/glimmer paper as well. I really didn’t want to have glitter everywhere.
Your cards are all gorgeous. I agree the Feels Like Frost is the prettiest paper ever. I used most of mine last year so am glad they are bringing it back.
Thanks, Donna! I was thrilled last holiday season when they announced it would be coming back.
love that Balmy Blue glitter paper. It adds so much. thanks for sharing.
Lovely cards. I like this abstract paper and it is beautiful on your projects. Thanks for sharing.
Thanks, Linda. I also really like the reverse sides with the silver and white patterns.
All three are beautiful, Sue. Great way to use the scraps!
What a pretty cards have you made ;O)
Each card is similar but different! I love that. You have really shown how versatile this paper is
Beautiful cards! Great tips; I often forget to dust my cardstock before embossing. I also like to stamp my sentiments several times once the stamp is perfectly positioned in the Stamparatus. This paper is so gorgeous, might have to break down and purchase it this year.
All of your cards a so elegant. I am so happy that this paper made a comeback! Can’t wait to get my paws on that beautiful shimmer paper as well! Xo