Aug 3, 2019 | Just Add Ink |
Just Add Ink # 468 says Just Add “C”
For this letter challenge, Just Add Ink meets Just Add “C”, meaning the project created needs to somehow incorporate “C”. A friend is celebrating a new job, and I created a card for her for to “celebrate” and for me to send “congratulations”.
Here’s the challenge banner:

Here’s both the inside and outside of the card I created:
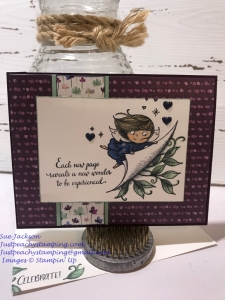

I am completely and thoroughly in love with the New Wonders hostess stamp set. While my first thoughts were not related to Christmas cards, I’ve already made two cards, which you can see here and here. I’ve already created some I’ve yet to blog, and am sure I will have many more to share. Love the versatility of this set!
The Process and Elements
I started going through my DSP, current and retired, and found my leftovers from the retired First Frost, but any DSP would work for this layout. The regal Blackberry Bliss provides the background mat glued, with my go-to TomBow liquid adhesive, onto a border of Blackberry cardstock. Since I don’t have those blends (yet!!) I needed a coordinating bold color, which I picked up from the flower banner, also from First Frost. I’d already colored the leaves using the Mint Macaron light and dark blends, and pulled the her hair color from the Crumb Cake on the banner as well. Coloring with the blends is such a relaxing process, and it’s interesting to play with the depth of the blended colors.
The Night of Navy flowers are just visible peaking out from the banner under and over the focal panel, so I grabbed those blends for the angel’s dress, with touches of Petal Pink for her slippers and the dots on the dress. I also used three retired Night of Navy enamel heart dots to pull in another touch of the color. Once again, I used clear Wink of Stella for the angel’s wings.
This sentiment and stamped image are beautiful together. I really think the font really picks up on the whimsical nature of the stamp set perfectly. I used the “Congratulations” stamp on the inside, and the “Celebrate” stamp on the front of the envelope. The set also includes a single leaf and swirl. I used it for three leaves on the inside to emphasize the “Congratulations” and also on the envelope for “Celebrate”
(See how the “C” words match the challenge? It definitely works!)
Finally, I decorated the front and back of the envelope. I am pleased with the way the bold colors balanced with the subtle Mint Macaron accents.
Thank You and a Little Bit More
Thank you very much for stopping by my blog today. As always, I greatly appreciate your time.
Have a Peachy day!
Sue
If you live in the U.S. and are in need of a demonstrator, please CLICK HERE to be connected to my store. I would be honored to help you create cards from beginner levels, to casual, and to avid levels. Placing an order with me would also entitle you to a free copy of the Holiday Catalog being released the first week of September.
Supply list:
New Wonders stamp set, item 149426
Blackberry Bliss cardstock, item 133675
Mint Macaron cardstock, item 138337
Whisper White cardstock, item 100730
Night of Navy blends combo, item 144040
Crumb Cake blends combo, item 44601
Mint Macaron blends combo, item 147283
TomBow liquid adhesive, item 110755
Stampin’ Dimensionals, item 104430
Jul 31, 2019 | Fab Friday, Just Add Ink |
By Now You Know…..
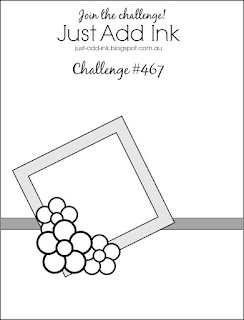
I love two-fers! Any time I can combine a color challenge (FabFriday168) and layout challenge (Just Add Ink #467), I am game.
Here are the banners for both challenges:

The Fab Friday colors are bright and happy and, to me at least, lend themselves to a whimsical card. Just Add Ink’s layout can be sophisticated, just as easily as it can be fun. I went with whimiscal and fun.
Here’s the inside and outside of my card:


Fab Friday Colors
In keeping with all my other blonde angels, I used the Pineapple Punch marker to color this angel’s hair. However, with just that one color, her hair looked very flat, so I pulled in Mango Melody to highlight her hair. I also used the Pineapple Punch DSP for the top 2/3 of the card.
Lovely Lipstick provided the color for the angel’s shoes and the enamel dots on her dress. I also used Lovely Lipstick DSP for the bottom third of the card.
I used Bermuda Bay in three somewhat subtle areas. First, I colored the dress using the blends combo. Second, I used the marker to color the stitching in the ditch created by the Stitched Shape dies. Finally, I pulled some retired ribbon to create a border between the two DSP pieces.
The final color, Pacific Point, provides the card base and the rotated mat for the angel.
Four colors accomplished. All the pieces were dry-fit and then attached using dimensionals and Tombow liquid glue.
Opinions
The four colors are pretty bright, but I really thought it worked all the way around. My DH and DD did not think so because they both thought the Pineapple Punch DSP on the top of the card was too bright. Did I mention that I had already adhered all the pieces?
In an effort to appease both of them, I decided that I would use a piece of vellum over the Pineapple Punch DSP to mellow it out. After some measuring, cropping, and very careful placement, I was able to get the vellum adhered behind the Pacific Point mat. At that point, I needed to figure out how to adhere at least the top corners of the vellum. I used the thin line glue to place a dot in each of the top corners and then covered the very small dots of glue with two more enamel dots from the Happiness Blooms dots.
I stamped the inside, decorated the front and flap of the envelope andshowed the new version of the card to my DH (dear husband) and DD (dear daughter). They both thought it looked “better”. I have to say, I agree that the more muted Pineapple Punch DSP helps to tone down all the bright colors.
Thank you very much for stopping by my blog today. I greatly appreciate your time.
Have a Peachy day!
Sue
If you live in the U.S. and are in need of a demonstrator, please CLICK HERE to be connected to my store. I would be honored to help you create cards from beginner levels, to casual, and to avid levels. Placing an order with me would also entitle you to a free copy of the Holiday Catalog being released the first week of September.
Just ONE more day to earn bonus coupons! $5 coupon for every $50 spent. I am really looking forward to spending my coupons on my holiday catalog pre-order!

Jul 25, 2019 | Uncategorized |
New Wonders Hostess Stamp Set
When I first saw this stamp set, and some of the samples in the catalog and on Pinterest, I thought this set was absolutely adorable, has angels, and a beautiful font. However, I also thought that coloring the precious angels would be time consuming and difficult. Boy, was I wrong!! The first card I created (which will be in an upcoming blog post) was so easy and fun! Just like that, and I am completely hooked on this stamp set. It’s always wonderful when a stamp set turns out to be so versatile!
One thing led to another, and I wound up trying out this angels for Christmas cards. Here are the two versions, and the inside for both are the same:


Christmas in July
The Old Olive Christmas DSP has retired, as has the Real Red ribbon. However, those two colors gave me my color palette. These cards would also be adorable using Old Olive and Real Red cardstock. As I am typing this, I am thinking that I can use Old Olive for the background and emboss it with the Tufted TIEF. Cuteness overload! I would also emboss the Real Red mat using the Subtle TIEF. Now, I know what my next pair of Christmas cards will be! Since I try to do something at least a little bit different for each Christmas card, these would be perfect!
Using both light and dark Old Olive and Real Red, I happily colored the angels clothes. I used the So Saffron blends, both light and dark, for the angels’ hair. Wink of Stella Clear is on their wings, and Wink of Stella Gold is on the pen tips. I colored the pen with the light and dark Crumb Cake blends.
The Making Christmas Bright stamp set carried over into the current catalog and, I think, it completely matches the angels.


