Welcome to the March Cardz 4 Guyz challenge for 2026! Our host for this month’s challenge, Deb H., chose Color Challenge using Light Blue & Brown for the theme. When you finish here, please visit the challenge site to see what the rest of the talented design team members created. Then, don’t forget to upload your creations to our gallery. We look forward to seeing your creations there!
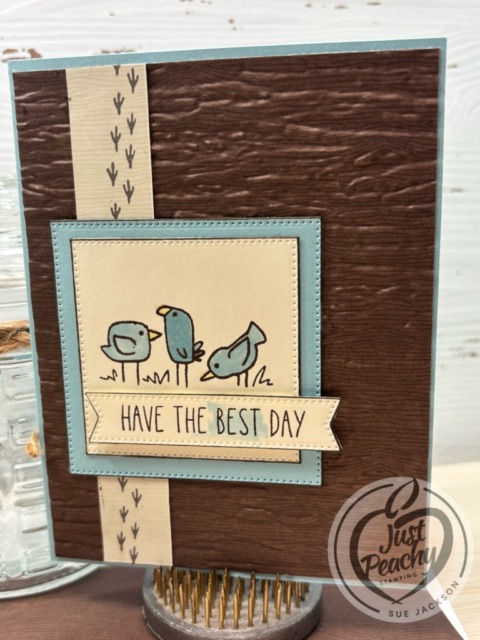
I used the birds from The Cutest Crew stamp set with Balmy Blue, Early Espresso, and Very Vanilla.
Here’s my card:
Easy Peasy Measurements:
The Balmy Blue base measures 8-1/2 by 5-1/2 inches, scored at 4-1/4 inches
After I dry-embossed a piece of the Early Espresso Wood Grain DSP (designer series paper) using the Birch Wood embossing folder, I trimmed it to 4-1/8 by 5-3/8 inches
The strip of DSP (which is the reverse side of the Early Espresso DSP) measures 1 inch by 5-3/8 inches
I trimmed a piece of the Early Espresso DSP to 6 by 2-1/2 inches for the envelope flap
Then, I punched a 1-inch circle from the reverse side and ran it through my XYRON create-a-sticker for the envelope flap
I used scraps of Very Vanilla and Balmy Blue cardstock to crop the two nested squares using the Stylish Shapes dies
The sentiment banner is also from the Stylish Shapes die set
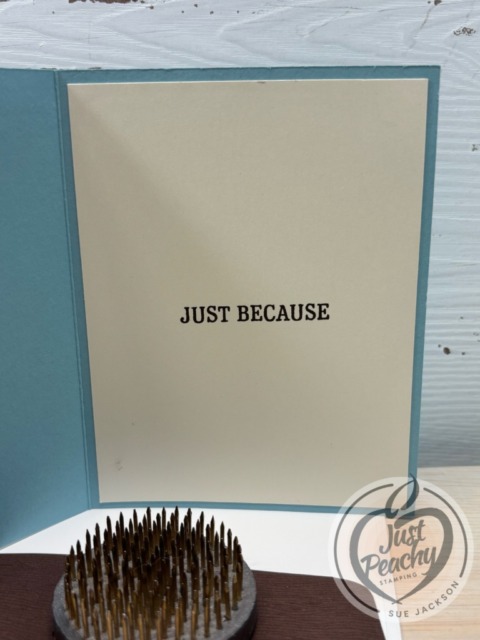
The Very Vanilla cardstock for the inside measures 4 by 5-1/4 inches
What I Did:
Since I wanted all the stamping to be done with Early Espresso ink and then would be coloring the birds with the Balmy Blue blends combo, I needed to stamp them first and allow the image time to dry thoroughly
With the exception of the dimensionals under the sentiment banner, I used multipurpose liquid glue to adhere the pieces together
Adhere the Early Espresso DSP to the base of the card
Using Early Espresso ink, stamp the bird feet on the strip and adhere it to the Early Espresso DSP
Stamp the sentiment on the inside using Early Espresso ink and adhere it to the base of the card
Color the birds using the Balmy Blue blends, and use the Crumb Cake light blend to color the beaks
Using the Early Espresso blend, outline the two cardstock squares and the banner
Layer the squares and adhere to the base of the card
Adhere the sentiment banner to the squares
With that, I’d finished this coordinated card, envelope, and envelope seal set.
Spring into stamping with the Notes of Spring Stamp Set! Featuring adorable springtime animals like a deer, bunny, and duck, plus some delicate river plants, this stamp set makes it easy to create layered, watercolor-style images. Includes a few all-occasion sentiments to complete your handmade cards for birthdays, thank-yous, and more.
PRODUCT OF THE MONTH: – Is a new exclusive product released each month! – Can be unlocked for just $5 with orders over $75 (after discounts and rewards). – Is only available while supplies last—they can sell out quickly! – Is limited to one per customer (including language versions).
Two New Kits for March!
RADIANT REMINDERS KIT – $14.00 USD
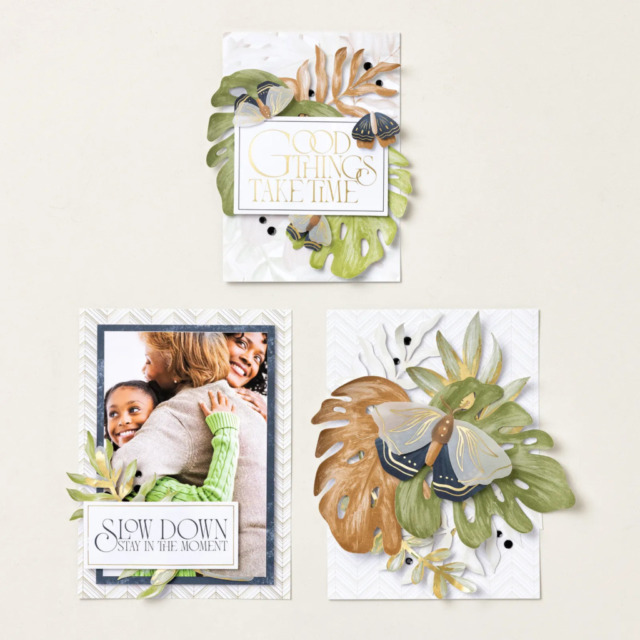
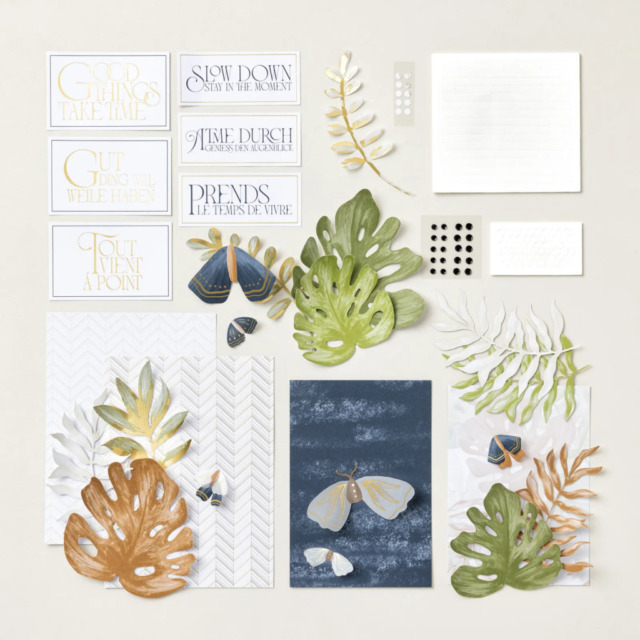
Create three DIY displays with the Radiant Reminders Kit. Featuring monstera leaves, luna moths, and neutral patterns in beige, black, brown, green, and gold, these handmade home decor pieces let your creativity shine while adding natural, organic style to any room.
EVERY LITTLE THING KIT – $21.00 USD
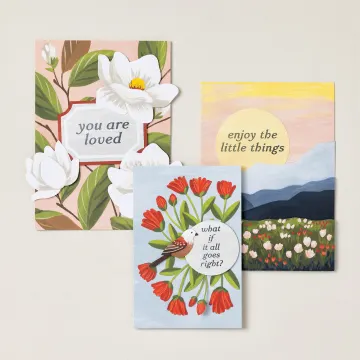
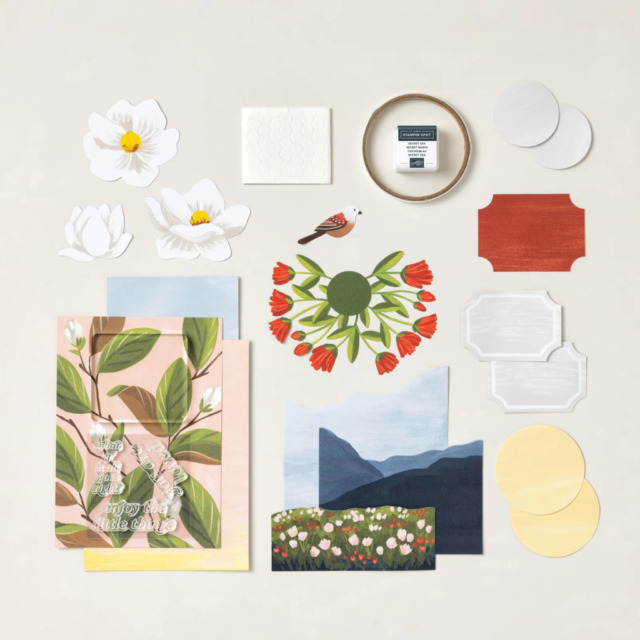
Create three DIY floral and nature-inspired paper artworks with the Every Little Thing Kit. Featuring magnolias, tulips, mountains, and a bird, each piece includes uplifting sentiment stamps to brighten your home. This kit coordinates with the Standing Clipboard Trio.
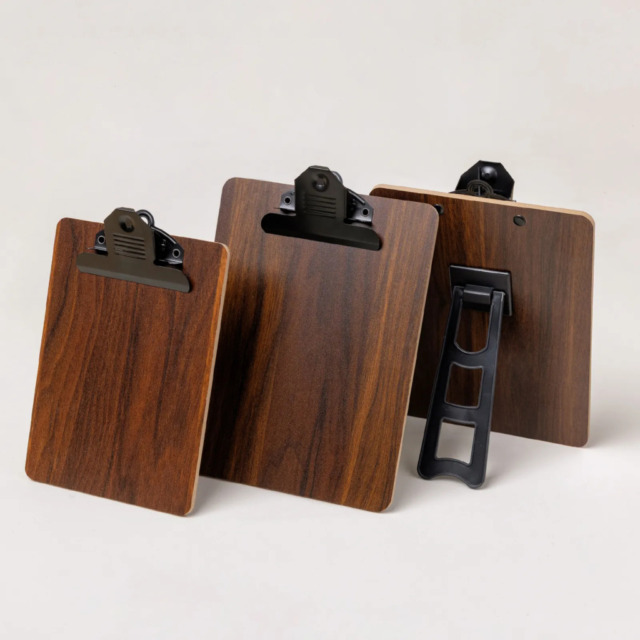
STANDING CLIPBOARD TRIO:
The Standing Clipboard Trio Kit includes three clipboards you can use to showcase creations from the coordinating Radiant Reminders and Every Little Thing Kits (sold separately). These are also great for your handmade cards, photos, stamped art, and favorite quotes. Each clipboard comes assembled and features a sturdy backing and kickstand. They’re perfect for adding a personal touch to your desk, craft room, or office.
If you live in the U.S. and don’t already have a Stampin’ UP! demo from whom you order, I would be honored to work with you.
Welcome to the newest Cardz 4 Guyz challenge #360! Billie A. is hosting this two-week challenge and she chose Pick 3 Colors for the theme. When you finish here, please visit the challenge site to see what the rest of the very talented design team members created. Then, don’t forget to upload your creations to our gallery. We look forward to seeing your creations there!
I chose to use the Adventurous Sky bundle and Take to the Sky DSP (designer series paper) for my card. The color combination of the Copper Clay and Boho Blue is one of my current favorite color combinations. The abundant Night of Navy accents on the focal DSP adds the motion to the front of the card.
Here’s my card:
This card, and the relatively short supply list, allows this card to fall into the easy-peasy category, but let’s keep that a secret between us.
Measurements:
The Copper Clay base measures 6-1/4 by 5-1/2 inches, scored at 2 inches
You need two additional pieces of Copper Clay cardstock, each measuring 3-1/4 by 4-3/4 inches
Trim two pieces of white cardstock to 4-5/8 by 3-1/8 inches
The clouds DSP on the inside measures 4-1/8 by 5-3/8 inches
Trim another piece of the clouds DSP to 6 by 2-1/2 inches for the envelope flap
Punch a 1-inch circle of the focal panel DSP and run it through your XYRON create-a-sticker for the envelope seal
Trim a piece of the plane DSP for the front flap to 5-3/8 by 2 inches
The focal DSP measures 3 inches by 4 inches
Stamping & Assembly:
Since this is a Cardz for Guyz card, I wanted to keep the front as clean as possible, especially with all the DSP patterns. Therefore, I didn’t use any extra embellishments.
I only used multipurpose liquid glue for this card assembly
On one of the white cardstock pieces, stamp some clouds using the second generation stamping technique and Boho Blue ink
HINT: It sounds fancy, but it just means after you ink your stamp, stamp it the first time on scrap paper and then stamp the second time on the white cardstock
By using second generation stamped clouds, the Copper Clay stamped sentiment would really stand out
One the second piece of white cardstock, stamp the plane using second generation stamping in Copper Clay
Stamp the inside sentiment using Boho Blue ink
Adhere the planes DSP to the flap on the front of the card
Adhere the outside white cardstock to one of the Copper Clay cardstock mats
Align the focal DSP on the front of the white cardstock/Copper Clay layers
Add liquid glue to the left 1-1/4 inches of the newly created focal panel and adhere it to the flap
HINT: Do not add glue to the whole focal panel because the card will then seal shut
Adhere the clouds DSP to the inside of the card
The easiest way to make sure your inside white cardstock panel stays perfectly aligned with the layered focal panel on the front is as follows:
Open the card so it lays flat
Lay the inside white cardstock/Copper Clay panel on the back of the front panel, making sure all the edges line up
Adhere liquid glue to the BACK of the inside white cardstock/Copper Clay panel
Fold the back of the card over onto the back of the inside panel
Since you are using liquid glue, you will have a small window of time to make sure the edges all align before securely adhering the inside panel to the back of the card
With that, you’ve finished this coordinated card, envelope, and envelope seal set for one of your “guyz”
I already know that I am going to use this sale to reorder drying out Stampin’ Blends, order some cardstock I missed on my last order, and the Winterly Tree Tops bundle and coordinating Nests of Winter DSP!
Here are all the details:
From the 2024–2025 Annual Catalog:
10% off ink, including pads, refills, markers, and Stampin’ Blends. Ink pad bundles and third-party ink pads are NOT included.
10% off cardstock. Close To My Heart cardstock is NOT included.
20% total off all stamp and die bundles and stamp and punch bundles. (Stamp bundles are normally 10% off. With this sale you get an additional 10% off.)
20% off all Designer Series Paper.
Important Information:
Shop online to see the full selection of discounted products available; this is a limited time offer.
Products are available while supplies last.
Discounts are automatically applied when sale items are added to any order, including Starter Kits.
Another Fabulous New Kit:
This new Layered Landscapes kit is absolutely fabulous! Just take a look:
Here’s the unboxing video:
Of course, this kit comes with step-by-step instructions, as seen below:
If you live in the U.S. and don’t already have a Stampin’ UP! demo from whom you order, I would be honored to work with you.
When ordering, please enter the following HOST CODE when prompted:
GYZSYSHE
Again, thanks for stopping by today.
About Me
Welcome to Just Peachy Stamping by Sue Jackson: an independent Stampin' Up demonstrator.
Through Stampin' Up!, I happily share my love of papercrafting through sales, classes, small stamping group meet-ups and workshops. I think that being a teacher in my "real life", I have a unique approach to sharing my fantastic hobby. I look forward to connecting with you!