Add Some Pink Flowers for Cardz 4 Galz # 268

Welcome back to the bi-weekly Cardz 4 Galz challenge #268. Our host for this edition of our bi-weekly challenge, Billie A., chose Add Some Pink Flowers for the theme. When you finish here, please visit the challenge site to see what the rest of the design team members created. Then, don’t forget to upload your creations to our gallery. We look forward to seeing your creations there!
Here’s my card:
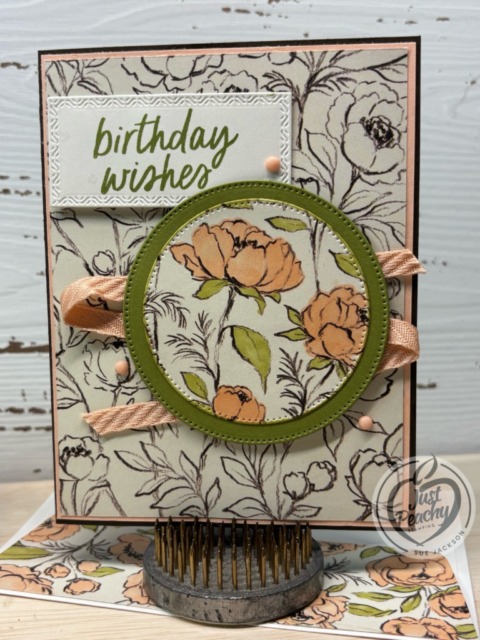
I used the Beautiful Gallery DSP (designer series paper), and this pattern uses Basic Beige and Early Espresso. I added Petal Pink and Old Olive. All in all, this could be considered an easy peasy card.
Measurements:
- The Early Espresso base measures 8-1/2 by 5-1/2 inches, scored at 4-`/4 inches
- I trimmed a piece of Petal Pink cardstock to 4-1/8 by 5-3/8 inches for the mat
- The Beautiful Gallery DSP measures 4 by 5-1/4 inches
- I also trimmed another piece of the DSP to 6 by 2-1/2 inches for the envelope flap
- I punched a 1-inch circle of coordinating DSP and ran it through the XYRON create-a-sticker for the envelope seal
- I cropped the sentiment panel out of white cardstock using a Textured Notes die
- The Basic Beige cardstock for the inside of the card measures 4 by 5-1/4 inches
What I Did:
- First, I used two of the Stylish Shapes circle dies and cropped a circle out of the DSP and one from Old Olive cardstock
- Next, I used the Petal Pink and Old Olive blends combos to color the cropped DSP circle and the DSP for the envelope flap
- Unless otherwise noted, I used multipurpose liquid glue to adhere the pieces together
- I adhered the DSP to the cardstock, then adhered the layers to the base of the card
- Then, I used glue dots to adhere some Petal Pink diagonal ribbon to the DSP
- I adhered the DSP circle to the Old Olive circle, then added dimensionals to the back of the Old Olive circle
- Make sure your dimensionals will straddle the ribbon before adding them to the back of the circle
- Stamp the sentiment using Old Olive ink and a sentiment from the With You in Mind stamp set on the scrap of the white cardstock
- I probably could have used Basic Beige for the sentiment block but I wanted a contrast so the sentiment didn’t blend into the background
- After adding dimensionals to the back of the sentiment and adhered it to the front of the card, I added three Petal Pink epoxy dots to the card
- Then, I stamped the sentiment for the inside in Old Olive ink on the Basic Beige cardstock and adhered it to the inside of the base
Thank you for stopping by today!
Have a Peachy Day!
Sue
Colors Used:
Supplies Used:
It’s Time for Bonus Days!

Here’s a video explaining the BONUS DAYS!
What better way to earn the January Product of the Month? Bonus Days & Product of the Month – Yes, Please!
Versatility is key! With the Fabulous Sayings Stamp Set, you’ll always have the right words on hand—whether you’re creating birthday cards, thank-you notes, or a cheerful hello.

You can purchase the Product of the Month item for only $5 USD | $5 CAD when you spend $75 USD | $100 CAD or more in a single order. I’ve already ordered this item and am looking forward to adding these sentiments to my other sentiment stamp sets.


