Welcome back to the bi-weekly Cardz 4 Galz challenge #264. It’s my turn to host this edition of our bi-weekly challenge, and I chose A Cute Christmas for the theme. When you finish here, please visit the challenge site to see what the rest of the design team members created. Then, don’t forget to upload your creations to our gallery. We look forward to seeing your creations there!
Here are my two cards:
Here goes with all the additional challenge for which these cards qualify.
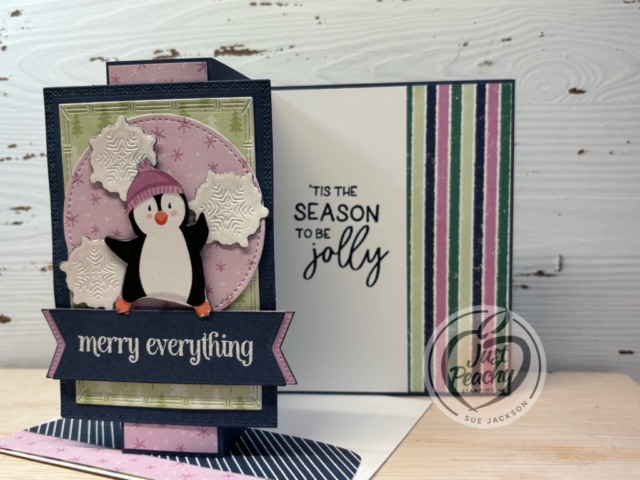
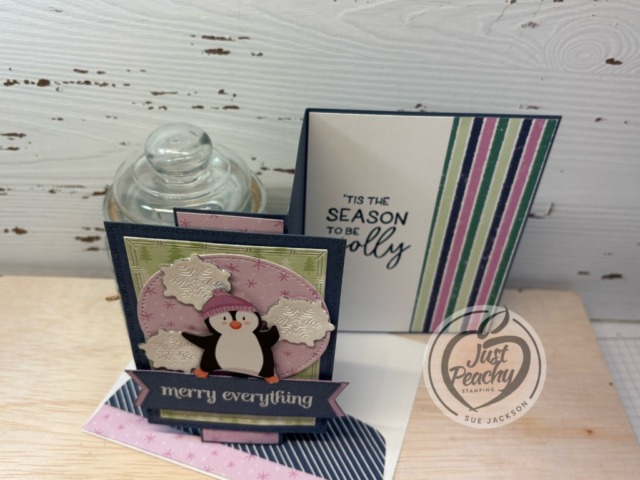
As always with a fun fold card, I will be adding this to the Creative Creases Challenge where the theme is always Anything Goes with a Fun Fold.
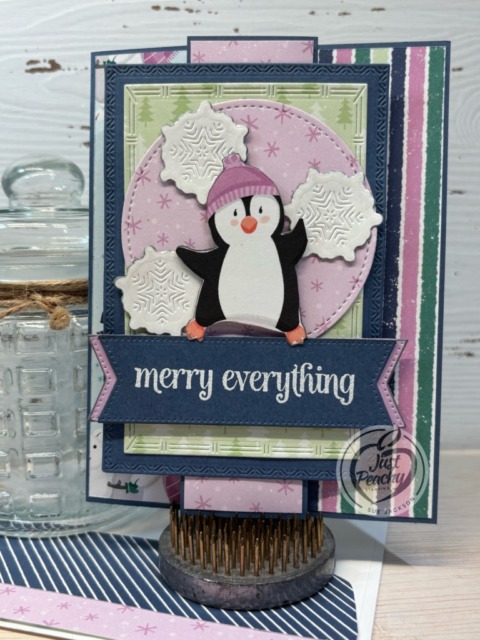
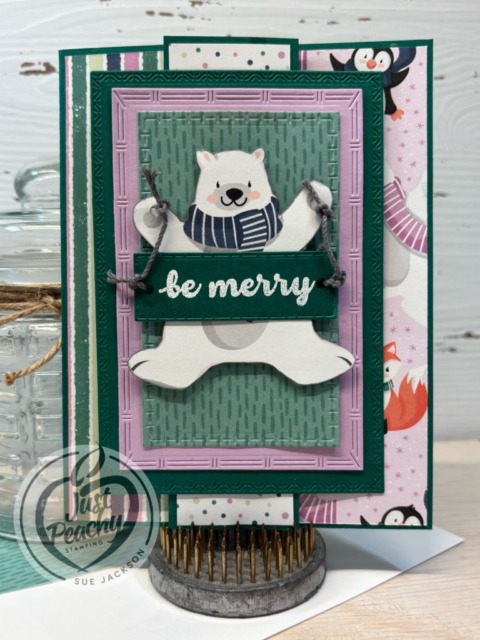
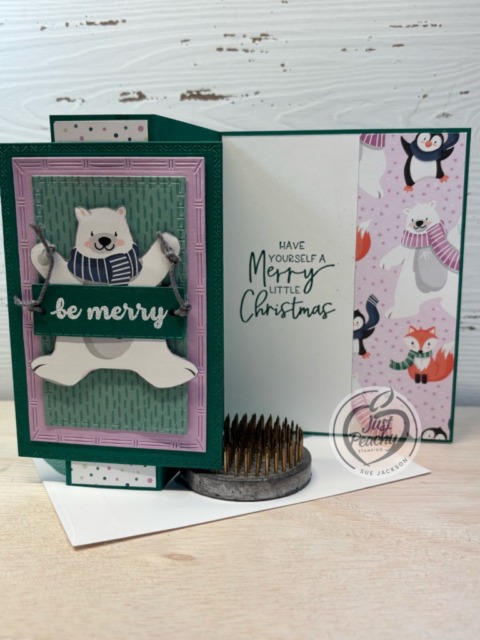
I’m also going to upload this card to the Critter Crazy Challenge . I fussy cut both the penguin and the polar bear from the retired Penguin Playmates DSP (designer series paper).
These cards also qualify for Thing 1’s recipe in the the Double Trouble Challenge #205. My three colors for the penguin card are Fresh Freesia, Misty Moonlight, and Soft Sea Foam. I used Fresh Freesia, Shaded Spruce, and the retired Just Jade for the Polar Bear card. Both cards have more than 2 layers, and they each have one fussy cut image. Three colors – check. Two layers – check. One image – check.
In addition, since I used leftover pieces for all the white cardstock elements of the card, I am also entering it in the Snippets Playground Challenge #520.
I have enough of two patterns of DSP to make two more of these cards, if I am careful when trimming. Then, I will be down to just using strips. Here’s a picture of some of the snippets of this DSP that I have left:
The Modified Z-fold Fun Fold Card:
I’ve already posted a card using this fold for the October, 2025 Stampin’ Pretty Pals’ Blog Hop, which you can see here.
Of course, I made a template so I can easily recreate the card. Instead of using the Everyday Arches dies, I used the Textured Note die set.
Here’s the template:
The circle on the penguin card and sentiment banners were cropped using dies from the Stylish Shapes die set
The Fresh Freesia die under the Misty Moonlight banner was cropped using the same die, which I cut in half and adhered for a mat of sorts
I cropped the snowflakes from the retired Stitched Snowflakes dies, then lightly covered them with clear Wink of Stella for just a touch of sparkle
I added dimensionals under the polar bear and sentiment and the penguin and sentiment
Since these cards already have multiple layers, I adhered the rest of the pieces using multipurpose liquid glue
You’ve asked, and we’ve answered! Get ready for our first-ever Black Friday sale with up to 40% off the most useful, needed, irresistible Stampin’ Up! products at deeper discounts than ever before. Shop between November 25 to December 1 so you can create more by spending less during this limited-time-only sale!
Promotion Details
Sales Period: November 25–December 1
Ordering Deadlines
Phone: December 1, 2025, at 6:59 p.m. (MT)
Online: December 1, 2025, at 11:59 p.m. (MT)
40% off
Stampin’ Blends
Paper Trimmer and blades
Ink refill bundles
25% off
Select adhesive
15% off
Select cardstock
Shop the full selection of discounted products online.
Products are available while supplies last.
Orders will likely arrive in time for the holidays.
Welcome to the newest Make My Monday bi-weekly challenge #238. Our host for this challenge, Claudia, chose Wild Animals for the theme. When you finish here, please visit the challenge site to see what the rest of the very talented design team members created. Then, don’t forget to upload your creations to our gallery. We look forward to seeing your creations there!
In addition, since I used leftover pieces for all the white cardstock elements of the card, I am also entering it in the Snippets Playground Challenge #492.
Here’s a photo of all my snippets:
Measurements:
The Petunia Pop base measures 5-1/2 by 8-1/2 inches, scored at 2-1/8 and 4-1/4 inches
The Petunia Pop “BABY” Z-fold measures 2-1/2 by 8-1/2 inches, scored at 2-1/8 and 4-1/4 inches
I used the Unbounded Beauty DSP for my card
Trim a piece of the DSP to 6 by 2-1/2 inches for the envelope flap
Punch a 1-inch circle from contrasting DSP for the envelope seal, and run it through your XYRON create-a-sticker
You need two background pieces of DSP (designer series paper): the first measures 2 by 5-3/8 inches and the second measures 4-1/8 by 5-3/8 inches
This double Z-card will lay flat, so I needed a piece of white cardstock measuring 2 by 5-3/8 inches for the inside fold on which a greeting can be written
The Pretty in Pink DSP requires 3 pieces: 1 at 2-3/8 by 4-1/8, and 2 at 2 by 2-3/8 inches
HINT: I’m probably the only one who will notice, but I was able to line up all the Pretty in Pink pieces so the patterns all line up
To do this, I first trimmed at piece of the DSP to 2-3/8 inches by 8-1/2 inches.
Then, I trimmed down that strip to the measurements given above
I wound up with a scrap of DSP from the end, but all the patterns do line up
Here’s a close-up of the patterns:
Stamping, Coloring, & Cropping:
I used the (retired) large numbers stamp set and coordinating dies for the “BABY” sentiment, which is stamped in Summer Splash
Next, I stamped the branches (twice), the giraffe, the bird, and the Wild about You sentiment using Momento Tuxedo Black ink
The Wild about You sentiment was cropped using a deckled rectangle die
I was very happy that the WELCOME, also stamped in black, fit inside the Keeping Tabs die
The tab is stamped in Summer Splash, then cropped using the coordinating die (I really wish I’d gotten the punch instead of the die)
The adorable bird comes from the (retired) Fluffiest Friends stamp set, cropped with the coordinating die
Don’t tell anyone, but the little bird actually was needed to cover a tiny splotch of Summer Splash ink
I used the 2024 – 2026 in Color markers to color the giraffe, leaves, bird, and frog
I purposefully left the branches and spots on the giraffe white to keep the elements cleaner
Assembly:
Unless otherwise noted, I used multipurpose liquid glue to adhere the pieces together
Adhere the floral DSP and white cardstock as shown on the card
Adhere the Pretty in Pink DSP to the smaller z-fold as shown
Add dimensionals under each BABY letter and adhere to the Pretty in Pink DSP
Adhere the Z-fold to the base of the card
I find it easier to adhere the short end to the right side of the base first
Do not put ink on the back of the flap with the bird and branches on it because if you do, the card won’t open
Lay the card base and the z-fold flat and adhere the left side of the z-fold to the left side of the card base
Again, you only need the left 2 inches adhered to the front flap of the card
Adhere the Welcome tab so that it is centered over BABY
Adhere the giraffe , branch, and bird to the card
Add mini-dimensionals to the back of the leaves and frog and adhere to the card
I finished the card by adding two Petunia Pop dots to the WELCOME tab and three Summer Splash dots to the leaves of the frog branch
With that, I’d finished this coordinated card, envelope, and envelope seal set
Welcome to the newest Cardz 4 Guyz challenge! Our host for challenge #345, Helen., chose Clean & Simple for the theme. When you finish here, please visit the challenge site to see what the rest of the very talented design team members created. Then, don’t forget to upload your creations to our gallery. We look forward to seeing your creations there!
Here’s my (somewhat) CAS Playing in the Rain card:
If this layout looks familiar, I just posted a card to the Try Stampin’ on Tuesday challenge using the same layout. You can see that card here.
As with the other card, this Playing in the Rain card is combined with other challenges. Since it’s a fun fold, I will be entering it in the Creative Creases gallery.. I’ve also been introduced to a new-to-me challenge, but it’s completely up my alley, and that’s the Snippets Playground challenge. Since I use snippets, aka scraps or leftovers, frequently, I think this challenge will be incorporated quite regularly. The main idea of the challenge is to use scraps and identify them in the card or with a picture. Therefore, here’s my trio of snippets:
Here are the Creative Creases and Snippets Playground challenge logos:
Still Working on My Video Skills:
Instead of listing out the measurements and assembly instructions, I am including a video for this card. I appreciate your patience as I learn the best way to film videos. My nephew wants to help me edit the videos but I am not there yet. He’s great at it, as evidenced by the videos on his YouTube channel, Florida Railfan. If you, or someone you know, is into trains, please share his channel with them. However, he doesn’t know I am giving him a plug, so we can keep it our secret.
PLEASE NOTE: During the video I said that the card base needs to be scored at 4-1/4 and 2-1/4. That’s a mistake! It’s scored at 4-1/4 and 2-1/8 inches.
Click on the link above ^^^ to be taken to the PDF of the annual catalog LAST CHANCE ITEMS!
HINT: Use the page numbers in the PDF to easily find the items listed in the ANNUAL CATALOG.
If you live in the U.S. and don’t already have a Stampin’ UP! demo from whom you order, I would be honored to work with you.
When prompted, please enter the following HOST CODE:
DHJEH4MG
Thanks again for stopping by today!
About Me
Welcome to Just Peachy Stamping by Sue Jackson: an independent Stampin' Up demonstrator.
Through Stampin' Up!, I happily share my love of papercrafting through sales, classes, small stamping group meet-ups and workshops. I think that being a teacher in my "real life", I have a unique approach to sharing my fantastic hobby. I look forward to connecting with you!