Welcome to the newest Make My Monday bi-weekly challenge #259. Our host & fearless leader, Caz, chose Hot Air Balloons for the theme. When you finish here, please visit the challenge site to see what the rest of the very talented design team members created. Then, don’t forget to upload your creations to our gallery. We look forward to seeing your creations there!
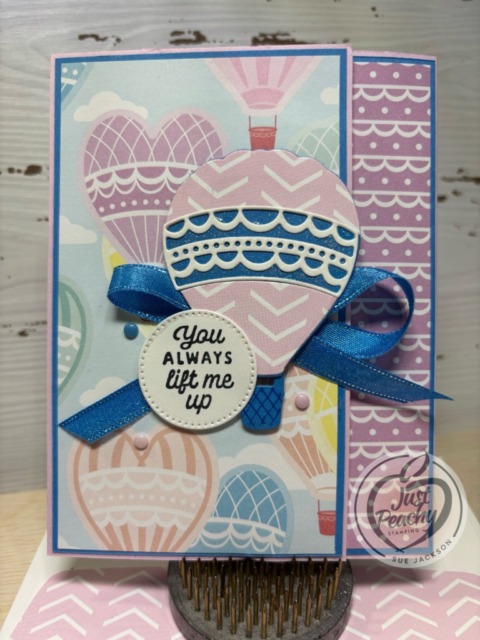
Here’s my card:
I’m very thankful that, as a design team member, I have access to the themes months in advance, especially for this theme. I didn’t have anything for this challenge, and needed to search. Luckily, the hot air balloon die set was on last chance product list for Stampin’ Up! so I snagged that. Then I turned to eBay, where I found a card kit for this retired DSP (designer series paper), which contained all the DSP I used for this card.
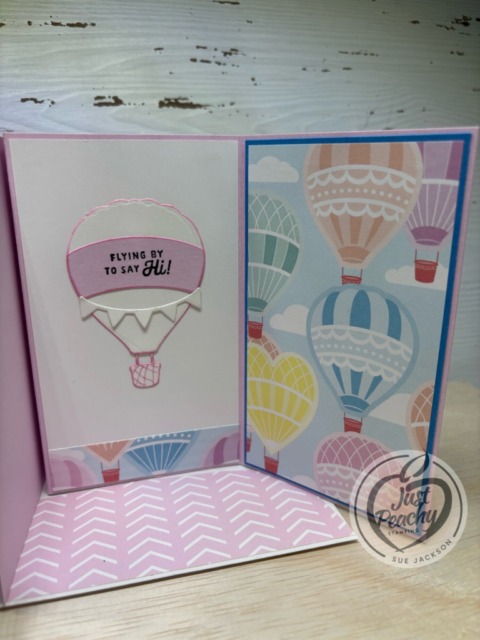
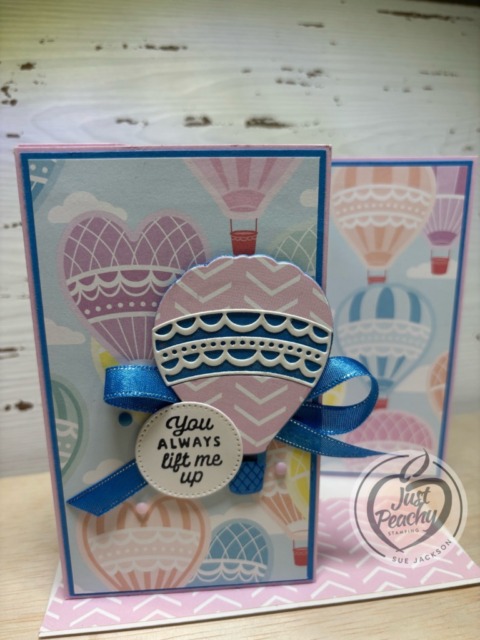
I’ve used this hidden flap card so many times because it lends itself perfectly to 6 x 6 inch DSP. You can see some of those cards here, here, here, and here.
As always with a fun fold card, I will be adding this to the Creative Creases Challenge where the theme is always Anything Goes with a Fun Fold.
Measurements:
Trim a piece of DSP to 6 by 2-1/2 inches for the envelope flap
Punch a 1-inch circle from coordinating DSP and run it through the XYRON create-a-sticker for the envelope seal
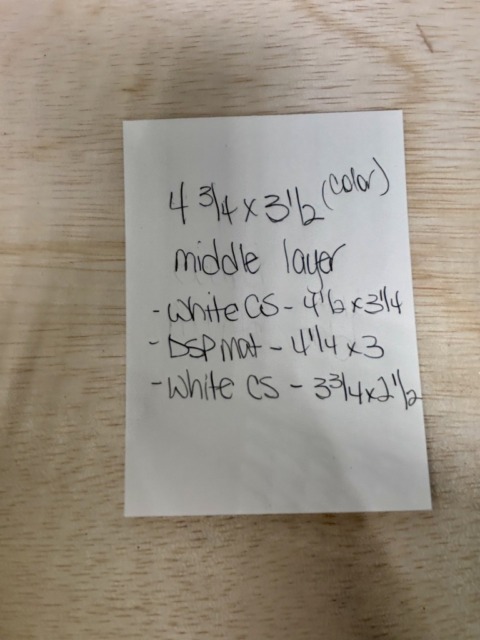
I’ve created a template for this card, and all the measurements are on the template. It’s so easy to just get it out of my fun fold mini-binder of templates and create without having to find all the measurements.
Here’s the template:
What I Did:
II used Fresh Freesia for base pieces according to the measurements on the template
I used Azure Afternoon cardstock for the mats, trimming it down by 1/8 inch on the short side and 1/8 inch on the long side
Trim the 6 x 6 inch DSP down to 5-1/4 inches by 3 inches, using the left piece for the outside panel and the right piece for the hidden flap part of the card
I trimmed a coordinating piece of the card kit DSP to 2 by 5-1/4 inches
The mat for this piece of DSP measures 2-1/8 by 5-3/8 inches
Unless otherwise noted, I used multipurpose liquid glue to adhere pieces together
I cropped one hot air balloon from the card kit DSP and the two coordinating pieces from Azure Afternoon and the center from white cardstock
After adhering the pieces together, I colored the Azure Afternoon pieces in clear Wink of Stella
Next, I cropped another hot air balloon from white cardstock, along with the coordinating banner
The center part of the white balloon was cropped from Fresh Freesia cardstock scraps
I used sentiments from the Adventurous Sky stamp set and stamped them in black ink
I adhered the pieces together and then it was time for the front
I created a loopy-loop bow from Azure Afternoon ribbon following the directions from Mary Deatherage and adhered it with mini-glue dots
After adhering the bow, I used dimensionals to adhere the hot air balloon and the sentiment
Finally, I added the enamel dots that came with the card kit
With that, I’d finished this coordinated card, envelope, and envelope seal set
The Loopy Loop Bow:
I was able to watch Mary Deatherage’s, from Stamps -n- Lingers, Perfectly Pears tutorial. In that video, she showed her loopy-loop bow. That’s what I used for the front of my card. I’m bow-challenged and this technique allows me to relatively easily add ribbon without adding the bulk of a tied bow. If you’ve never seen her videos, you owe it to yourself to watch them. I think she’s the Queen of the Collage. Gorgeous cards!!
Who would love a sale on select In Color Merchandise?
We all would, right?
Here are the Promotion Details:
Sales Period: August 5–31
Ordering Deadlines
Phone: August 29, 2025, at 6:59 p.m. (MT)
Online: August 31, 2025, at 11:59 p.m. (MT)
Sale includes select inks, cardstock, Designer Series Paper, embellishments, and other products that include these new In Colors. Only products featured on the 2025–2027 In Colors page are included in this promotion.
Some products are excluded from the sale, including the Month by Month Album Retreat 2025 kit (167338).
Products are available only while supplies last.
Pre-Order for SU! Demos for the upcoming September – January Mini Catalog and the September online exclusives release is ongoing. I’ve already gotten some products, and just placed an order for more. In the meantime, here’s some sneak peek cards for you:
If you live in the U.S. and don’t already have a Stampin’ UP! demo from whom you order, I would be honored to work with you. You can reach me at my justpeachystamping@gmail.com.
Welcome to the newest Make My Monday bi-weekly challenge #258. Our host, Heather, chose Snow in August for the theme. When you finish here, please visit the challenge site to see what the rest of the very talented design team members created. Then, don’t forget to upload your creations to our gallery. We look forward to seeing your creations there!
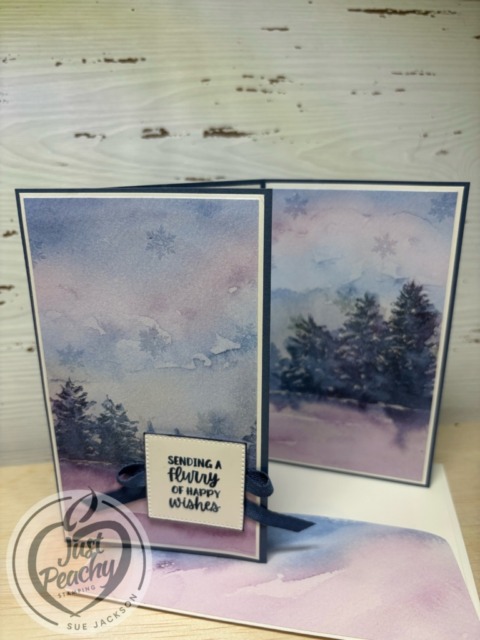
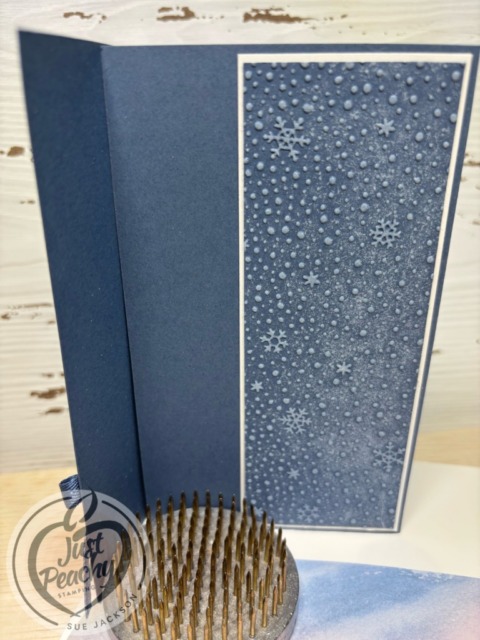
Here’s my hidden flap fun fold card:
I’ve used this hidden flap card so many times because it lends itself perfectly to 6 x 6 inch DSP, in this case from Thoughtful Journey. You can see some of those cards here, here, and here.
As always with a fun fold card, I will be adding this to the Creative Creases Challenge where the theme is always Anything Goes with a Fun Fold.
Measurements:
I’ve created a template for this card, and all the measurements are on the template. It’s so easy to just get it out of my fun fold mini-binder of templates and create without having to find all the measurements.
Here’s the template:
Trim a piece of 6 x 6 inch DSP to 5-1/4 inches by 6 inches
Trim the DSP in half so you have 2 pieces measuring 3 inches by 5-1/4 inches
You need two mats for the DSP, each measuring 3-1/8 by 5-3/8 inches
The very inside piece of cardstock measures 3 by 5-3/8 inches
I had a piece of the embossed Misty Moonlight cardstock and trimmed it to 5-1/4 by 1-7/8 inches
The mat for the embossed cardstock measures 5-3/8 by 2 inches
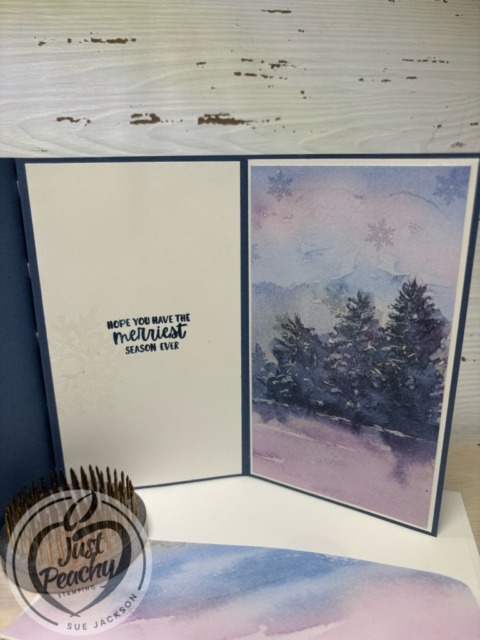
I used a scrap of white cardstock for the sentiment and cropped it using one of the square Stylish Shapes dies
I trimmed a coordinating piece of DSP to 6 by 2-1/2 inches for the envelope flap
Then, I punched a 1-inch circle from Misty Moonlight DSP and ran it through my XYRON create-a-sticker for the envelope seal
Putting it Together:
Add dimensionals to the base as shown in the template to adhere the front flap
The only other place I used dimensionals was under the sentiment because the rest of the card is already bulky
This card will fit into a medium Stampin’ Up! envelope for mailing
Use multipurpose liquid glue to adhere all the other elements of the card
Since the only snow on the card was the embossed cardstock layer, I stamped some snowflakes from the One of a Kind stamp set using VersaMark ink and clear embossing powder on the winter DSP pieces
I stamped a larger snowflake on the inside white cardstock next to the sentiment using VersaMark ink, clear embossing powder, and heat set it with my heat tool
I stamped the sentiments using Misty Moonlight ink
I added a loopy-loop bow, from Mary Deatherage, under the front sentiment, for which I will add the directions below
With that, I’d finished this coordinated card, envelope, and envelope seal set
The Loopy Loop Bow:
I was able to watch Mary Deatherage’s, from Stamps -n- Lingers, Perfectly Pears tutorial. In that video, she showed her loopy-loop bow. That’s what I used for the front of my card. I’m bow-challenged and this technique allows me to relatively easily add ribbon without adding the bulk of a tied bow. If you’ve never seen her videos, you owe it to yourself to watch them. I think she’s the Queen of the Collage. Gorgeous cards!!
Who would love a sale on select In Color Merchandise?
We all would, right?
Here are the Promotion Details:
Sales Period: August 5–31
Ordering Deadlines
Phone: August 29, 2025, at 6:59 p.m. (MT)
Online: August 31, 2025, at 11:59 p.m. (MT)
Sale includes select inks, cardstock, Designer Series Paper, embellishments, and other products that include these new In Colors. Only products featured on the 2025–2027 In Colors page are included in this promotion.
Some products are excluded from the sale, including the Month by Month Album Retreat 2025 kit (167338).
Products are available only while supplies last.
If you live in the U.S. and don’t already have a Stampin’ UP! demo from whom you order, I would be honored to work with you. You can reach me at my justpeachystamping@gmail.com.
Welcome to the newest Make My Monday bi-weekly challenge #257. Our host for #257, Pamela, chose Masculine Cards for the theme. When you finish here, please visit the challenge site to see what the rest of the very talented design team members created. Then, don’t forget to upload your creations to our gallery. We look forward to seeing your creations there!
Here’s my masculine card:
This woodgrain DSP (designer series paper) from Country Woods and the camping DSP from Weekend Adventures just seemed to work together for this card. I’ve seen a. number of cards using torn DSP and thought I could use that to create a CAS (clean and simple) card for this challenge.
I’ve already posted a card using the Weekend Adventures DSP and you can see that one here.
Measurements:
The Early Espresso base measures 8-1/2 by 5-1/2 inches, scored at 4-1/4 inches
Next, I trimmed a piece of the Country Woods DSP to 4-1/8 by 5-3/8 inches
The Weekend Adventures DSP measures 4-1/8 by 2 inches
Carefully tear the Country Woods DSP, making sure that the open space in the tear will cover the background DSP
Trim another piece of the Country Woods DSP to 6 by 2-1/2 inches for the envelope flap
Punch a 1-inch circle from the woodgrain Country Woods DSP for the envelope seal and run it through the XYRON create-a-sticker
Trim a piece of white cardstock to 4 by 5-1/4 inches for the inside of the card
Use a scrap piece of white cardstock for the outside sentiment
Putting the Card Together:
Unless otherwise noted, I used multipurpose glue to adhere pieces together
Adhere the torn Country Woods DSP to the Weekend Adventures DSP making sure that the combined pieces measure 4-1/8 by 5-3/8 inches
Stamp the outside sentiment on the scrap of white cardstock using the Sweetly Scripted stamp set
Stamp the inside sentiment and the cross-hatch lines in Early Espresso ink using the Spring Corners stamp set
To coordinate the inside with the outside, I decided to stamp the cross-hatch lines on the front as well
Crop the sentiment using the banner from the Stylish Shapes die and outline it with a Pumpkin Pie marker
Wrap twine around the front DSP pieces three times, securing the ends using glue dots behind the front piece
Add dimensionals to the sentiment banner so they straddle the twine and adhere to the front of the card
Adhere the DSP panel to the front of the cardstock base
Adhere the inside white cardstock to the base
With that, I’d finished this CAS masculine card and coordinated envelope and envelope seal
Halloween in July? My daughter certainly thinks so!
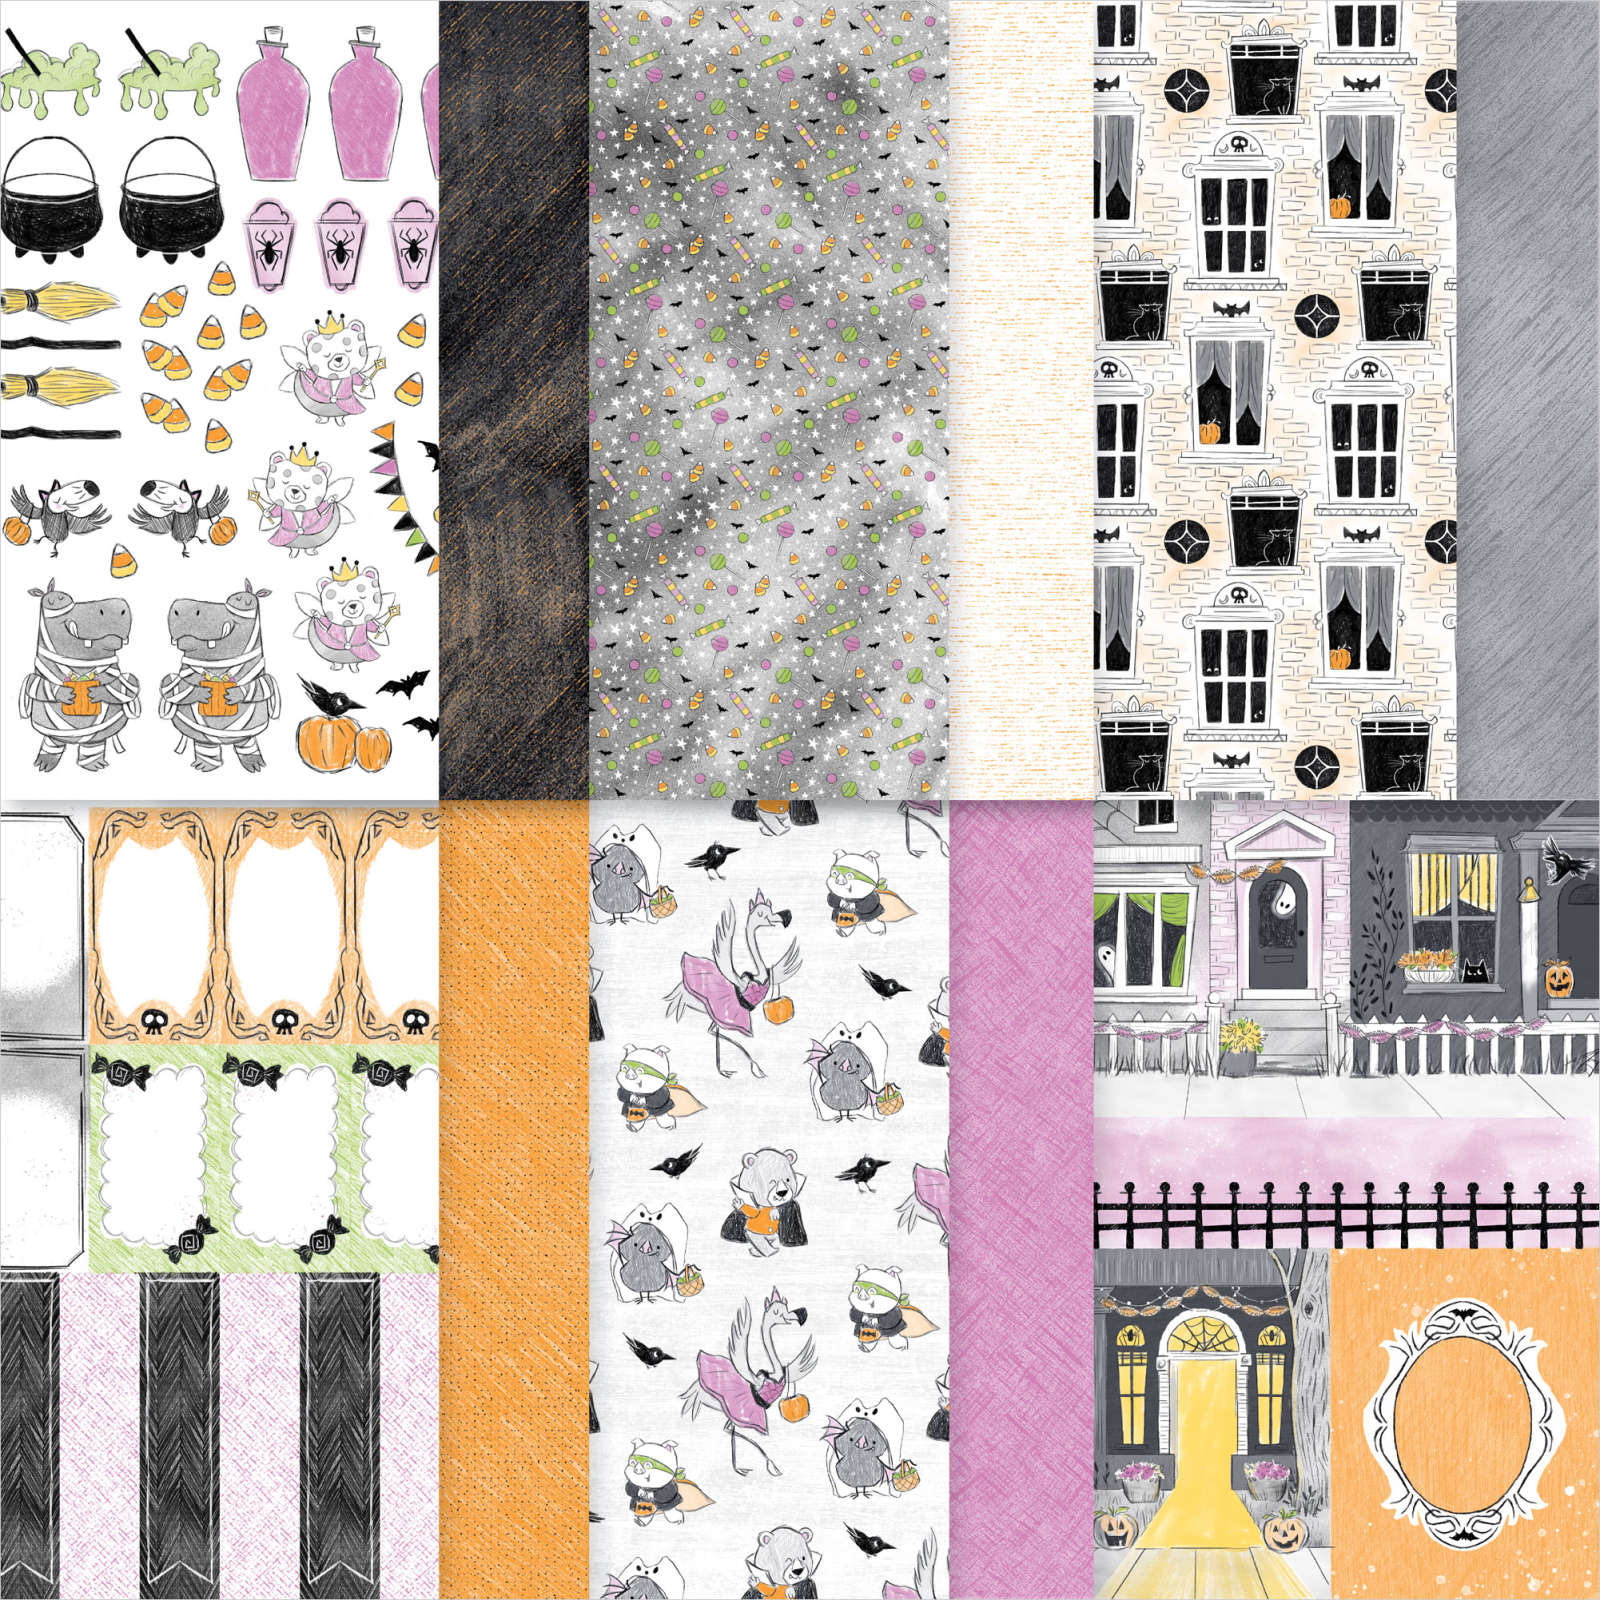
I normally do not need very much in the way of Halloween sets, but I just can’t help myself! I’ve already purchased this Spooky Sweet DSP pack, which includes patterned paper, precut images, and cut-apart scenes and elements. It’s perfect for creating tags and gift packaging for Halloween goodies, accents for scrapbooks, or other spooky-cute paper crafts.
Take a look at all this cuteness! The first page has all the precut images. So cute!
I could’ve stopped there, and would’ve had more than I needed for Halloween. However, I didn’t stop there. I got this Fright Night bundle as well.
Now, all I “need” are these shiny stars, and I will be all set! It’s already in my cart for my next order.
If you live in the U.S. and don’t already have a Stampin’ UP! demo from whom you order, I would be honored to work with you.
Welcome to the newest Make My Monday bi-weekly challenge #255. I’m hosting this challenge and chose Summer Fun for the theme. When you finish here, please visit the challenge site to see what the rest of the very talented design team members created. Then, don’t forget to upload your creations to our gallery. We look forward to seeing your creations there!
Summer Fun has a very individual interpretation, so I am looking forward to seeing your creations in our gallery. I chose flowers because I am hoping to do some productive gardening this summer. Cross your fingers that no plant is harmed in this endeavor because I do not have a green thumb.
Here’s my card:
Since the front sentiment is for an all-occasion card, I haven’t stamped an inside sentiment yet. Instead, I used removable tape to adhere the white cardstock. When I know the occasion, I can stamp the sentiment, and adhere it permanently using multipurpose liquid glue. I’ve already posted one of these cards for the last MMM challenge, and you can see that post here. I’d also posted a dinosaurs version, and you can see that one here. Once I got started making these fun folds, I couldn’t stop.
As with other fun fold card, I’m going to be adding this to the Creative Creases Challenge for which the theme is always Anything Goes with a Fun Fold. If you love fun folds as much as I do, please upload your creations to the gallery.
DSP and Templates:
I made myself a template to use for the measurements, and am adding the pictures in lieu of including measurements.
I used Timid Tiger for the base pieces of this card. The DSP (designer series paper) is a combination of the 2025 – 2027 6 x 6 inch In Color DSP and the Florals in Bloom 12 x 12 inch DSP. Both of these DSP packs can be found in the annual catalog.
Today, June 30, 2025, is the LAST DAY for the Buy One, Get One 50% Off!
Our suite collections are known (and loved!) for their coordination, quality, and style. With stamps, tools, patterned paper, and embellishments in stunning colors and unique designs, suites make creativity simple and fun. Shop the individual products or buy as a full collection!
I have two orders making their way to me and I couldn’t be more excited! Some of the products are pre-orders for the upcoming additions to the Online Exclusives!
If you’d like some help getting the most out of your Buy One, Get One 50% OFF sale, please contact me for assistance.
Promotion Details
Sales Period: June 3–30, 2025
Ordering Deadlines
Phone: June 30, 2025, at 6:59 p.m. (MT)
Online: June 30, 2025, at 11:59 p.m. (MT)
All available suites and suite products from the 2025–2026 Annual Catalog and Online Exclusives are buy one, get one 50% off.
When you shop the sale, the 50% off discount will apply to the lower-priced item (for example, if you buy a suite collection and a stamp set from a suite, the suite would be full price, and the stamp set would be 50% off).
Suite collections are available if all items are in stock; if all items are not in stock, you can still shop the available suite products.
You don’t have to buy a suite and suite products all from the same suite collection for the discount to apply. You can buy any suite products from any suite.
The discount will appear in your cart once you’ve added two items within the sale parameters to your cart.
Products are available only while supplies last.
If you live in the U.S. and don’t already have a Stampin’ UP! demo from whom you order, I would be honored to work with you. If you’d like some help getting the most out of your Buy One, Get One 50% OFF sale, please contact me for assistance.
Welcome to the newest Make My Monday bi-weekly challenge #254. I’m hosting this challenge and the theme is Butterflies (1 or more) for the theme. When you finish here, please visit the challenge site to see what the rest of the very talented design team members created. Then, don’t forget to upload your creations to our gallery. We look forward to seeing your creations there!
The Beautiful Butterflies hybrid embossing folder, which includes the die set, has been unavailable. However, it’s now available and I’ve got my order in the picking stage. I’m so happy that I was able to take advantage of the Buy One, Get one 50% Off sale going until the end of June, but more about that later in this post. The Florals in Bloom 12 x 12 DSP and the In Color flat pearls are part of the Floral in Bloom Suite Collection, so those items individually also quality for the Buy One, Get one 50% Off.
Here’s my fun fold (single) fussy cut butterfly card:
Since the front sentiment is for an all-occasion card, I haven’t stamped an inside sentiment yet. Instead, I used removable tape to adhere the white cardstock. When I know the occasion, I can stamp the sentiment, and adhere it permanently using multipurpose liquid glue.
As with other fun fold card, I’m going to be adding this to the Creative Creases Challenge for which the theme is always Anything Goes with a Fun Fold. If you love fun folds as much as I do, please upload your creations to the gallery.
In Colors, Templates, and Sale Items:
The base of this card is Strawberry Slush, one of the 2025-2027 In Colors, as are the ribbon and dots.
I’ve already posted a Darling Dinos diagonal tri-fold card, which you can see here. At that time, I made myself a template so I can recreate this impressive fold.
Our suite collections are known (and loved!) for their coordination, quality, and style. With stamps, tools, patterned paper, and embellishments in stunning colors and unique designs, suites make creativity simple and fun. Shop the individual products or buy as a full collection!
I have two orders making their way to me and I couldn’t be more excited! Some of the products are pre-orders for the upcoming additions to the Online Exclusives!
If you’d like some help getting the most out of your Buy One, Get One 50% OFF sale, please contact me for assistance.
Promotion Details
Sales Period: June 3–30, 2025
Ordering Deadlines
Phone: June 30, 2025, at 6:59 p.m. (MT)
Online: June 30, 2025, at 11:59 p.m. (MT)
All available suites and suite products from the 2025–2026 Annual Catalog and Online Exclusives are buy one, get one 50% off.
When you shop the sale, the 50% off discount will apply to the lower-priced item (for example, if you buy a suite collection and a stamp set from a suite, the suite would be full price, and the stamp set would be 50% off).
Suite collections are available if all items are in stock; if all items are not in stock, you can still shop the available suite products.
You don’t have to buy a suite and suite products all from the same suite collection for the discount to apply. You can buy any suite products from any suite.
The discount will appear in your cart once you’ve added two items within the sale parameters to your cart.
Products are available only while supplies last.
If you live in the U.S. and don’t already have a Stampin’ UP! demo from whom you order, I would be honored to work with you. If you’d like some help getting the most out of your Buy One, Get One 50% OFF sale, please contact me for assistance.
Welcome to the newest Make My Monday bi-weekly challenge #253. Our host for this challenge, Guylaine, chose Something Fishy for the theme. When you finish here, please visit the challenge site to see what the rest of the very talented design team members created. Then, don’t forget to upload your creations to our gallery. We look forward to seeing your creations there!
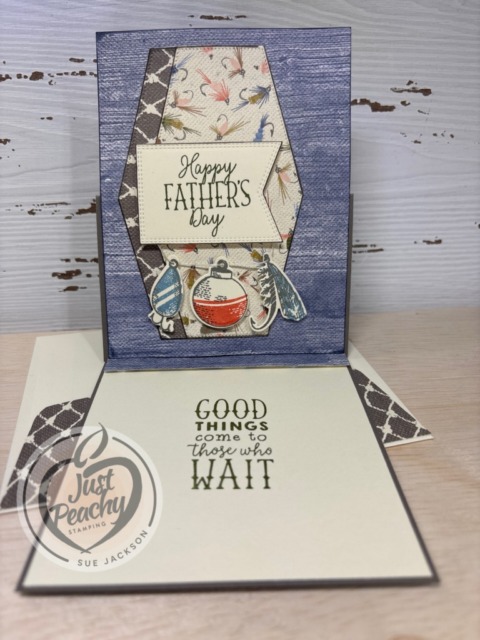
Here’s my fishy easel card:
Measurements:
Trim a piece of Pebbled Path to 11 by 4-1/4 inches, scored at 2-3/4 and 5-1/2 inches
Trim a piece of DSP (designer series paper) to 4-1/8 by 5-3/8 inches for the outside and 1/2 by 4-1/8 inches for the inside stopper piece
Crop two patterns of Let’s Go Fishing DSP using the largest hexagon die from Nested Essentials die set
Trim a piece of DSP to6 by 2-1/2 inches for the envelope flap
Punch a 1-inch circle and run it through your XYRON create-a-sticker machine for the envelope seal
Trim a piece of Very Vanilla cardstock to 4-1/8 by 5-3/8 inches for the inside of the card
Use scraps of Very Vanilla for the sentiment banner and the hooks and bobber pieces
Putting the Card Together:
Unless otherwise noted, I used multipurpose glue to adhere the pieces together
Stamp the sentiment from the Gone Fishing stamp set using Mossy Meadow ink on a scrap of Very Vanilla
Use Mossy Meadow ink to stamp the inside sentiment on the Very Vanilla cardstock and adhere to the inside of the card
Stamp the three pieces for the bottom of the card on Very Vanilla using Pebbled Path ink
Use Calypso Coral ink for the bottom part of the bobber
Stamp the hook and lure using Boho Blue ink
Crop the sentiment using a banner die from the Nested Essentials die set, and outline it using a Mossy Meadow marker
Crop the three bottom pieces using the Gone Fishing die set
Add dimensionals to the back of the sentiment banner, the three bottom pieces, and the stopper strip of DSP for the inside of the card
Adhere the two hexagons to the front of the DSP
Punch tiny holes in each of the three bottom pieces and thread some twine through the holes
HINT: I wanted to mimic fishing line so I used the center thread of the gold Simply Elegant twine
To get the center, twirl the end of a length of the gold (or silver) thread counter-clockwise to expose the clear center thread and pull it out
Dry-fit the placement of the three bottom pieces and adhere the ends of the thread to the back of the sentiment banner
Adhere the three bottom pieces and the sentiment to the front of the card
Adhere the front DSP piece to the bottom half of the base of the front of the card
HINT: Make sure you do not adhere the top half of the DSP to the cardstock base
Adhere the stopped to the inside Very Vanilla cardstock
HINT: I usually add the stopper about an inch from the top, which gives a very steep easel
With that, I’d finished this coordinated card, envelope, and envelope seal set
First up – The Beautiful Blues Kit retailing for $23.00 USD, product # 165658.
Craft timeless handmade cards for sharing messages of friendship, support, and sympathy with the Beautiful Blues Kit. This all-inclusive crafting kit comes with everything you need to create nine lovely cards featuring hand-painted floral designs and a palette of soothing blues.
These colors, DSP, and die cuts are strikingly gorgeous!
Here’s the video for the Beautiful Blues Kit:
Second – the Share a Smile Kit, retailing for $14.00 USD, product # 165637.
Want to make a difference in someone’s day? Have an uplifting card ready to go at a moment’s notice with the Share a Smile Kit! This all-inclusive crafting kit offers fun, no-fuss crafting, with card bases, envelopes, and precut paper pieces for making bright and cheery designs. Store the completed cards in the included notecard box until you’re ready to give them out!
Check out these adorable cards which are sure to bring a smile to the recipient’s face!
Here’s the video with Sarah from Stampin’ Up!
If you live in the U.S. and don’t already have a Stampin’ UP! demo from whom you order, I would be honored to work with you.
Welcome to Just Peachy Stamping by Sue Jackson: an independent Stampin' Up demonstrator.
Through Stampin' Up!, I happily share my love of papercrafting through sales, classes, small stamping group meet-ups and workshops. I think that being a teacher in my "real life", I have a unique approach to sharing my fantastic hobby. I look forward to connecting with you!