A Soccer Z-Fold for the Make My Monday # 274

Welcome to the newest Make My Monday bi-weekly challenge #273. Our host for this edition, Pamela, chose Hobbies for the theme. When you finish here, please visit the challenge site to see what the rest of the very talented design team members created. Then, don’t forget to upload your creations to both galleries. We look forward to seeing your creations there!
For my hobby card, I chose to highlight soccer. Our high school boys’ soccer team just won the state title, so I thought I would celebrate the team.
Here’s my z-fold card:
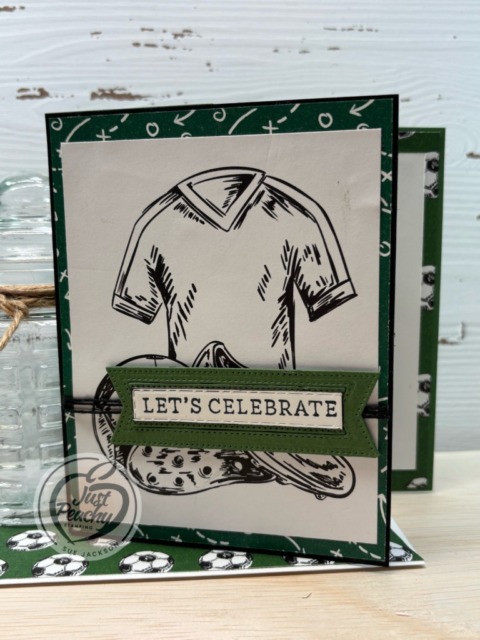
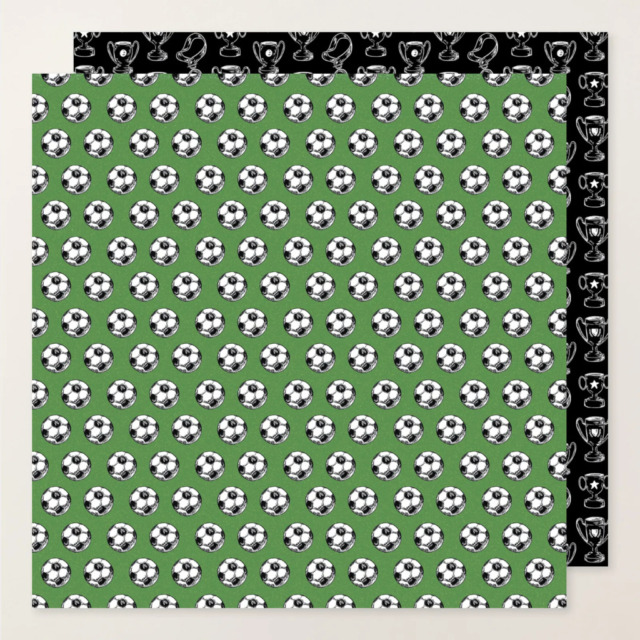
This card lets the DSP (designer series paper) do all the work! Here’s a look at the pages I used:

Measurements:
- The Shaded Spruce base measures 5-1/2 by 8-1/2 inches, scored at 2-1/8 and 4-1/4 inches
- I used a piece of black cardstock measuring 4-1/4 by 5-1/2 inches for the front part of the z-fold
- I needed two pieces of the soccer ball. DSP measures 4-1/8 by 5-3/8 inches so I’d have one for the inside and one for the outside
- Trim a piece of the DSP to 6 by 2-1/2 inches for the envelope flap
- Punch a 1-inch circle from coordinating cardstock and run it through the XYRON create-a-sticker for the envelope seal
- i trimmed the soccer jersey and shoes image to 4 by 5 inches
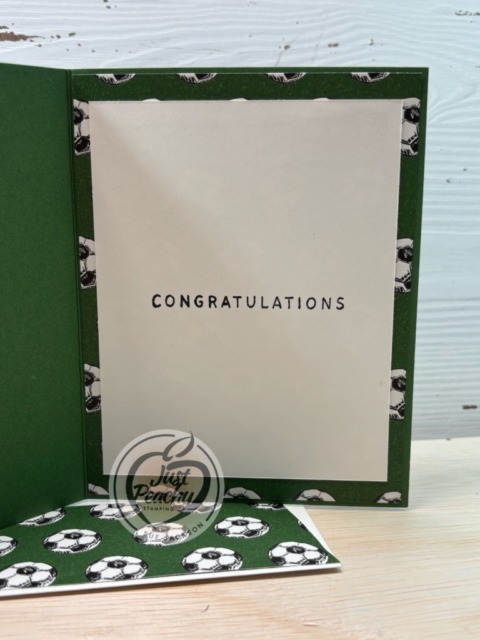
- Trim a piece of white cardstock to 3-3/4 by 5 inches for the inside of the card
- I used scraps of Shaded Spruce and white cardstock for the sentiment banner
The Z-Fold:
- Unless otherwise noted, I used multipurpose liquid glue to adhere the pieces of the card together
- Adhere the black cardstock to the front flap of the z-fold making sure to line up the top, bottom, and left side of the edges
- Adhere the Shady Spruce soccer ball DSP to the black cardstock layer
- Wind black bakers’ twine around the soccer jersey piece of DSP three times and adhere the ends using tear & tape
- Make sure the layers of the twine do not overlap so you can use liquid glue to adhere the DSP to the front of the z-fold
- Adhere the soccer jersey DSP to the soccer ball DSP
- Stamp the sentiment from the Simply Said Mix & Match stamp set in black ink on the scrap of the white cardstock
- Crop the sentiment using one of the Textured Notes dies
- Crop the Shaded Spruce cardstock using a label banner from the Stylish Shapes die set
- Adhere the sentiment to the label banner
- Add mini-dimensionals to the back of the label banner so they straddle the bakers’ twine and adhere it down
- Stamp the inside sentiment in black ink on the white cardstock and adhere
With that, I’d finished this coordinated card, envelope, and envelope seal set.
Thank you for stopping by today!
Have a Peachy Day!
Sue
Colors Used:
Supplies Used:
New March Product of the Month!


PRODUCT DETAIL:
Spring into stamping with the Notes of Spring Stamp Set! Featuring adorable springtime animals like a deer, bunny, and duck, plus some delicate river plants, this stamp set makes it easy to create layered, watercolor-style images. Includes a few all-occasion sentiments to complete your handmade cards for birthdays, thank-yous, and more.
PRODUCT OF THE MONTH:
– Is a new exclusive product released each month!
– Can be unlocked for just $5 with orders over $75 (after discounts and rewards).
– Is only available while supplies last—they can sell out quickly!
– Is limited to one per customer (including language versions).
An Online Exclusive Kit: The Happy Happenings Kit

Retails for $24.00 USD.
This kit is already in my cart waiting for the preorder opportunity for the upcoming catalog. I need a new baby and wedding stamp, and this all-inclusive kit will give me both!
Product detail
Have cards ready for life’s happiest events. With the Happy Happenings Kit, you can quickly craft cards to welcome a new baby, celebrate a wedding, or say thank you. These oval cards feature layered designs and pearlized details. Create them as shown or customize each one for the occasion.
DETAILS
– Makes 9 cards: 3 each of 3 designs
– Folded card size: 4-1/4″ x 5-1/2″ (10.8 x 14 cm)
– Colors: Cloud Cover, Daffodil Delight, Mossy Meadow, Old Olive, Petal Pink, Timid Tiger
– Also available in French
Kit includes one of each item listed below.
– Happy Happenings Photopolymer Stamp Set
– Clear stamp block
– Mossy Meadow Classic Stampin’ Spot
– Step-by-step instructions
– 9 printed envelopes
– Precut paper pieces
– Clear self-adhesive dewdrop embellishments
– Adhesive
KITS COLLECTION
– Includes designed projects that come in a range of project types.
– Is perfect for new crafters, busy crafters, or crafters who want quick and easy projects.