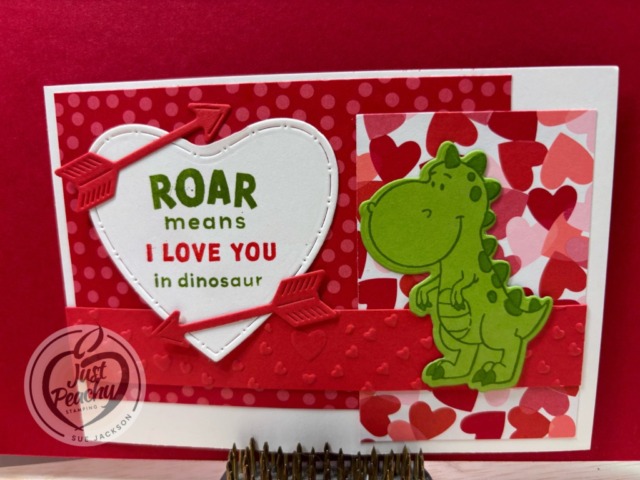
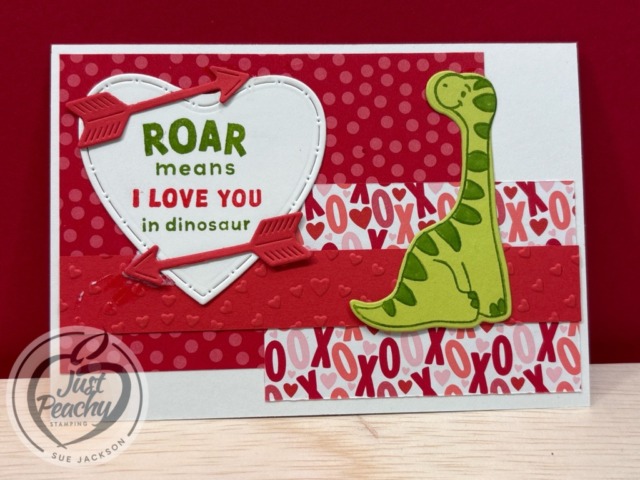
Welcome to the newest Make My Monday bi-weekly challenge #271. Our host and fearless leader, Billie A., chose Use Two Dies for the theme. I used a Darling Dino, a heart, and arrow set for my dies. There’s a class set for my great-nephew to share with his kindergarten class. I also made a class set of Valentine’s for his sister’s second grade class, which will be included for the Stampin’ Pretty Pals’ Blog Hop on Wednesday.
When you finish here, please visit the challenge site to see what the rest of the very talented design team members created. Then, don’t forget to upload your creations to both galleries. We look forward to seeing your creations there!
Here’s my postcard style Valentine’s Day card:
Since the postcard base is white and my photo background is white, I needed to add a piece of cardstock behind the postcard.
What I Did:
When I am mass-producing cards, I get all my trimming, stamping, and cropping done first
When I put the cards together, I added all the DSP pieces, then went back and added the cardstock, heart, arrows, and dinosaurs
I used the Stampin’ Up! notecards and trimmed them in half for the bases of the postcards
The one pack of 20 notecards gave me enough postcards for both class sets of cards for my great-nephew and his sister
For both sets of cards, I trimmed 4 12″ x 12″ inch Made with Love pieces of DSP (designer series paper) to 4-inch strips, then trimmed those down to 3 inch x 4 inch pieces of DSP
If you are using directional DSP, make sure you pay attention to the orientation of the paper
I needed something to anchor the dinosaur, so I embossed a piece of cardstock using the Hearts of Love embossing folder and trimmed strips to 3/4 by 4-3/8 inches
The heart die cut actually has a tag piece on the top for ribbon, so I trimmed it off
The dinosaurs were stamped onto either Granny Apple Green or Lemon Lime Twist cardstock and cropped down
I colored the spikes and dots using the blunt end of the dark Granny Apple Green blend
I used multipurpose liquid glue to adhere all the pieces together
It’s time to redeem the coupons you earned in January! Make sure you place your order before time runs out!
It’s Time for a Joining Bonus!
Crafting is even more fun with community, and there’s never been a better time to join Stampin’ Up! as a demonstrator. There’s no commitment beyond the initial joining quarter and you get to enjoy all the perks that come with that, like a 20–25% product discount, early access to the latest products and catalogs, the opportunity to earn a modest supplemental income, the chance to attend incredible training and crafting events, and so much more. And for a limited time, new demonstrators will receive our new Stampin’ Positioner tool FREE along with their Starter Kit!
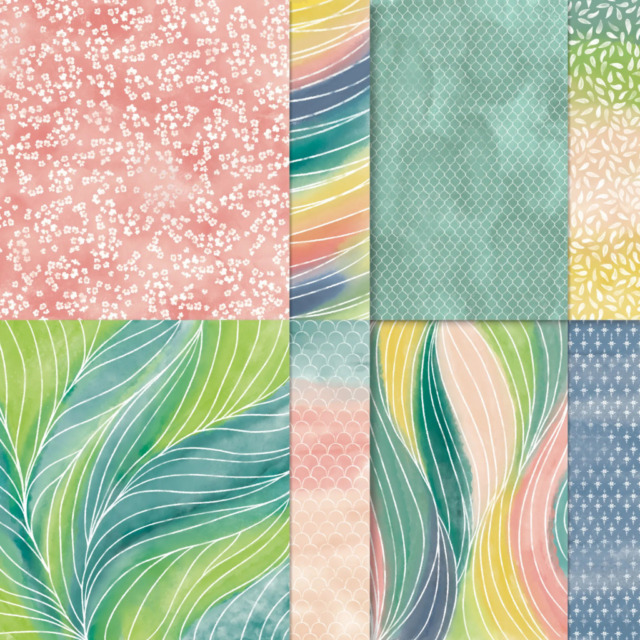
It’s Time for the February Product of the Month!
Painted Illusions 12″ x 12″ (30.5 x 30.5 cm) Designer Series Paper
Beautiful watercolors and whimsical patterns make up this one-of-a-kind paper. Make a wide variety of projects with this paper that is sure to dazzle!
Welcome to the newest Make My Monday bi-weekly challenge #270. Our host and fearless leader, Caz, chose Clean & Simple for the theme.
When you finish here, please visit the challenge site to see what the rest of the very talented design team members created. Then, don’t forget to upload your creations to both galleries. We look forward to seeing your creations there!
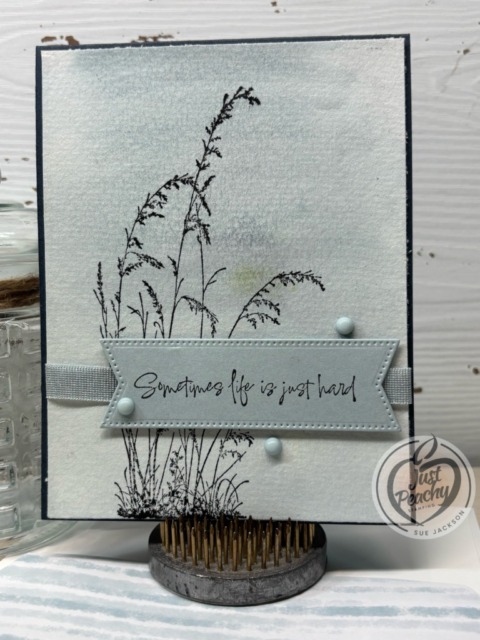
Here’s my CAS card:
I used watercolor paper for the front of the card, and just added a light Cloud Cover wash on the paper.
Clean & Simple:
Unless otherwise noted, I used multipurpose liquid glue to adhere the pieces together
The Secret Sea base measures 5-1/2 by 8-1/2 inches, scored at 4-1/4 inches
The watercolor paper measures 4-18 by 5-3/8 inches
After stamping the Secret Sea Prairie Grass on the watercolor paper, I trimmed along the bottom so that the grass stamp would be on the bottom edge
The front sentiment, from the Prairie Grass stamp set, was stamped using Secret Sea ink on Cloud Cover cardstock, then cropped using a banner die from Stylish Shapes die set
I needed to anchor the sentiment banner, so I simply added a length of the Cloud Cover ribbon
It’s easy to adhere the ends on the back using the tear & tape adhesive
When adding dimensionals to the back of the sentiment banner, make sure they will straddle the ribbon
I finished off the front with three Cloud Cover dots
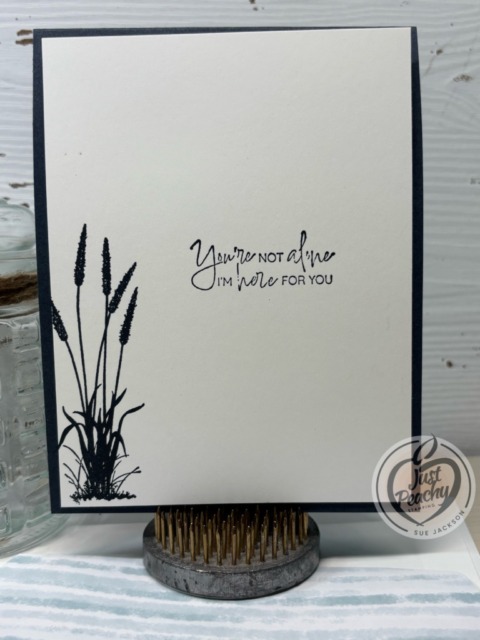
The white card for the inside measures 4 by 5-1/4 inches and I stamped the sentiment and prairie grass in Secret Sea
I used a piece of the Cloud Cover 6 by 6 inch DSP for the envelope flap and trimmed it to 2-1/2 by 6 inches
Then, I punched a 1-inch circle from a scrap of Secret Sea DSP and ran it through my XYRON create-a-sticker for the envelope seal
With that, I’d completed this coordinated card, envelope, and envelope seal set.
What better way to earn the January Product of the Month? Bonus Days & Product of the Month – Yes, Please!
Versatility is key! With the Fabulous Sayings Stamp Set, you’ll always have the right words on hand—whether you’re creating birthday cards, thank-you notes, or a cheerful hello.
You can purchase the Product of the Month item for only $5 USD | $5 CAD when you spend $75 USD | $100 CAD or more in a single order. I’ve already ordered this item and am looking forward to adding these sentiments to my other sentiment stamp sets.
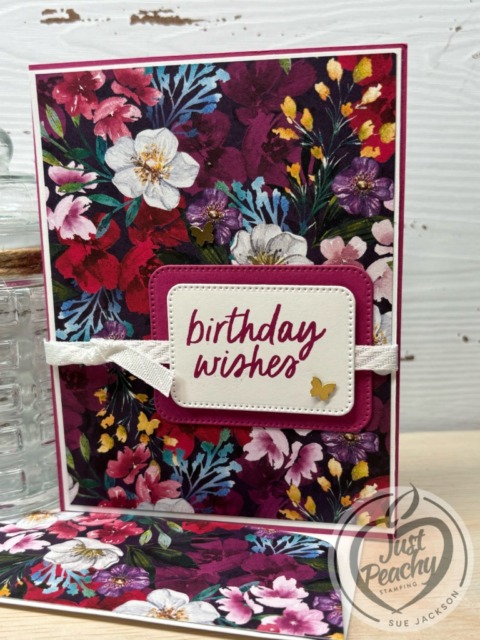
Welcome to the newest Make My Monday bi-weekly challenge #269. Our host, Melissa, chose Using Patterned Paper for the theme.
When you finish here, please visit the challenge site to see what the rest of the very talented design team members created. Then, don’t forget to upload your creations to both galleries. We look forward to seeing your creations there!
Here’s my patterned paper easy-peasy card:
Creating the Easy-Peasy Card:
The Berry Burst base measures 8-1/2 by 5-1/2 inches, scored at 4-1/4 inches
Trim a piece of white cardstock to 4-1/8 by 5-3/8 inches for the mat
When I was making Christmas cards, I cropped so many arches from white cardstock, and I kept the negative of the arches to use for mats on future cards
The Regal Winter DSP (designer series paper), which is retired, measures 4 by 5-1/4 inches
Trim another piece of the DSP to 6 by 2-1/2 inches for the envelope flap
Don’t forget to punch a 1-inch circle of coordinating DSP and run it through your XYRON create-a-sticker for the envelope seal
I cropped the white and Berry Burst labels from scraps using the Nested Essentials die set
Unless otherwise noted, I used multipurpose liquid glue to adhere pieces together
After adhering the DSP to the white cardstock, I wrapped a length of white ribbon around the paper and tied it in a square knot
Then I adhered the Berry Burst label under the ribbon
I added dimensionals under the sentiment label making sure to straddle the ribbon
The white cardstock for the inside measures 4 by 5-1/4 inches, and I stamped the birthday sentiment in Berry Burst
Finally, I added brushed brass butterflies to the front of the card
With that, I’d finished this coordinated card, envelope, and envelope seal set.
Thank you for stopping by today!
Have a Peachy Day!
Sue
It’s Time for Bonus Days!
Here’s a video explaining the BONUS DAYS!
What better way to earn the January Product of the Month? Bonus Days & Product of the Month – Yes, Please!
Versatility is key! With the Fabulous Sayings Stamp Set, you’ll always have the right words on hand—whether you’re creating birthday cards, thank-you notes, or a cheerful hello.
You can purchase the Product of the Month item for only $5 USD | $5 CAD when you spend $75 USD | $100 CAD or more in a single order. I’ve already ordered this item and am looking forward to adding these sentiments to my other sentiment stamp sets.
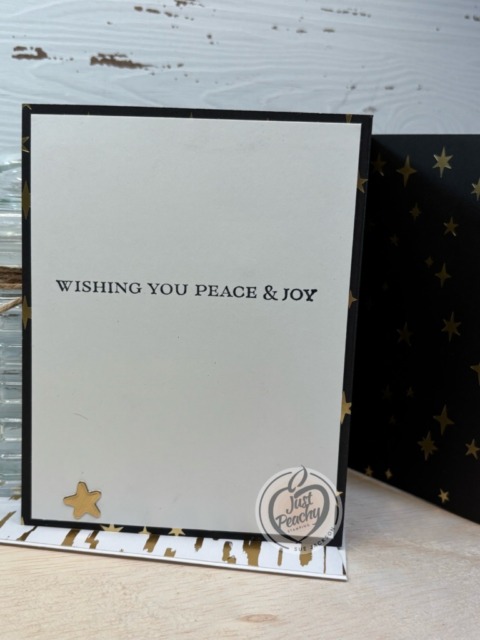
Welcome to the newest Make My Monday bi-weekly challenge #267. Our host, Caz, chose A Quickie CAS Christmas Card for the theme. I was able to combine this card with the Creative Crafters Challenge #95, where the theme is always Anything Goes, which is also going live today.
When you finish here, please visit both challenge sites to see what the rest of the very talented design team members created. Then, don’t forget to upload your creations to both galleries. We look forward to seeing your creations there!
Here’s my CAS Christmas card:
This gorgeous paper, the Traditions of Christmas 12″ by 12″ Specialty DSP, from the September – December mini catalog completely carries this card. It’s absolutely stunning! I paired it with Old olive and Real Red cardstock and a greeting from the Peace on Earth stamp set.
What I Did:
The Old Olive base measures 8-1/2 by 4-1/2 inches, scored at 4-1/4 inches
I trimmed the Real Red mat to 4-1/8 by 5-3/8 inches
The DSP measures 4 by 5-1/4 inches
Don’t forget to trim a coordinating piece of DSP to 6 by 2-1/2 inches for the envelope flap
I also punched a 1-inch circle from DSP and ran it through my XYRON create-a-sticker for the envelope seal
After trimming the red cardstock, I cropped the circle from the center of the mat using the largest circle die from the Stylish Shapes set
I stamped the outside and inside sentiments using Tuxedo Black ink on white cardstock
I cropped the outside sentiment using the next smaller circle die from Stylish Shapes
The inside piece of cardstock measures 4 by 5-1/4 inches
The only place I used dimensionals was behind the white circle Merry Christmas sentiment
For the other pieces of the card, I used multipurpose liquid glue to adhere them together
I adhered the red cardstock to the base
Next, I wrapped a piece of Real Red ribbon around the front of the card and tied it in a square knot
Then I adhered the DSP to the red cardstock, and anchored the ribbon knot in place with a mini-glue dot
Adhere the larger red circle with multipurpose liquid glue and slide it under the ribbon
Place the dimensionals on the back of the white circle making sure they straddle the ribbon, and adhere
Add five red enamel dots to the front sentiment
Adhere the inside white cardstock to the base of the card
With that, I’d finished this CAS coordinated card, envelope, and envelope seal set
Browse our selection of Last Chance paper crafting products. Additional items are added every other month. These products are available only while supplies last so be sure to buy them before they are discontinued! Discounts vary and are subject to change.
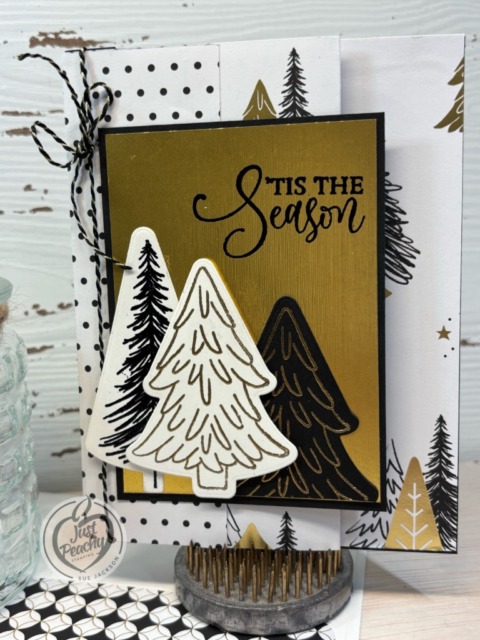
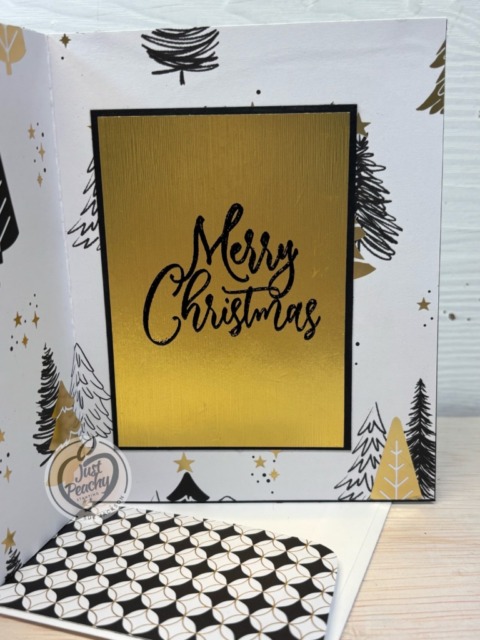
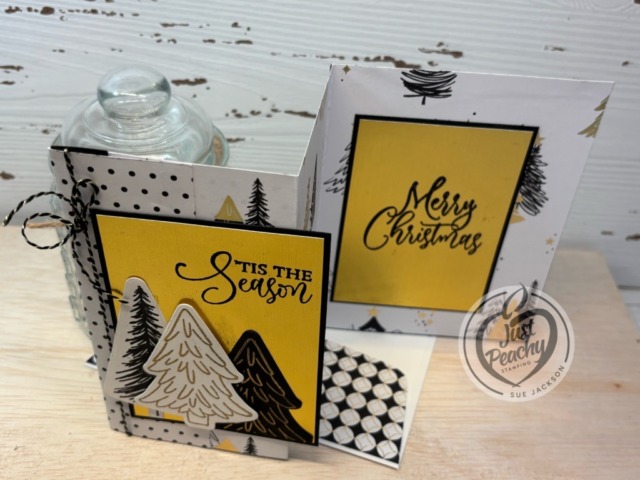
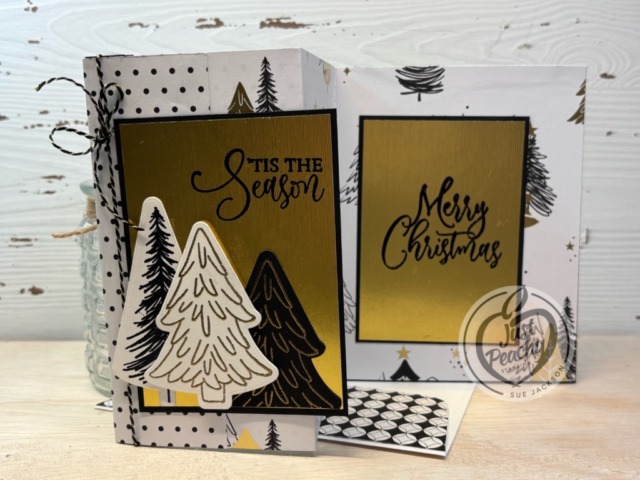
Welcome to the newest Make My Monday bi-weekly challenge #266. Our host, Heather, chose Christmas Trees for the theme. I used the Modern Christmas suite collection.
When you finish here, please visit the challenge site to see what the rest of the very talented design team members created. Then, don’t forget to upload your creations to our gallery. We look forward to seeing your creations there!
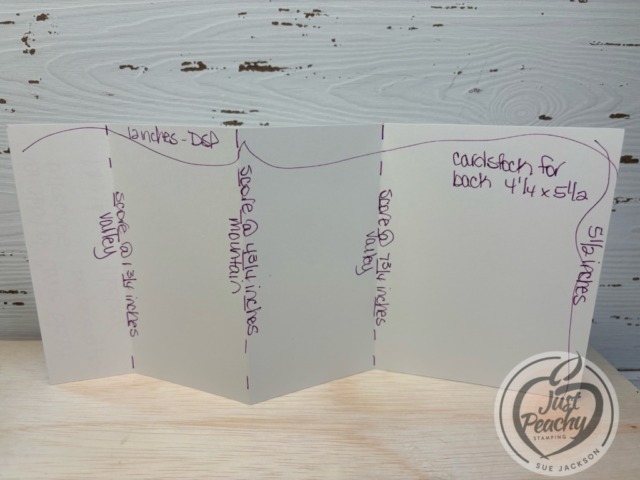
Here’s my card:
As always with a fun fold card, I will be adding this to the Creative Creases Challenge where the theme is always Anything Goes with a Fun Fold.
The extra cardstock piece for the back isn’t necessary because the card will stand up without it. However, I just wanted extra stability.
I added two pieces of 1/2 by 5-1/4 inches strips on either side of the first score line at 1-3/4 inches so I could add the baker’s twine without worrying about it tearing the DSP.
Don’t forget to trim a piece of coordinating DSP to 6 by 2-1/2 inches for the envelope flap.
I also punched a 1-inch circle from another DSP pattern and ran it through my XYRON create-a-sticker for the envelope seal.
The two black cardstock pieces for the sentiment panels measure 3 by 4-1/8 inches
The gold foil specialty DSP pieces measure 2-7/8 by 4 inches.
What I Did:
I added dimensionals on the back of the white Christmas tree on the front and the glue dot to hold the baker’s twine bow in place
For everything else, I used multipurpose liquid glue to adhere pieces together since this card is already bulky
This will fit in a medium SU! envelope, but it will require additional postage
I adhered the front flap down so the extra pieces of cardstock I used for the baker’s twine support needed to be covered
I used embossing gold and black embossing powder for the trees and sentiment on the inside and front
Embossing on the gold foil was easier than I thought it would be
For all areas to be embossed, make sure you wipe down the papers using your embossing buddy
Cover the areas with either black or gold embossing powder and heat set using your heat tool
Make sure to allow the embossed images to cool before cropping to prevent smudging
Crop the trees using the Ornamental Christmas dies included in the suite of products
Adhere both sentiment panels together
Add liquid glue on the left half of the front sentiment panel and adhere it to the front flap
Adhering to just the front flap is especially important if you are not going to glue the flap down
After adhering the front sentiment, open the card and position the inside sentiment face down on the back of the front sentiment
This will allow you to make sure you line up both sentiment pieces so the inside doesn’t show when the card is closed
Add liquid glue to the back of the inside sentiment panel, then fold the back of the card over the panel
TA-DA! Perfect placement!
I did add another holiday sentiment on the back of the card, which has room for a personal message as well
With that, I’d completed this coordinated card, envelope, and envelope seal set.
You’ve asked, and we’ve answered! Get ready for our first-ever Black Friday sale with up to 40% off the most useful, needed, irresistible Stampin’ Up! products at deeper discounts than ever before. Shop between November 25 to December 1 so you can create more by spending less during this limited-time-only sale!
Promotion Details
Sales Period: November 25–December 1
Ordering Deadlines
Phone: December 1, 2025, at 6:59 p.m. (MT)
Online: December 1, 2025, at 11:59 p.m. (MT)
40% off
Stampin’ Blends
Paper Trimmer and blades
Ink refill bundles
25% off
Select adhesive
15% off
Select cardstock
Shop the full selection of discounted products online.
Products are available while supplies last.
Orders will likely arrive in time for the holidays.
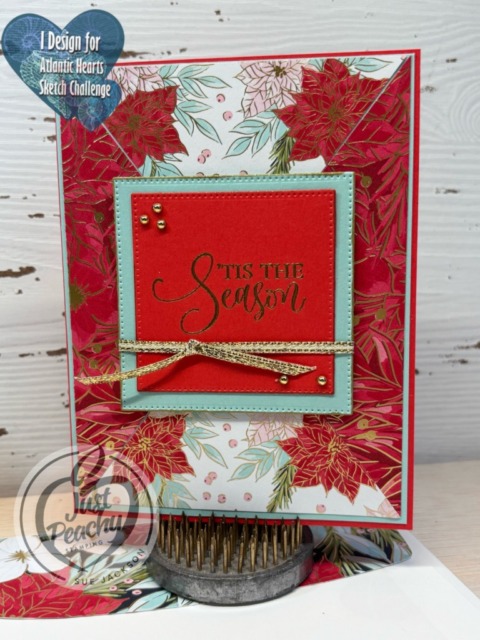
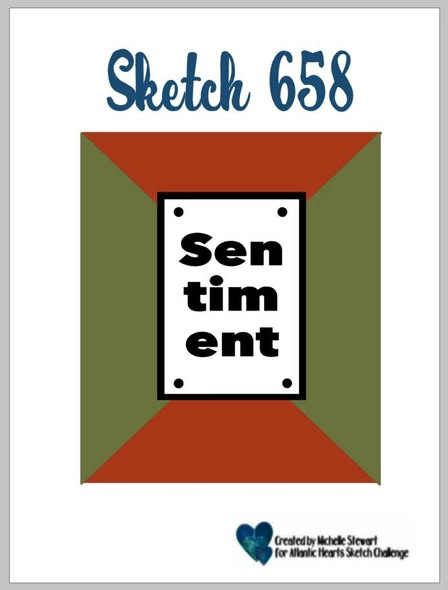
Melissa, our host for the Sparkles Christmas Challenge, chose Poinsettias for the theme. I used the AHSC #658 sketch for the layout.
Please check out the challenges pages for the creations by the other very talented design team members. When you’ve created your own card for either, or both, of the challenges, please don’t forget to upload them to the challenges. We’d love for you to play along.
Here’s my card:
Here’s the AHSC sketch #658:
Measurements:
The Real Red base measures 8-1/2 by 5-1/2 inches, scored at 4-1/4 inches
The Pool Party mat measures 4-1/8 by 5-3/8 inches
I used two pieces of 4 by 5-1/4 inch pieces of DSP (designer series paper) for the front of the card, which will allow me to make another card using the same layout
Line up the top left corner to the bottom right corner diagonally on your trimmer for each piece of DSP, and trim
Carefully realign the DSP to be able to trim from the top right corner to the bottom left corner
If you want to just use the two sides of the DSP for the opposite sides of the layout, you do not need to trim another piece of DSP
I used scraps of the red and Pool Party cardstock to create the sentiment blocks, cropping them using squares from the Stylish Shapes die set
Trim a piece of white cardstock to 4 by 5-1/4 inches for the inside of the card
Trim a coordinating piece of DSP to 6 by 2-1/2 inches for the envelope flap
Punch a 1-inch circle from DSP and run it through your XYRON create-a-sticker for the envelope seal
What I Did:
Unless otherwise noted, I used multipurpose liquid glue to adhere pieces together
Adhere the Pool Party at to the red base
After dry fitting your DSP pieces, adhere to the Pool Party mat, permanently adhere the pieces
If the pieces do not line up perfectly, let the differences meet in the center because the sentiment block will cover any issues
Use your embossing buddy to wipe down the red cardstock and stamp the sentiment using Versa Mark ink
Cover the sentiment with gold embossing powder and heat set with your heat tool
Crop both the red sentiment panel and the Pool Party panel
I still have a gold Wink of Stella brush so I outlined both pieces
Adhere the red cardstock to the Pool Party panel
Wrap a piece of gold ribbon around the panels and tie in a square knot
Add dimensionals to the back of the sentiment blocks making sure they straddle the ribbon
Adhere the sentiment to the front of the card
Add small gold festive pearls to the sentiment panel
Stamp the inside sentiment using red ink and adhere to the inside of the card
You’ve asked, and we’ve answered! Get ready for our first-ever Black Friday sale with up to 40% off the most useful, needed, irresistible Stampin’ Up! products at deeper discounts than ever before. Shop between November 25 to December 1 so you can create more by spending less during this limited-time-only sale!
Promotion Details
Sales Period: November 25–December 1
Ordering Deadlines
Phone: December 1, 2025, at 6:59 p.m. (MT)
Online: December 1, 2025, at 11:59 p.m. (MT)
40% off
Stampin’ Blends
Paper Trimmer and blades
Ink refill bundles
25% off
Select adhesive
15% off
Select cardstock
Shop the full selection of discounted products online.
Products are available while supplies last.
Orders will likely arrive in time for the holidays.
Welcome to Just Peachy Stamping by Sue Jackson: an independent Stampin' Up demonstrator.
Through Stampin' Up!, I happily share my love of papercrafting through sales, classes, small stamping group meet-ups and workshops. I think that being a teacher in my "real life", I have a unique approach to sharing my fantastic hobby. I look forward to connecting with you!