
Welcome to the newest Make My Monday bi-weekly challenge #222. Our host for this challenge, Dawn, chose Transport as the theme. When you finish here, please visit the challenge site to see what the rest of the very talented design team members created. Then, don’t forget to upload your creations to our gallery. We look forward to seeing your creations there!
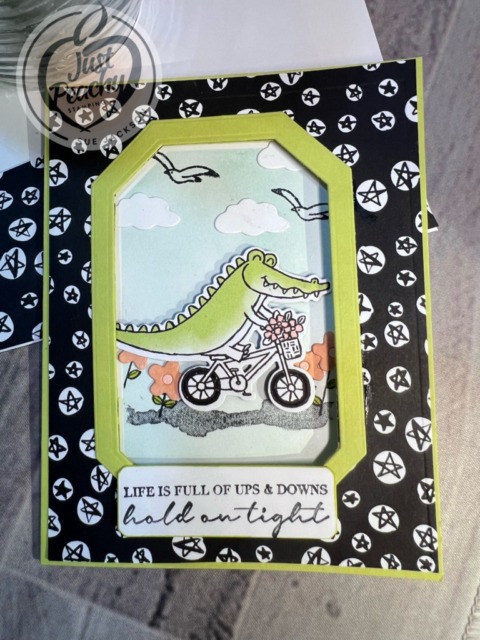
Here’s my Zany Zoo fun fold card:


Of course, posting a fun fold means that I’ll also be entering this in the Creative Creases challenge!

Let me start by saying that one night last week, I went down the rabbit hole of the internet by clicking, then clicking again, and again. Then, I had no way back to the video tutorial for this card, but thankfully I wrote down the dimensions of the inside, smaller card. Therefore, I am dividing the measurements and directions into Part 1 for the outside card, and Part 2 for the inside card.
Part 1 – the basic card
- The Lemon Lime Twist base measures 8-1/2 by 5-1/2, scored at 4-1/4 inches.
- The Zoo Crew DSP (designer series paper measures 4-1/8 by 5-3/8 inches. I also trimmed a piece to 6 by 2-1/2 inches for the envelope flap. Then, I punched a 1-inch circle from the DSP and ran it through my XYRON create-a-sticker backside up for the envelope seal.
- Use multipurpose liquid glue to adhere all the front cardstock and DSP pieces together.
- Stamp the sentiment on the front using Momento Tuxedo Black ink.
- Crop the sentiment using the second smallest Countryside Corners die. Outline the sentiment in Lemon Lime Twist ink.
- Using a Countryside Corner die, crop out an opening in the middle (or as close as possible) of the front of the card. Crop another cut using the same die out of scrap cardstock to use in Part 2.
- Next, use the same size die and the next larger die to cut out a frame, as pictured below.
- Adhere the frame and sentiment to the front of the card.
- That’s it for the basic card front.
Part 2 – Masking and coloring the “inside” card:
- Trim a piece of white cardstock to 7-3/4 by 5-1/8, scored at 3-7/8.
- Use removable tape to temporarily adhere the inner card in place making sure that the fold side is on the right hand side of the card.
- Use a pencil and a very light touch to add tick marks showing where the cropped center of the front of the card appears on the inner card.
- Remove the inner card so you can work on it without making a mess on the outer card.
- Use the negative of the extra cropped die from part 1 as a mask on the inner card by lining up the sides of the mask with the tick marks you lightly drew.
- I used Post-It note tape to adhere the mask to the front of the inner card.
- Using a blending brush, add layers of color to the front of the inner card using Pool Party ink. When you get the color intensity you want, remove the mask and decorate
Part 2 continued: Decorating
- Unless otherwise noted, I used liquid glue to adhere the pieces together when decorating.
- The bike riding alligator was cropped from the Zoo Crew DSP using the coordinating dies. I love when the DSP images match up with the coordinating dies.
- Add dimensionals to the back of the alligator.
- Using the cropped mask again, I stamped the ground in Tuxedo Black ink. This stamp came from the Wildlife Wonder stamp set.
- Using the flower stamp and coordinating dies from Fluffiest Friends, I stamped and cropped flowers from a scrap of Petal Pink cardstock.
- The bird stamp comes from the Beach Day Bundle.
- The cloud die cuts were made using the cloud die from the Zany Zoo dies.
- Then, I stamped the sentiment on the inside of the card and added the trio of flowers from Fluffiest Friends stamp set.
- Finally, line up your blended ink-masked area so it lines up with the cropped middle of the Lemon Lime Twist/DSP card front. Then adhere the inside card to the back of the base of the card.
- With that, I’d finished this Zany Zoo fun fold coordinated card, envelope, and envelope seal set.
Thanks for stopping by today!
Have a Peachy Day!
Sue
Colors Used:
Supplies Used:
Shopping in the current mini-catalog is a wonderful way to shop!
Click on the image/link below to browse and download the mini-catalog!


