Welcome back to the monthly Stampin’ UP! Demonstrators Fun Fold Blog Hop. If you love fun folds, you’ve come to a hop filled with really great projects by some very talented fellow demonstrators. When you finish here, I hope you will hop along with the rest of the demos using the links below.
I’m also using this fun fold for the Atlantic Hearts Sketch Challenge #666, and here’s the sketch:
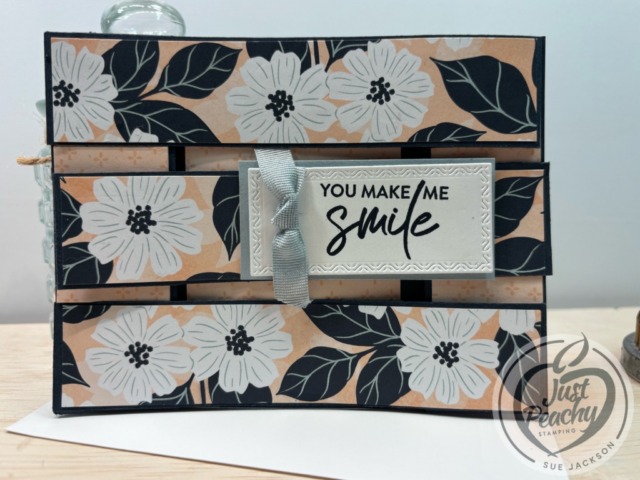
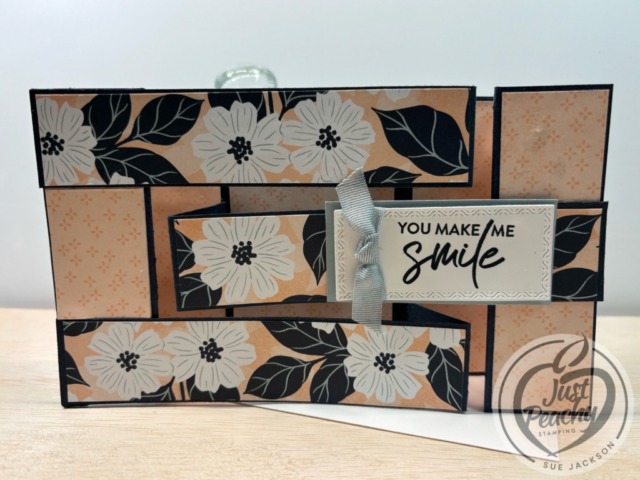
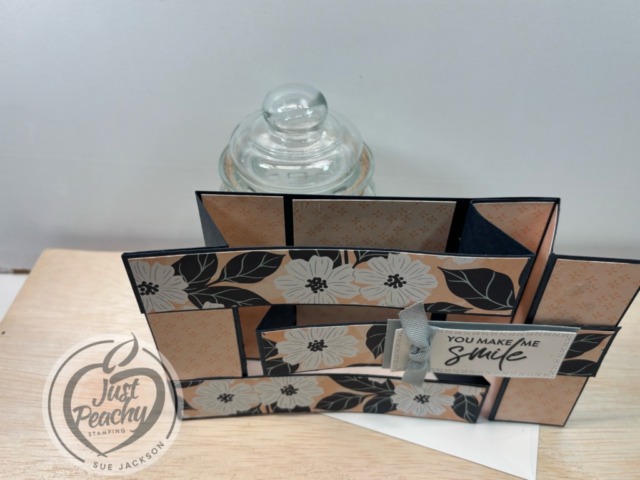
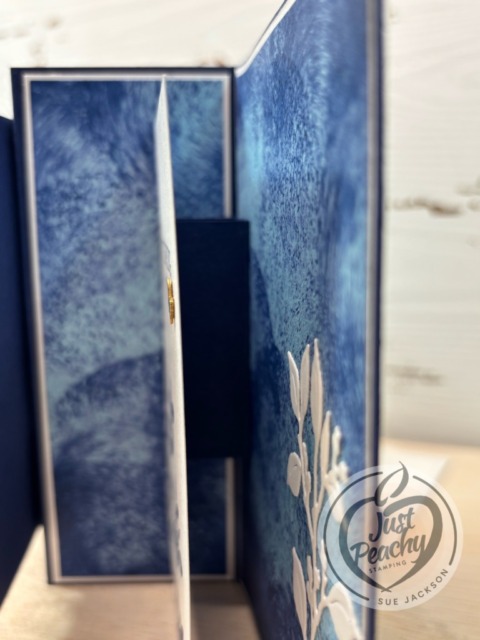
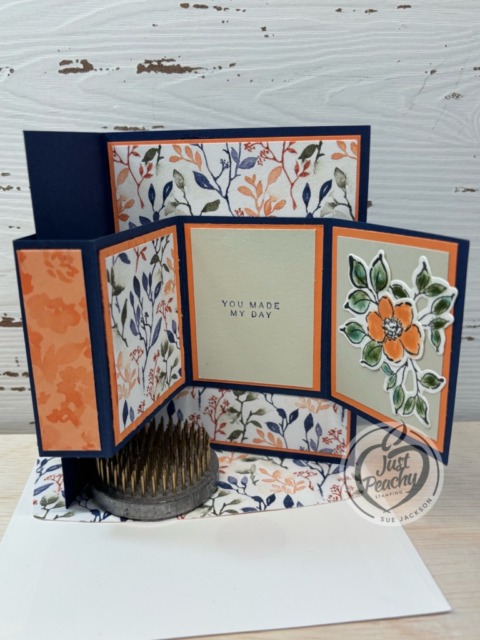
Without further ado, here’s my Triple Bridge Z-fold card:
As soon as I saw this Lovely Blossoms DSP (designer series paper) pattern on pre-order for the online exclusives, I knew I had to have it! The combination of Petal Pink, Secret Sea, pops of Cloud Cover, and the white flowers is absolutely gorgeous!
Connie Stewart’s Video:
I found this video posted by Connie Stewart for this card, and you can watch it here. I’ve watched it three times, once before doing anything with paper. The second time, I followed along and paused when I needed to do so to trim my pieces. When I had everything trimmed, I watched it a third and fourth time to help me put the pieces together. Please don’t let the number of times I watched the video scare you away because if you’ve ever made a z-fold card, you can do this.
In her video, Connie says that the more you play with the card, the easier it will fold back up properly. Even after burnishing each of the score lines as both a valley and as a mountain, I still need to play with the card to loosen up the folds.
I would strongly suggest making this for the first time using retired DSP, and I wish I had done so. I would rather have 1/8 inch borders around my DSP pieces. Connie’s measurements are for 1/4 inch borders. Therefore, I needed to adjust the sizes going up 1/8 inch for the length and width for each piece.
Back to the Stampin’ Up! Demos Fun Fold Blog Hop:
We all hope you will follow the links below and hop along with us. There’s so much inspiration to be found here. We’d love to see what inspires you to create a fun fold as well. Don’t forget to upload it to the Creative Creases challenge!
If you get lost along the way, you can always come back here to find the next demo in line.
What better way to earn the January Product of the Month? Bonus Days & Product of the Month – Yes, Please!
Versatility is key! With the Fabulous Sayings Stamp Set, you’ll always have the right words on hand—whether you’re creating birthday cards, thank-you notes, or a cheerful hello.
You can purchase the Product of the Month item for only $5 USD | $5 CAD when you spend $75 USD | $100 CAD or more in a single order. I’ve already ordered this item and am looking forward to adding these sentiments to my other sentiment stamp sets.
Welcome back to the monthly Stampin’ UP! Demonstrators Fun Fold Blog Hop. If you love fun folds, you’ve come to a hop filled with really great projects by some very talented fellow demonstrators. When you finish here, I hope you will hop along with the rest of the demos using the links below.
It’s just a given that fun fold cards also post to the Creative Creases Challenge. Debbie Mageed at Secret Stamper coordinates both this hop and the challenge. I can always find a new fold or other inspiration from the challenge. I would love to see your creations there as well.
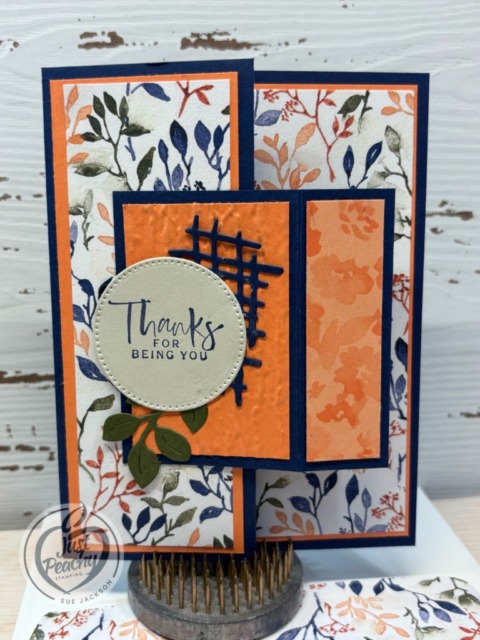
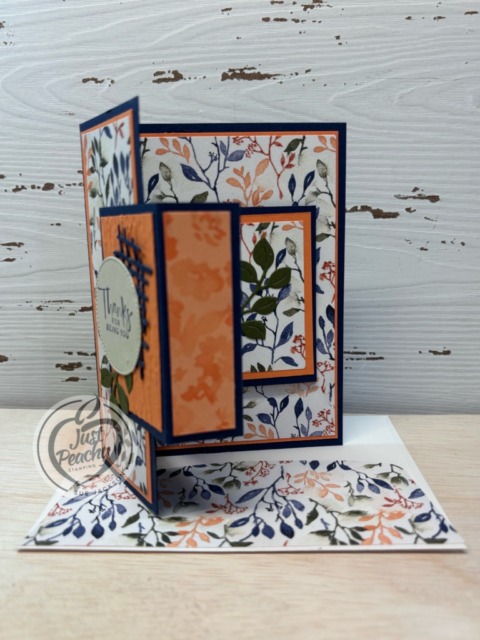
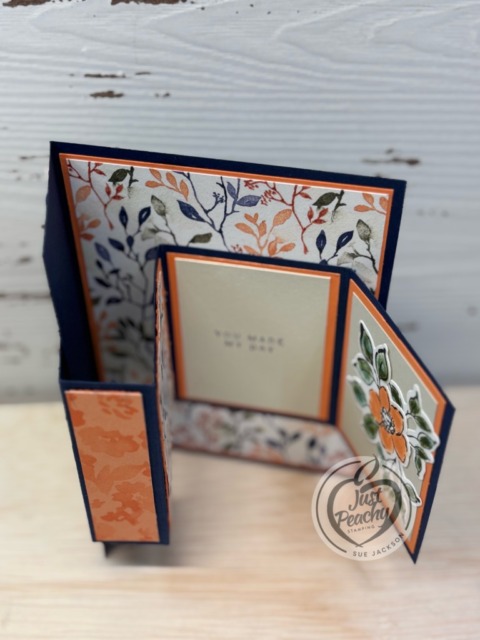
Here’s my card:
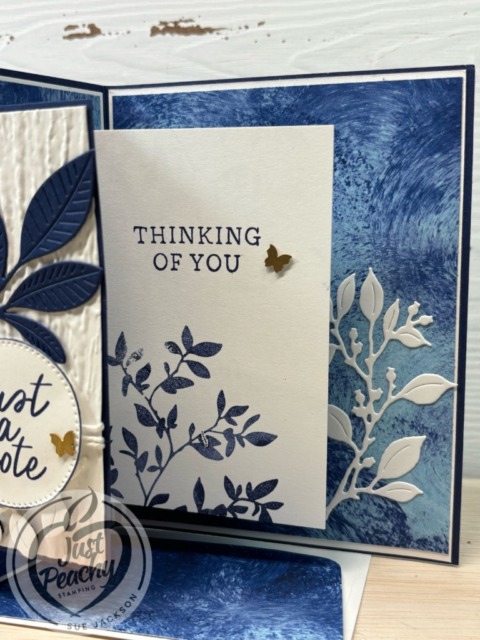
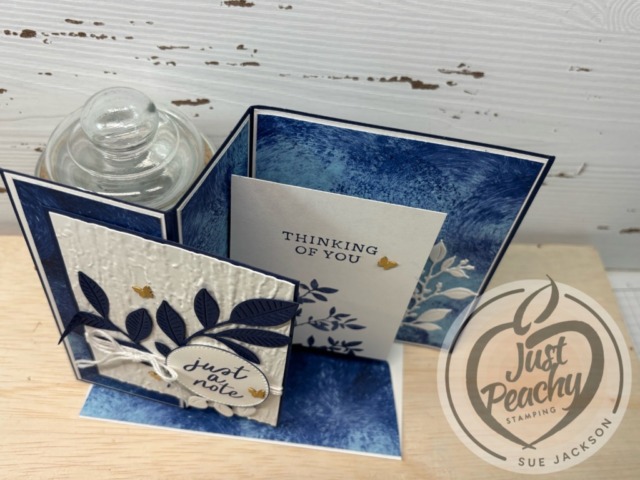
This card starts with a basic z-fold card, and then has a pop-up piece when opened, which she called a double-decker pop-out card. I found this card on Sue Campfield’s YouTube channel, and you can see her video here. Sue used 1/4 inch borders for her cards, and I used 1/8, which explains the difference in measurements. Her video is from May, 2023, which means the products used are retired. The Nature’s Walk Suite of products I used will be available on January 6, 2026 in the online exclusive products.
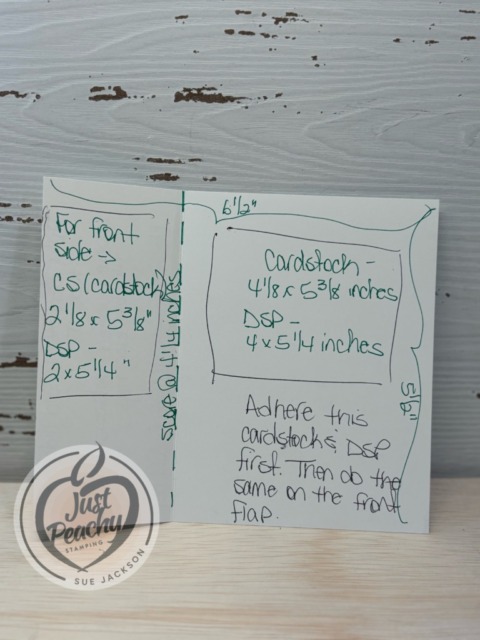
Measurements:
The Night of Navy base measures 5-1/2 by 8-1/2 inches, scored at 2-1/8 and 4-1/4 inches
There are three white mats, the first measure 5-1/8 by 4-1/8 inches for the back of the base
The two bases for the flaps each measure 2 by 5-3/8 inches
The Night of Navy piece for the front of the card measures 3-3/8 by 4-3/8 inches
After dry embossing a piece of white cardstock using the Birchwood EF, trim it to 3-1/4 by 4-1/4 inches
The white piece of cardstock for the pop-up panel measures 4-1/4 by 3 inches
The Night of Navy pop-up mechanism piece measures 3 by 2-1/4 inches, scored on the long side at 3/4, 1-1/2, and 2-1/4 inches
I used the upcoming Nature Walk DSP (designer series paper) for my card and needed to trim three pieces
The first two for the flaps each measure 1-7/8 by 5-1/4 inches, and the one in the back measures 4 by 5-1/4 inches
HINT: I wanted the pieces of DSP to line up after being trimmed, so I needed to trim it with the backside pattern facing up
You could also trim the back piece then the two flaps but remember to trim from right to left
I needed a piece of DSP measuring 6 by 2-1/2 inches for the envelope flap
I had enough of the white embossed cardstock leftover to punch a 1-inch circle and ran it through my XYRON create-a-sticker for the envelope seal
I used leftover pieces of white and Night of Navy cardstock for the sentiment and leaf die cuts
The white leaves die cuts were leftover from another project
Sue Campfield’s Video:
I’ve made a number of z-fold cards and have made a number of variations of the z-fold as well. Following Sue’s video, I was able to easily fold and adhere the pop-up mechanism. It would be so much easier to follow her video for that part of the card.
What I Did:
Unless otherwise noted, I used multipurpose liquid glue to adhere pieces together
I started by adhering the DSP to the white cardstock pieces, then adhered them to the base of the card
I used the ____ stamp set for the sentiments
Using Night of Navy ink, I stamped the front sentiment on a leftover piece of white cardstock
Crop the sentiment using a circle die from the Stylish Shapes die set
Next, I stamped the inside sentiment in Night of Navy ink
Since I wanted to have the branches/leaves on the inside piece to be lighter, I used stamped off Night of Navy before stamping on the white cardstock
After adhering the Night of Navy branches to the embossed piece of cardstock, I wound white baker’s twine around the cardstock three times
It helps to use some tear & tape to the back of the cardstock to hold the ends of the baker’s twine in place
Next, I added a mini-glue dot under the baker’s twine to pull the three pieces together where I wanted to place the double bow
I used another glue dot to adhere the bow
Add dimensionals under the sentiment circle so they straddle the baker’s twine and adhere
Adhere the inside panel on the pop-up mechanism
The white cardstock branches were after-thoughts, and I added dimensionals on the piece for the front and slipped it under the sentiment
Then I adhered the large leaves/branches to the inside base of the card
Finally, I added three brass butterflies on the outside and one on the inside popped-up piece
With that, I’d finished this coordinated card, envelope, and envelope seal set.
Back to the SU! Demos Fun Fold Blog Hop:
We all hope you will follow the links below and hop along with us. There’s so much inspiration to be found here. We’d love to see what inspires you to create a fun fold as well. Don’t forget to upload it to the Creative Creases challenge!
If you get lost along the way, you can always come back here to find the next demo in line.
Welcome back to the monthly Stampin’ UP! Demonstrators Fun Fold Blog Hop. If you love fun folds, you’ve come to a hop filled with really great projects by some very talented fellow demonstrators. When you finish here, I hope you will hop along with the rest of the demos using the links below.
I made my great-nieces and great-nephew fun fold cards for Halloween. My 9 year-old great niece loved hers and I said that I was doing something special for Christmas cards for them. That sent me on the hunt for new-to-me fun folds.
Here’s my open bay window card:
It’s just a given that fun fold cards also post to the Creative Creases Challenge. Debbie Mageed at Secret Stamper coordinates both this hop and the challenge. Hopefully, you will be inspired to upload your own fun fold project to the challenge!
I’m also going to upload this card to the Critter Crazy Challenge since I have the dog and squirrel on the front and center, and added the chipmunk on the back. I hope that qualifies for Critter Crazy.
I found this card and video tutorial posted by Creative Moments By G on October 14, 2025, and loved it. After watching the video the first time, I sat down and used their measurements to trim all my paper, then followed along with the YouTube video while creating my test card. I probably should’ve used retired DSP (designer series paper), but live and learn. I also created a template for myself to follow using a 1/8 inch margin instead of a 1/4 inch margin.
Template & Practice Card:
Here’s my practice card, without the acetate and floating front:
Here’s the template:
What I Did:
I’d strongly suggest watching the video by Creative Moments by G, which I linked above just to see how the card goes together
I used the Jolly Delivery stamp set and North Pole Delivery 12″ by 12″ Specialty DSP, which includes two sheets of precut designs
Just a little side note – I can not believe that I was able to get all 4 of the Christmas village DSP pattern strips to line up so perfectly
Before I started putting anything together, I first trimmed all the paper I would need which made it much easier for me to follow along with the video
Since this card is already bulky, I only used multipurpose liquid glue and tear & tape to adhere all the pieces together
Make sure you let the liquid glue dry completely
The layers of the sentiment panel on the front were cropped using two of the Nested Essential dies
The three glittery dots come from the low-profile sparkly dots set
For the bay window Garden Green pieces, I used the Regals 6 x 6 inch DSP
The center inside panel comes from the Pool Party pattern in the Subtles 6 x 6 inch DSP
The adorable dog pulling the gift sleigh comes from the precut designs, as does the squirrel I added behind the presents
The addition of Very Vanilla cardstock on the back is necessary for a sentiment and my personal note to my great-niece
I also used two precut pieces for the back bottom corners of the card
BIG HINT: I added cardstock layers behind all the DSP pieces, which was a mistake because the card won’t fit in the envelope
This card will be hand-delivered, so I can get an envelope better suited for the bulk
The practice card only has one layer of added cardstock, and that’s behind the inside center DSP panel
The practice card easily fits in a medium envelope, and will do so even after the acetate and front pieces are added
This card will require additional postage
It truly took longer to trim all the paper than it did to put this card together, so I hope you will add it to your fun fold rotation
With that, I’d finished this coordinated card, envelope, and envelope seal set.
Back to the Stampin’ Up! Demo Fun Fold Blog Hop:
We all hope you will follow the links below and hop along with us. There’s so much inspiration to be found here. We’d love to see what inspires you to create a fun fold as well. Don’t forget to upload it to the Creative Creases challenge!
If you get lost along the way, you can always come back here to find the next demo in line.
You’ve asked, and we’ve answered! Get ready for our first-ever Black Friday sale with up to 40% off the most useful, needed, irresistible Stampin’ Up! products at deeper discounts than ever before. Shop between November 25 to December 1 so you can create more by spending less during this limited-time-only sale!
Promotion Details
Sales Period: November 25–December 1
Ordering Deadlines
Phone: December 1, 2025, at 6:59 p.m. (MT)
Online: December 1, 2025, at 11:59 p.m. (MT)
40% off
Stampin’ Blends
Paper Trimmer and blades
Ink refill bundles
25% off
Select adhesive
15% off
Select cardstock
Shop the full selection of discounted products online.
Products are available while supplies last.
Orders will likely arrive in time for the holidays.
Welcome back to the monthly Stampin’ UP! Demonstrators Fun Fold Blog Hop. If you love fun folds, you’ve come to a hop filled with really great projects by some very talented fellow demonstrators. When you finish here, I hope you will hop along with the rest of the demos using the links below.
It’s just a given that fun fold cards also post to the Creative Creases Challenge. Debbie Mageed at Secret Stamper coordinates both this hop and the challenge. Hopefully, you will be inspired to upload your own fun fold project to the challenge!
Here’s my card:
I was inspired by Debbie’s September Fun Fold Blog Hop card, which you can see here, and the post includes the measurements. I used her measurements to create my card. Debbie’s card used 1/4 inch margins on the mats, which I followed to a T. I’ll be creating another card using 1/8 inch margins on the mats and DSP. I also followed the directions on Patty Bennett’s of Patty Stamps video for putting the card together, Patty’s didn’t use mats on her card. They are both gorgeous!
I used the Floral Charm DSP (designer series paper), along with Basic Beige, Night of Navy, and Timid Tiger cardstock, with just a bit of Mossy Meadow scraps.
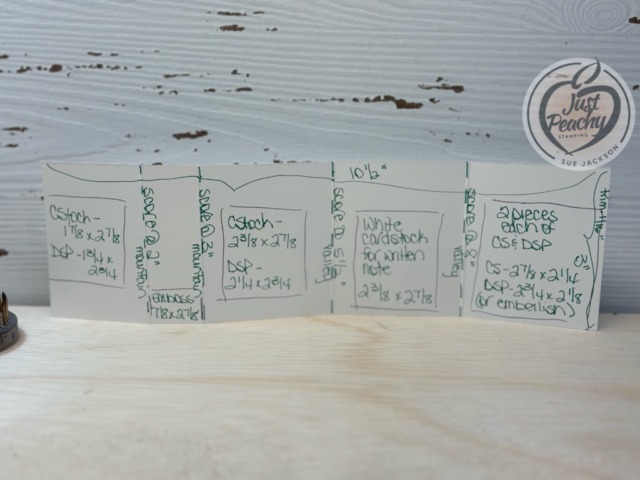
Measurements:
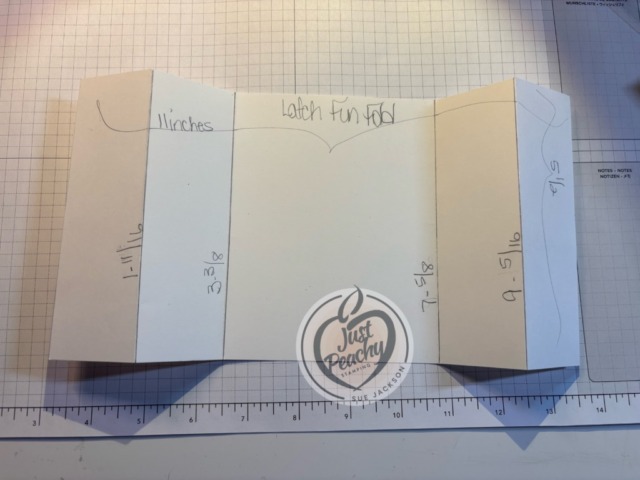
I created a template for my next trifold hidden flap card which will have narrower margins.
Here are the two pieces of this template:
These templates have a lot going on on each piece. To make it a bit clearer for me, I boxed off the cardstock and DSP measurements for each piece.
I did trim off just 1/16 of an inch for the piece that folds inward at the end to make it lay flatter.
Having Debbie’s measurements allowed me to trim all the pieces I needed before I went to Patty’s video. This prep work made the whole card come together relatively easily.
I also trimmed a piece of DSP to 6 by 2-1/2 inches for the envelope flap.
Then, I punched a 1-inch circle and ran it through my XYRON create-a-sticker for the envelope seal.
I already have the cardstock colors and DSP picked for the next card and can’t wait to put it together!
Once I saw her do it, I realized that this card looks so much more complicated than I originally thought
Following Debbie’s lead, I did add some Charming Day stamped/cropped pieces to the last inside flap instead of using another piece of DSP
I used multipurpose liquid glue to adhere all the pieces together
Since the DSP print looks water-colored, I wanted the flower and leaves on the die cuts to come out very soft
I struggled with different techniques to color the pieces and finally landed on using Q-tips and the stamp pads to do the coloring
I didn’t add any jewels or ribbon because the card is already so bulky
This card will be bulky even if leaving off the cardstock mats, so make sure you add extra postage
This card is really worth all the trimming to be able to make it over and over again because it just consists of trimming and scoring
Back to the SU! Demo Fun Fold Blog Hop:
We all hope you will follow the links below and hop along with us. There’s so much inspiration to be found here. We’d love to see what inspires you to create a fun fold as well. Don’t forget to upload it to the Creative Creases challenge!
If you get lost along the way, you can always come back here to find the next demo in line.
Welcome back to the monthly Stampin’ UP! Demonstrators Fun Fold Blog Hop. If you love fun folds, you’ve come to a hop filled with really great projects by some very talented fellow demonstrators. When you finish here, I hope you will hop along with the rest of the demos using the links below.
It’s just a given that fun fold cards also post to the Creative Creases Challenge. Debbie Mageed at Secret Stamper coordinates both this hop and the challenge. Hopefully, you will be inspired to upload your own fun fold project to the challenge!
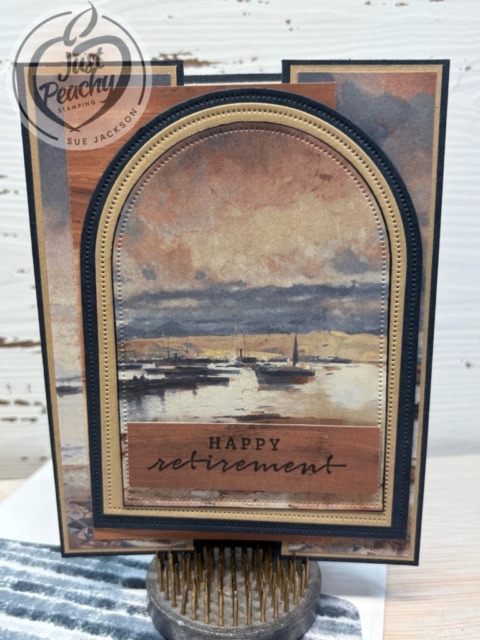
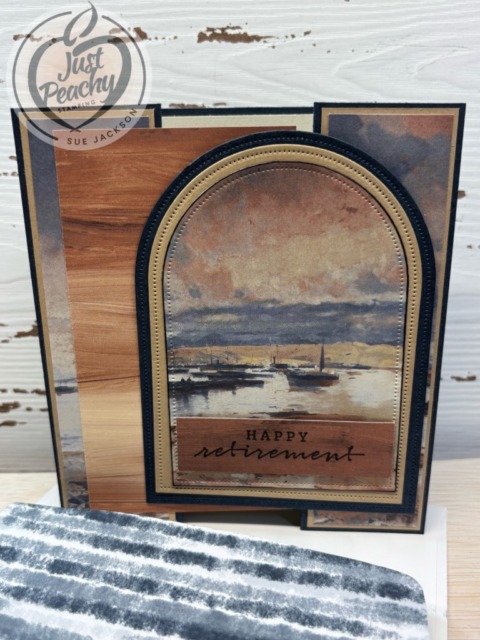
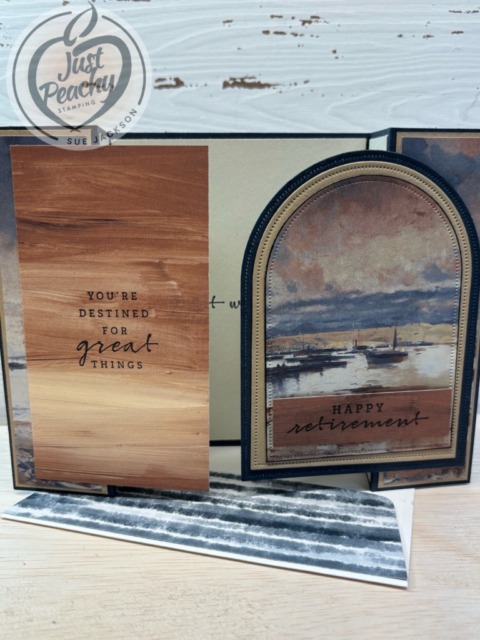
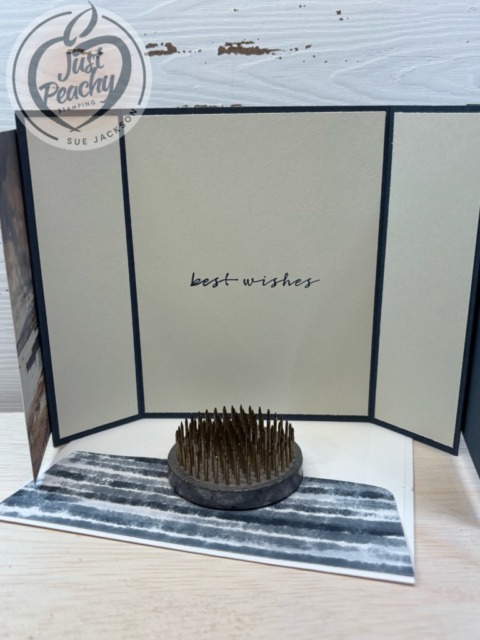
I need a retirement card which a group of people will want to sign. I used the Beautiful Gallery DSP, the Sunrise Sailing photopolymer stamp set, and the Everyday Arches die set to create a latch fold card. Here’s my card:
This gorgeous DSP is one of the two main reasons I purchased the DSP pack. I fell in love with the colors and designs because they remind me of growing up on the South Shore of Long Island and walking to the bay or boating out to the best clamming spots.
I’ve made a number of latch fold cards in both vertical and horizontal layouts. You can see some of the vertical cards here and here.
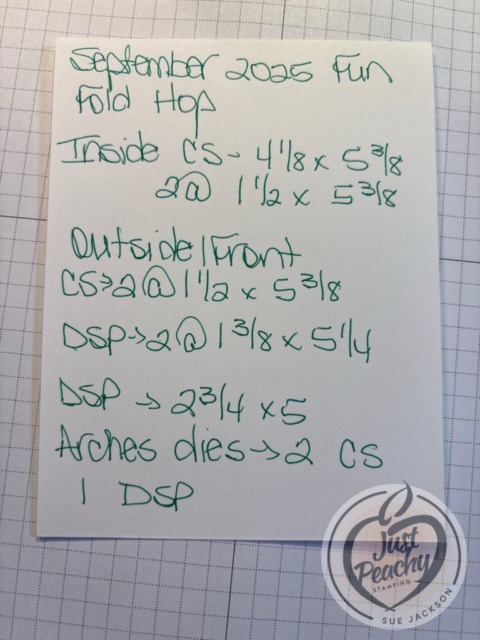
Measurements:
As with many of my fun fold cards, I have created templates for all the measurements.
Here are the templates for this latch fold card:
HINT: I find it easier to score at 1-11/16 and 3-3/8 and then flip the cardstock to the other end and score at 1-11/16 and 3-3/8. I only have to remember two measurements that way.
HINT #2: 1-11/16 is one tick mark before 1-3/4 inches if you are using the Stampin’ Up! trimmer
Some Hints:
I did plan out how I was going to trim the Beautiful Gallery DSP so I could get everything I needed from two of the 6 x 6 inch papers and still have some leftover for another card
The Cajun Craze piece of DSP used as the part to fold under the latch is the reverse side of the boats pattern
I used a scrap of the DSP for the retirement sentiment
All the sentiments come from the Sunrise Sailing stamp set and I stamped them all using Secret Sea
I am probably going to have to trim another piece of Basic Beige to adhere to the back of the card if we run out of room on the cardstock pieces on the inside
I did all my trimming, then cropping using the Everyday Arches dies, then adhered everything together
The only place where I used dimensionals was under the retirement sentiment
I adhered all the other pieces using multipurpose liquid glue
This will fit in a medium white envelopes but since it’s going to be hand-delivered.I don’t need to add extra postage, which would be necessary if mailing this
While the card looks complicated, the hardest part was trying to be very frugal when trimming and cropping the DSP because I don’t want to waste any of it; if I could, I’d buy a whole pack of just this boat paper
Back to the Stampin’ Up! Demonstrator’s Fun Fold Blog Hop:
Before you go, I hope you will hop along with us! I always learn something new from everyone on the hop, and I think you will as well. Inspiration comes from so many places. Lately I’ve been really watching cloud formations to get ideas for coloring or inking clouds on my projects. Embracing the process can lead to new and exciting end results, at least that’s what I keep telling myself.
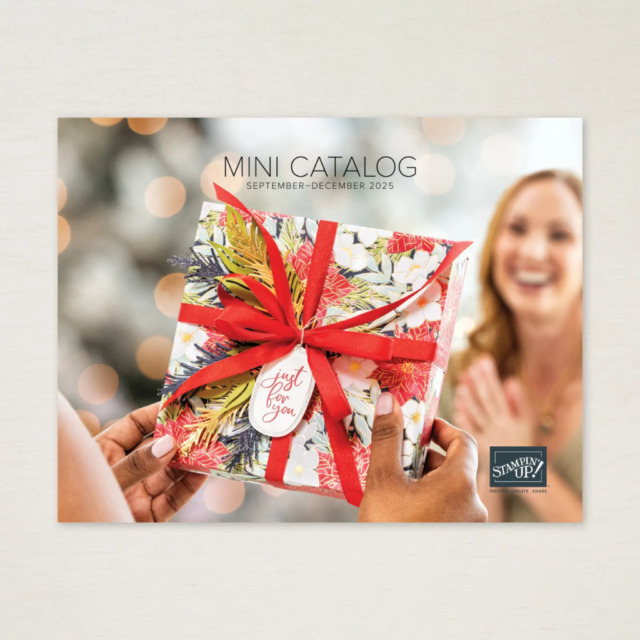
The September – December 2025 Mini-Catalog is now available!
Of course, this means there are new Online Exclusives as well! Here are some examples:
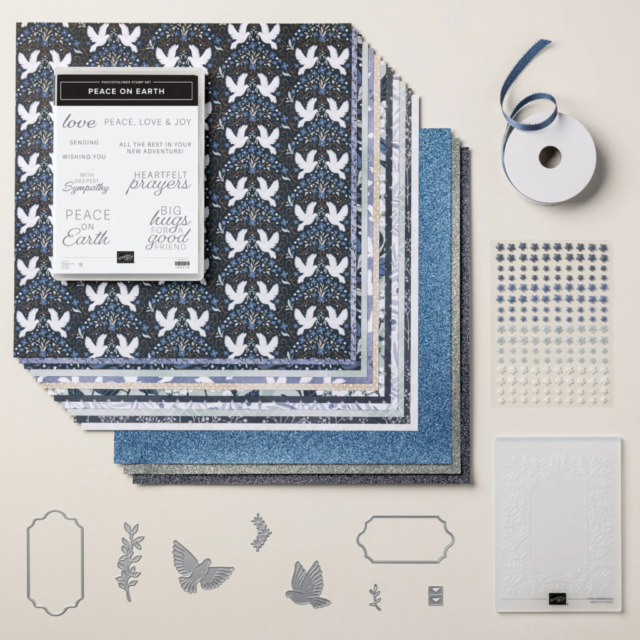
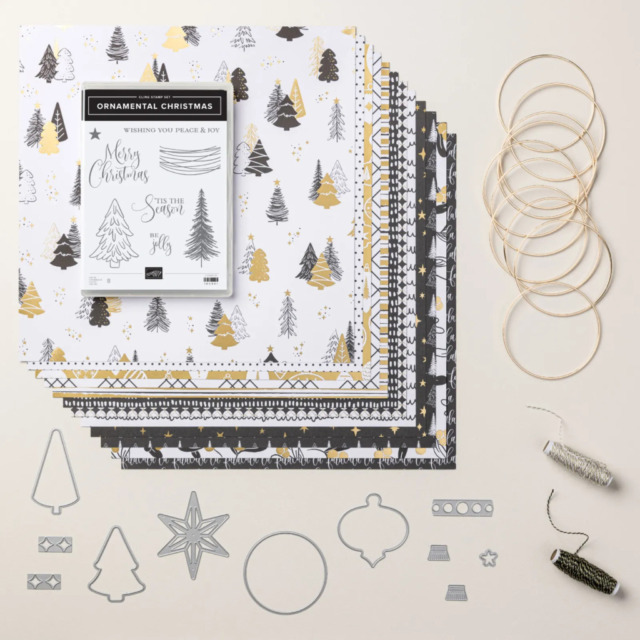
This Peaceful Garden Suite Collection is beautiful, and I love non-traditional colors for Christmas. I thought I would be able to use this suite for all my Christmas cards.
This Modern Christmas Suite Collection is absolutely gorgeous! I told myself that I wouldn’t need anything other than the Peaceful Garden Suite Collection. I was wrong. This suite is already in my cart:
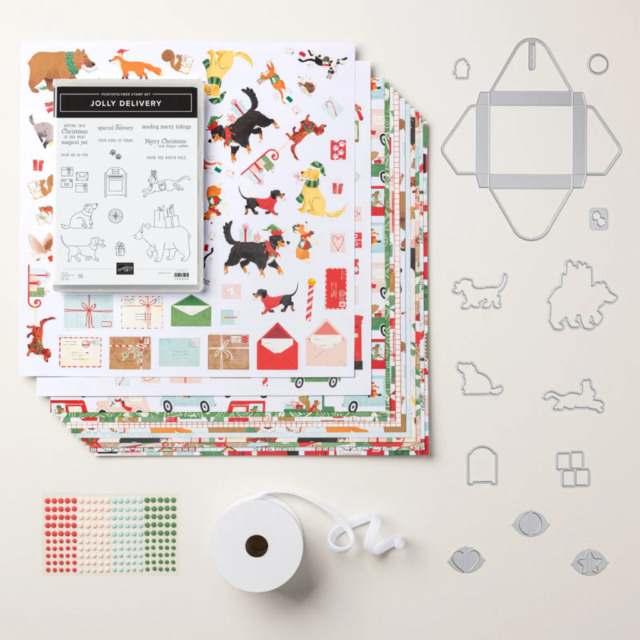
Of course, I had to get a cute Christmas critters set of products. This Jolly Delivery Suite fit the bill perfectly:
Last Chance Stamping Write Markers!
While you are shopping, make sure you pick up the Last Chance Stamping Write Markers! These markers, including the 2025 – 2027 In Color markers, are being discontinued. I love using these markers when sending cards because I can coordinate the card with the writing color. Therefore, I have all the available sets ready and waiting in my SU! cart.
If you live in the U.S. and don’t already have a Stampin’ UP! demo from whom you order, I would be honored to work with you. You can reach me at my justpeachystamping@gmail.com.
Welcome back to the monthly Stampin’ UP! Demonstrators Fun Fold Blog Hop. If you love fun folds, you’ve come to a hop filled with really great projects by some very talented fellow demonstrators. When you finish here, I hope you will hop along with the rest of the demos using the links below.
It’s just a given that fun fold cards also post to the Creative Creases challenge. Debbie Mageed at Secret Stamper coordinates both this hop and the challenge. Hopefully, you will be inspired to upload your own fun fold project to the challenge!
Here’s my double box fun fold card:
I love finding fun folds that are based on trimming and scoring, and this one fits the bill perfectly. I’ve seen these cards for a while, and finally looked into creating one. I found the directions on the site of Jill Andress from the Wandering Stamper.
Measurements:
The Secret Sea box #1 base measures 9-3/8 by 4-1/4 inches, scored at 3/8, 1-3/8, 2-7/8, and 3-7/8 inches
All of those score lines need to be burnished well into valley folds
Panels for the box #1 base measure 5-1/4 by 4 inches, 1-1/4 by 4, and I added the optional panel of 7/8 by 4 inches
The Secret Sea box #2 base measures 5-1/8 by 3-1/2 inches, scored at 3/8 and 1-3/8 inches
Panels for box #2 measure 3-7/8 by 7/8 inches and 3-5/8 by 3-3/8 inches
The white cardstock panel for the back of the card measures 5-1/4 by 4 inches
I also trimmed a piece of the Cloud Cover DSP to 6 by 2-1/2 inches for the envelope flap
Then, I punch a 1-inch circle from the roses DSP and ran it through my XYRON create-a-sticker for the envelope seal
I used a length of Secret Sea ribbon for the box
Putting the Card Together:
I recommend using Jill’s video for putting this card together as she explains everything and it’s easy to follow along
If you need help with using eighths on your paper trimmer, Jill explains exactly how to do it
Things I learned:
The Beautiful Gallery DSP is gorgeous on this card
Add the ribbon before adhering the DSP to the base of box #1
While you will be able to cover most of the ribbon using the white cardstock on the back, it’s just easier to adhere it before you get that far
Make sure you burnish your folds very well because it needs to be able to pop back into place when removed from the envelope
The optional piece of DSP on the side of box #1 really does need a piece of DSP or embossed cardstock since the card will fold flat
I like using a mat layer between the base and the DSP for cards, but that will make this card too bulky and it will require extra postage
Use multipurpose liquid glue to adhere the pieces together, with the exception of the sentiment
If you like fun folds, this one is for you! It looks very complicated, and the recipient will be completely impressed. It will be our little secret that it is much easier than it looks.
Back to the SU! Demos Fun Fold Blog Hop:
When you finish here, please follow the line-up for the blog hop. I always learn something new here and am amazed at the talent these demos possess. If you get lost, please refer back to this list.
This is the best time to check your supply of cardstock! Can you imagine the savings on shipping? That’s what I will be ordering!
Here are the details:
All order types qualify for this promotion.
Free shipping is for three days only. Orders must be closed July 25.
Free shipping automatically applies to your cart after the qualifying amount has been met, which is $75 USD | $100 CAD (before tax).
Coupon codes and Stampin’ Rewards will lower your order’s retail amount. Orders must meet the qualifying amount to be eligible for free shipping.
The additional cost for expedited shipping is not covered by this promotion.
Prepaid 3-, 6-, and 12-month Paper Pumpkin subscriptions and month-to-month subscriptions do not qualify for free shipping. Refills, past kits and add-ons do qualify toward free shipping, but you must be a subscriber to purchase. Subscriptions billed and shipped this month will be charged for the normal amount ($27.00 USD | $36.75 CAD shipping included) + tax.
If you live in the U.S. and don’t already have a Stampin’ UP! demo from whom you order, I would be honored to work with you.
Welcome to Just Peachy Stamping by Sue Jackson: an independent Stampin' Up demonstrator.
Through Stampin' Up!, I happily share my love of papercrafting through sales, classes, small stamping group meet-ups and workshops. I think that being a teacher in my "real life", I have a unique approach to sharing my fantastic hobby. I look forward to connecting with you!