Welcome to the January Creative Crafters Challenge #97, where the theme is always Anything Goes. When you finish here, please visit our challenge site to see what the rest of the very talented design team members created. Then, don’t forget to upload your creations to our gallery. We look forward to seeing your creations there!
What do you do when you realize that you need a beautiful card in a jiffy? You grab the very gorgeous Lovely Blossoms DSP (designer series paper), cardstock, some ribbon and epoxy dots and create an easy-peasy card.
Here’s my Lovely Blossoms card:
The DSP truly does all the work for this card and made the whole process quick and easy! Here’s a look at the sheet I used for the front of the card:
What I Did:
The Secret Sea base measures 11 by 4-1/4 inches, scored at 5-1/2 inches to create a tent card
I trimmed a piece of Cloud Cover cardstock to 4-1/8 by 5-3/8 inches for the mat
To make this card even easier, I stamped the sentiment using Secret Sea ink on the piece of Cloud Cover and cropped it using one of the dies in the bundle
No one will see the cut out piece once I adhere the DSP
The panel of DSP originally measured 6 by 4 inches, then I trimmed it down to 4 by 5-1/4 inches
I needed to trim a coordinating piece of DSP to 6 by 2-1/2 inches for the envelope flap
Next, I punched a 1-inch circle of DSP and ran it through my XYRON create-a-sticker for the envelope seal
I trimmed a piece of white cardstock to 4 by 5-1/4 inches for the inside of the card
The last piece of DSP I needed was to go on the bottom of the white cardstock on the inside, and it measures 1/2 inch by 4 inches
I made a loopy-loop bow out of Petal Pink diagonal trim ribbon, using glue dots to secure the ribbon in place
Next, I added two mini-dimensionals to the underside of the sentiment in the middle and then added glue dots for the ends
The glue dots will adhere the cardstock to the ribbon without adding bulk
Finally, I added three Petal Pink dots to the front
With that, I’d finished this super easy coordinated card, envelope, and envelope seal.
It’s time to redeem the coupons you earned in January! Make sure you place your order before time runs out!
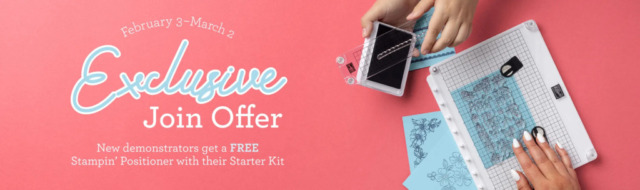
It’s Time for a Joining Bonus!
Crafting is even more fun with community, and there’s never been a better time to join Stampin’ Up! as a demonstrator. There’s no commitment beyond the initial joining quarter and you get to enjoy all the perks that come with that, like a 20–25% product discount, early access to the latest products and catalogs, the opportunity to earn a modest supplemental income, the chance to attend incredible training and crafting events, and so much more. And for a limited time, new demonstrators will receive our new Stampin’ Positioner tool FREE along with their Starter Kit!
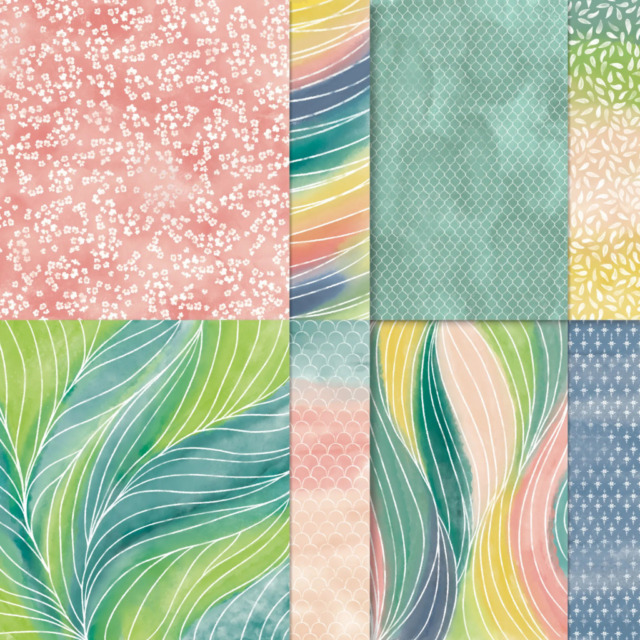
It’s Time for the February Product of the Month!
Painted Illusions 12″ x 12″ (30.5 x 30.5 cm) Designer Series Paper
Beautiful watercolors and whimsical patterns make up this one-of-a-kind paper. Make a wide variety of projects with this paper that is sure to dazzle!
Welcome to the January Creative Crafters Challenge #96, where the theme is always Anything Goes. I’ve been wanting to make these mini-desk calendars for a few years and never seem to get them done in a timely manner. This year was finally the time, and I made more than 20 of them for people with whom I teach. Easy-peasy, truly.
When you finish here, please visit both challenge sites to see what the rest of the very talented design team members created. Then, don’t forget to upload your creations to both galleries. We look forward to seeing your creations there!
Here’s a sample of the calendars:
Since our school colors are black and gold, and the mascot is a hornet, I used the retired Honey Bees stamp set, die set, and DSP (designer series paper).
Measurements:
The base measures 4 by 12 inches, scored at 3/4, 1-1/2, and 2-1/4 inches
The DSP measures 3-7/8 by 4-1/2 inches
My calendars are 2 by 3 inches, so the mat for them measure 3-1/4 by 2-1/4
The finished size is 4-7/8 by 4 inches
What I Did:
The first scored line is a mountain fold, the middle is a valley fold, and the last one is a mountain fold
Add two strips of tear-&-tape adhesive the the outside of the first fold and adhere it to the bottom of the back base
Using multipurpose liquid glue, adhere the DSP to the front of the base, then adhere the the cardstock
Adhere the calendar to the mat using liquid glue
Wrap a length of ribbon around the base and tie in a square knot, and adhere using a glue dot
I added a little bee using a dimensional, then added two epoxy dots to the DSP
If you wanted to mail these, they would fit in a medium SU! envelope, but remember to add extra postage
HINT: Since I made 20 of these, I trimmed and scored 20 bases, then trimmed 20 pieces of DSP and cardstock. I cropped all 20 bees and trimmed all the ribbon. When I put the calendars together, I did all the bases, then added the DSP and cardstock, then added all the ribbon, and finished by adding all the bees and dots. For me, this is the way I mass produce projects because it seems to be easier. Let me know if it works for you.
What better way to earn the January Product of the Month? Bonus Days & Product of the Month – Yes, Please!
Versatility is key! With the Fabulous Sayings Stamp Set, you’ll always have the right words on hand—whether you’re creating birthday cards, thank-you notes, or a cheerful hello.
You can purchase the Product of the Month item for only $5 USD | $5 CAD when you spend $75 USD | $100 CAD or more in a single order. I’ve already ordered this item and am looking forward to adding these sentiments to my other sentiment stamp sets.
Welcome to the newest Make My Monday bi-weekly challenge #267. Our host, Caz, chose A Quickie CAS Christmas Card for the theme. I was able to combine this card with the Creative Crafters Challenge #95, where the theme is always Anything Goes, which is also going live today.
When you finish here, please visit both challenge sites to see what the rest of the very talented design team members created. Then, don’t forget to upload your creations to both galleries. We look forward to seeing your creations there!
Here’s my CAS Christmas card:
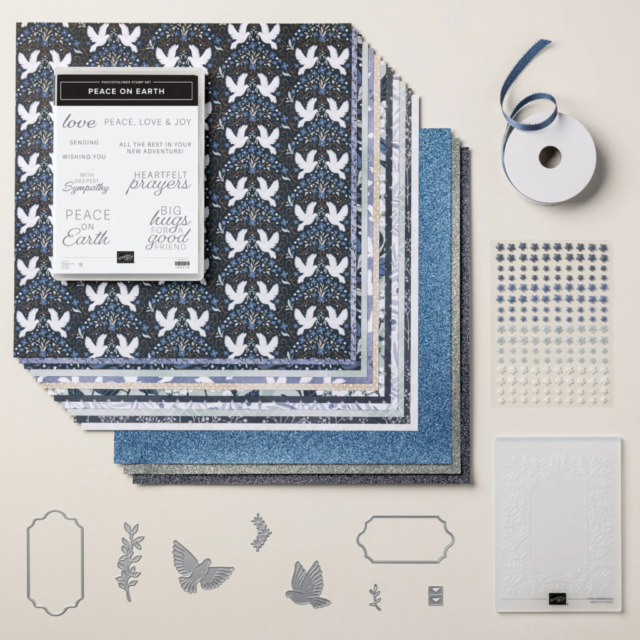
This gorgeous paper, the Traditions of Christmas 12″ by 12″ Specialty DSP, from the September – December mini catalog completely carries this card. It’s absolutely stunning! I paired it with Old olive and Real Red cardstock and a greeting from the Peace on Earth stamp set.
What I Did:
The Old Olive base measures 8-1/2 by 4-1/2 inches, scored at 4-1/4 inches
I trimmed the Real Red mat to 4-1/8 by 5-3/8 inches
The DSP measures 4 by 5-1/4 inches
Don’t forget to trim a coordinating piece of DSP to 6 by 2-1/2 inches for the envelope flap
I also punched a 1-inch circle from DSP and ran it through my XYRON create-a-sticker for the envelope seal
After trimming the red cardstock, I cropped the circle from the center of the mat using the largest circle die from the Stylish Shapes set
I stamped the outside and inside sentiments using Tuxedo Black ink on white cardstock
I cropped the outside sentiment using the next smaller circle die from Stylish Shapes
The inside piece of cardstock measures 4 by 5-1/4 inches
The only place I used dimensionals was behind the white circle Merry Christmas sentiment
For the other pieces of the card, I used multipurpose liquid glue to adhere them together
I adhered the red cardstock to the base
Next, I wrapped a piece of Real Red ribbon around the front of the card and tied it in a square knot
Then I adhered the DSP to the red cardstock, and anchored the ribbon knot in place with a mini-glue dot
Adhere the larger red circle with multipurpose liquid glue and slide it under the ribbon
Place the dimensionals on the back of the white circle making sure they straddle the ribbon, and adhere
Add five red enamel dots to the front sentiment
Adhere the inside white cardstock to the base of the card
With that, I’d finished this CAS coordinated card, envelope, and envelope seal set
Browse our selection of Last Chance paper crafting products. Additional items are added every other month. These products are available only while supplies last so be sure to buy them before they are discontinued! Discounts vary and are subject to change.
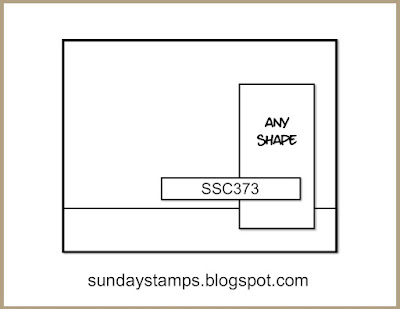
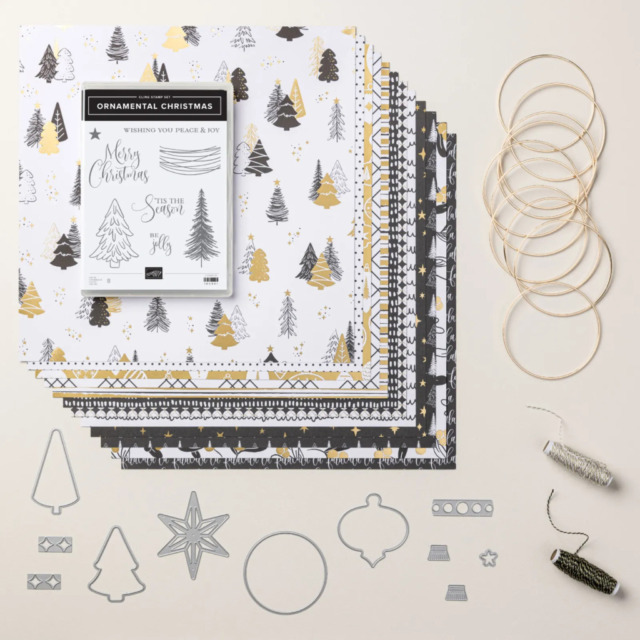
Welcome to my one card, two challenges post. As always, the theme for The Creative Crafters challenge # 94 is Anything Goes. This month I have a Christmas card made with the Modern Christmas suite collection. I used the SSC373 sketch for my card, so I will upload this card to that gallery. I hope you will visit the design team members’ blogs for some gorgeous inspiration! We can’t wait to see what you create, so please remember to upload your creation to our gallery.
When I purchased the Peace on Earth suite collection I told myself that I could make all the Christmas cards I needed with that suite. Then I saw the Modern Christmas suite and knew I “had” to have it! This is the first card I’ve made with the products, and I can’t wait to keep playing with them, although the DSP (designer series paper) is almost too beautiful to cut up!
Measurements:
Trim a piece of black cardstock to 8-1/2 by 5-1/2 inches, and score at 4-1/4 inches to create a tent card
Choose a background DSP and trim it to 4-1/8 by 5-3/8 inches
You will need a strip of DSP for the bottom, and I trimmed that piece to 1 by 5-3/8 inches
I find it easier to adhere strips like this over the bottom of the background DSP rather than try to fuss with measurements to create the size I need
Trim a piece of coordinating DSP to 1 by 5-3/8 inches for the bottom of the inside of the card
I trimmed a piece of the fa la la DSP to 6 by 2-1/2 inches for the envelope flap
Then I punched a 1-inch circle of the striped DSP and ran it through my XYRON create-a-sticker for the envelope seal
Trim a piece of white cardstock to 4 by 5-1/4 inches for the inside of the card
I used scraps of black and white cardstock for the tree and the sentiment on the front of the card
A Quick Card:
Once I figured out what DSP patterns I was going to use, the rest of the card fell into place. I love that the simple sketch was enhanced by the DSP, which does all the work on this card.
Both the tree and the sentiment on the front are heat embossed
First, make sure you rub your embossing buddy over the cardstock to be stamped and embossed
After cleaning the cardstock with the embossing buddy, stamp your images using VersaMark ink
Cover the ink with WOW! embossing powders, and flick off the extra, or use the brush from the embossing additions kit to remove any excess powder
Heat set with your heat tool
Make sure you allow the embossing images to dry before trying to crop them
Crop the sentiment using one of the rounded rectangles from the Nested Essentials die set
Crop the tree using the Ornamental Christmas tree die
Unless otherwise noted, I adhere the pieces together with multipurpose liquid glue
Adhere the strip on the bottom of the front piece of DSP
At this point, I pulled out my gold Wink of Stella brush and outlined the tree, sentiment, and the DSP background of the front of the card
Using the gold and white baker’s twine from the suite, wrap it around the line where the two pieces of cardstock come together
I used tear-&-tape to adhere the ends on the back of the card
Use another length of baker’s twine to tie a square knot around the wrapped pieces
I wanted to use a bow, but I am completely bow-challenged at the present time
Adhere the DSP to the front of the base of the card
Add dimensionals behind the tree and adhere it to the front of the card
Add dimensionals to the back of the sentiment so that it fits over the tree, then use liquid glue to adhere the corner to the tree
Adhere the tree and sentiment to the front of the card
Crop a star from the gold foil DSP, add a mini-dimensional to the back of it and adhere it to the top of the tree
Stamp the inside sentiment using Momento Tuxedo Black
Add the 1-inch strip along the bottom of the white cardstock and adhere to the inside of the card
With that, I’d finished this coordinated card, envelope, and envelope seal set
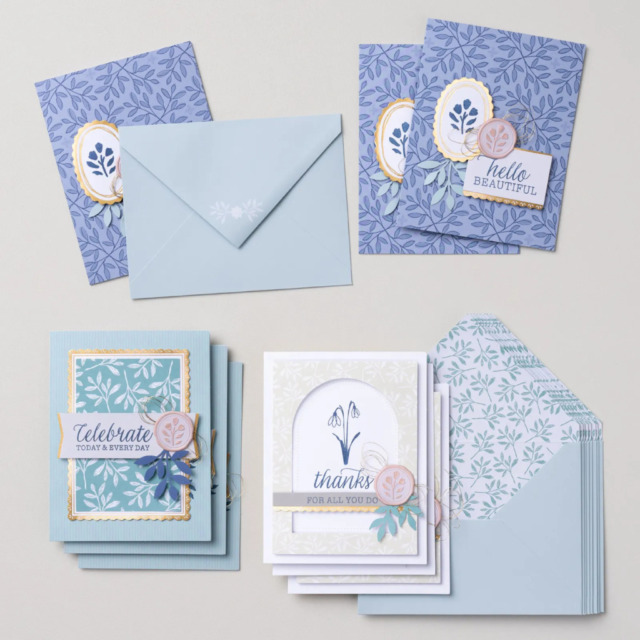
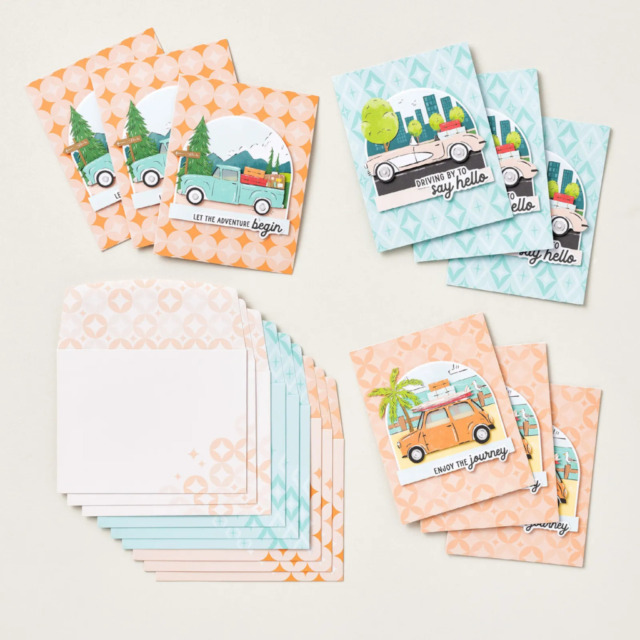
Kits Make Crafting Simple, Fun, and Just Simply Fun!
Here’s a look at the two new kits available:
First, it’s the Everyday Beauty Kit, which retails for $25 USD.
Create the perfect card for any occasion using the all-inclusive Everyday Beauty Kit. This kit comes with everything you need to make three unique card designs: printed card bases and coordinating envelopes with lovely botanical patterns, precut paper pieces, timeless faux wax seals, shimmering metallic thread, and a versatile stamp set that you can use on countless other projects.
DETAILS – Makes 9 cards: 3 each of 3 designs – Folded card size: 5-1/2″ x 4-1/4″ (14 x 10.8 cm) – Colors: Basic Beige, gold, Gray Granite, Lost Lagoon, Night of Navy, Petal Pink – Also available in French
Kit includes one of each item listed below. – Everyday Beauty Photopolymer Stamp Set – Clear stamp block – Night of Navy Classic Stampin’ Spot – Step-by-step instructions – 9 printed envelopes – Faux wax seal stickers – Metallic thread – Adhesive
The second kit is the Adventure Awaits kit, which retails for $14 USD.
Let your creativity take the driver’s seat with the Adventure Awaits Kit. Coast in the retro colours and hand-drawn artwork that can be either feminine or masculine. With printed sentiments, precut paper, and vellum details, this kit comes with everything you need to make nine cute cards.
DETAILS – Makes 9 cards: 3 each of 3 designs – Folded card size: 5-1/2″ x 4-1/4″ (14 x 10.8 cm) – Colors: Basic Black, Coastal Cabana, Crushed Curry, Garden Green, Granny Apple Green, Pecan Pie, Petal Pink, Poppy Parade, Pretty Peacock, Timid Tiger – Sentiments printed in English, French, and German
Kit includes one of each item listed below. – Step-by-step instructions – 9 printed envelopes – Vellum – Adhesive
If you have any questions, or need a bit of a creative mojo boost, you can reach me at my justpeachystamping@gmail.com.
If you live in the U.S. and don’t already have a Stampin’ UP! demo from whom you order, I would be honored to work with you.
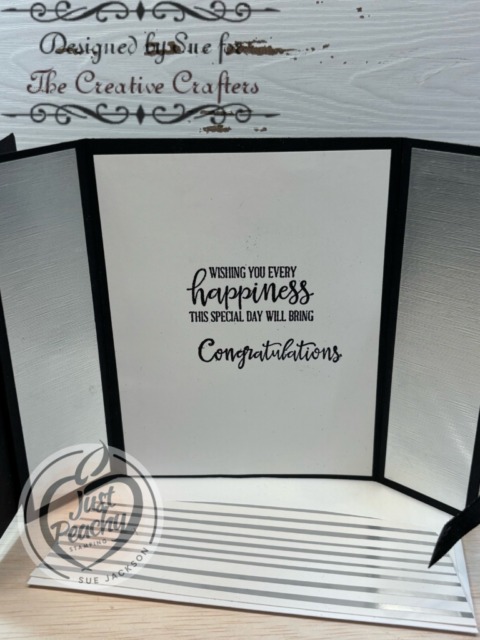
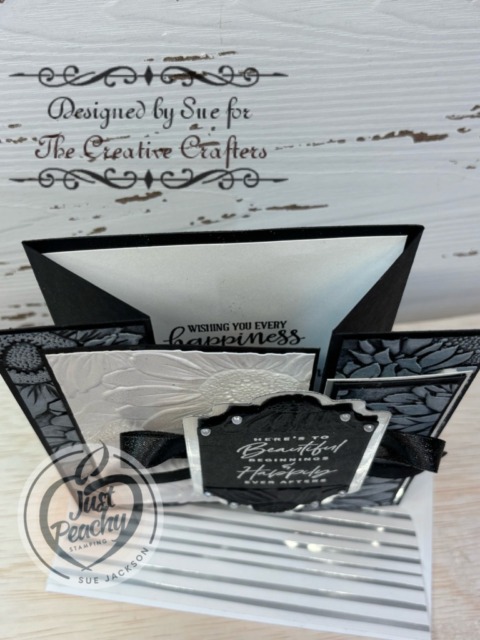
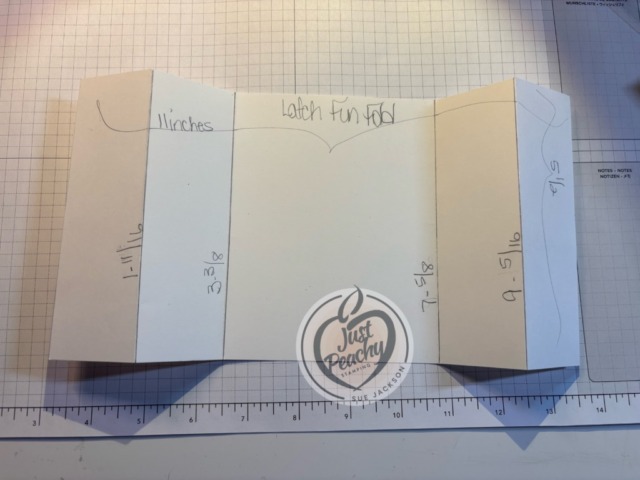
Welcome to my one card, two challenges post. As always, the theme for The Creative Crafters challenge # 93 is always Anything Goes. This month I have a latch fold wedding card I created for my niece’s wedding. The colors she chose were black and white with pops of silver and gold. It was such a beautiful wedding!
Here’s my card:
It’s just a given that fun fold cards also post to the Creative Creases Challenge. Debbie Mageed at Secret Stamper coordinates both this hop and the challenge. Hopefully, you will be inspired to upload your own fun fold project to the challenge!
I have another latch fold card for you, but this time it’s for a birthday! You can see some of my other latch fold cards here, here, here, and here.
My Basic Template:
One of the things I absolutely love about this card is that it is so easy to change up the front of the card, as you can tell by my other posts.
Here’s the basic template that I use and revise as needed:
I trimmed a piece of retired silver and white specialty DSP to 6 by 2-1/2 inches for the envelope flap
Then I punched a 1-inch circle from a leftover piece of black embossed cardstock and ran it through the XYRON create-a-sticker for the envelope seal
There is a pretty significant amount of bulk to this card, but it still fit in a medium white SU! envelope
If this card needed to be mailed, I would put it in a small padded manila envelope for safe travels and add extra postage
Putting the Card Together:
The absolute star of this card is the Sunflowers 3D embossing folder!
It’s really hard to see in the pictures, but I stamped VersaMark ink on the raised side of the embossing folder
After I wiped a 4-1/4 by 5-1/2 piece of white cardstock down with my embossing buddy, I ran it through my Cut & Emboss machine
Then, I added clear embossing powder to the ink and heat set it with my heat tool
Then I trimmed down the cardstock to fit the measurements of the template
I used two 4-1/4 by 5-1/2 inch pieces of black cardstock and ran them each through the embossing folder in the Cut & Emboss machine
Using a fairly wet white craft ink pad, I lightly swiped multiple layers of white ink onto the raised sunflowers
I did let each layer of ink dry before I added more ink
It was necessary to add more ink to the ink pad to get the depth of white that I wanted
The sentiment on the front of the card comes from the Something Fancy stamp set, and I used white embossing powder on the back cardstock
After heat embossing and cropping the black sentiment cardstock, I decided I needed to add texture to the panel so I very carefully embossed the top and bottom using the Sunflower embossing folder
I used silver foil for mats on this card mainly because the black ribbon has silver flecks running through it
I’ve added information for the loopy loop bow below
Finally, I added some pearlized dots to the corners of the sentiment panel
With that, I’d finished this coordinated wedding card, envelope, and envelope seal set
Heat-embossing HINTS:
One of the most important steps when using embossing powder is to wipe down the cardstock using your embossing buddy, which is available in the Embossing Additions Tool kit
Another important thing to remember is to use the sticky end of your Take Your Pick tool to remove stray flecks of embossing powder before heat embossing
Make sure to let your embossed sentiments dry completely before trying to crop the sentiments, otherwise you might smear your beautiful embossed sentiment
While my heat tool is warming up (especially helpful with metallic powders) I will warm the underside of the cardstock to help keep the warping to a minimum
The Loopy Loop Bow:
I was able to watch Mary Deatherage’s, from Stamps -n- Lingers, Perfectly Pears tutorial. In that video, she showed her loopy-loop bow. That’s what I used for the front of my card. I’m bow-challenged and this technique allows me to relatively easily add ribbon without adding the bulk of a tied bow. If you’ve never seen her videos, you owe it to yourself to watch them. I think she’s the Queen of the Collage. Gorgeous cards!!
Two Joining Promotion Options for the Month of October!
Join Our Community
Become a Stampin’ Up! demonstrator when you choose one of these amazing Starter Kit offers. (And did we mention your Starter Kit comes with FREE shipping, FREE business supplies, AND a bonus, FREE Paper Pumpkin kit?) Join from October 1 to 31 and experience all the amazing benefits that come with being a demonstrator.
Honestly, I saw this promotion banner and was stunned in a very good way! This deal is amazing, and what’s more there are no other purchase requirements!
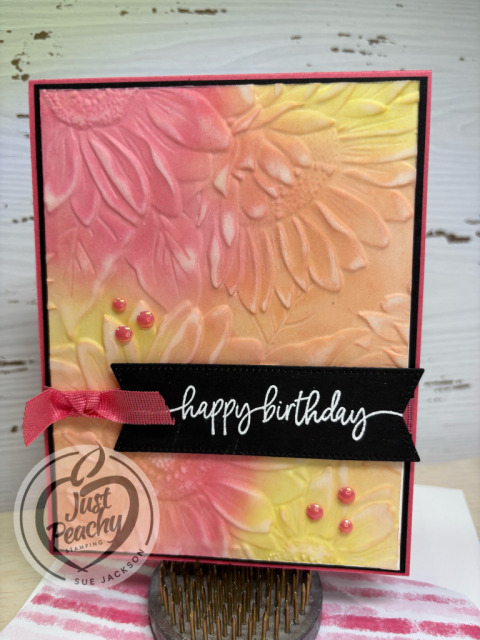
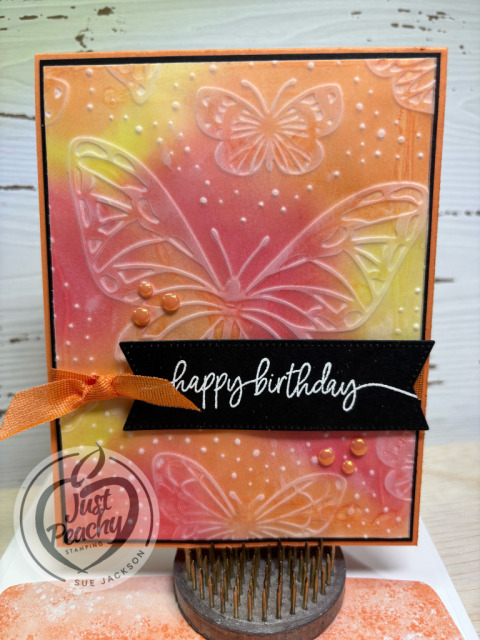
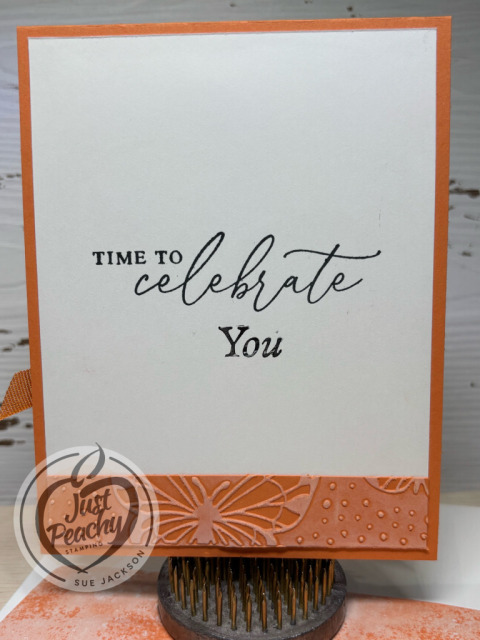
Welcome to my one card, two challenges post. As always, the theme for The Creative Crafters challenge # __ is always Anything Goes. This month, for me, anything goes means two birthday cards combining the 2025-2027 In Colors, vellum, and embossing folders. I had so much fun creating the butterfly embossed card, I wanted to make another one using the sunflower embossing fold.
Here are my cards:
Measurements:
I used a tent fold, and that base measures 11 by 4-1/4 inches, scored at 5-1/2 inches
For the second card, I used a base measuring 8-1/2 by 5-1/2 inches, scored at 4-1/4 inches
The black cardstock mats measure 4-1/8 by 5-3/8 inches
I cropped the sentiment banners from each piece of the mat cardstock using the Stylish Shapes die set
Each card has a piece of white cardstock for the inside, each of which measure 4 by 5-1/4 inches
I started with 2 pieces of vellum measuring 5-1/2 by 4-1/4 inches, one for each card
I trimmed coordinating in Color DSP to 6 by 2-1/2 inches for each envelope flap
Then, I punched a 1-inch circle of DSP for each envelope seal and ran them through my XYRON create-a-sticker machine
What I Did:
Unless otherwise specified, I used multipurpose liquid glue to adhere pieces together
I used blending brushes and the Strawberry Slush, Timid Tiger, and Darling Duckling inks to color the vellum
After blending colors on the back of the vellum, I adhered the vellum to the white cardstock by lightly covering the entire back of the vellum with multipurpose liquid glue
Then, I embossed each piece with a 3D embossing folder
Trim each piece of vellum/white cardstock to 5-1/4 by 4 inches
Lightly swipe the white craft ink pad over the embossed images to create highlights
Wrap a piece of ribbon around the 3 layers for the front and tie it in a square knot.
After wiping down your sentiment banners using an embossing buddy, stamp your sentiment using VersaMark ink
Cover the ink with white embossing powder and set it with your heat tool
Add dimensionals to the back of the sentiment banners and adhere to the front of the card
Stamp your inside sentiments on the piece of white cardstock
Emboss a piece of cardstock to match your card base using the embossing folders
After lightly swiping white craft ink over the embossed cardstock, trim it to 4 by 1 inch and adhere it to the inside white cardstock
Adhere the inside white cardstock to the card
With that, I’d finished these coordinated cards, envelopes, and envelope seals
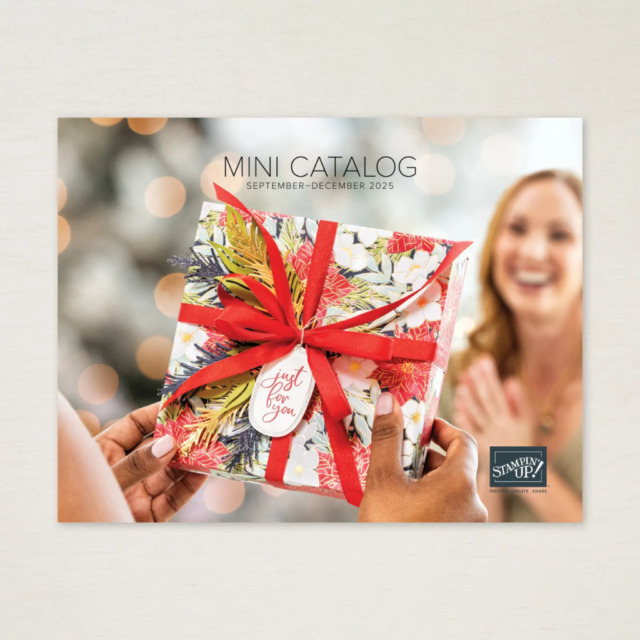
The September – December 2025 Mini-Catalog is now available!
Of course, this means there are new Online Exclusives as well! Here are some examples:
This Peaceful Garden Suite Collection is beautiful, and I love non-traditional colors for Christmas. I thought I would be able to use this suite for all my Christmas cards.
This Modern Christmas Suite Collection is absolutely gorgeous! I told myself that I wouldn’t need anything other than the Peaceful Garden Suite Collection. I was wrong. This suite is already in my cart:
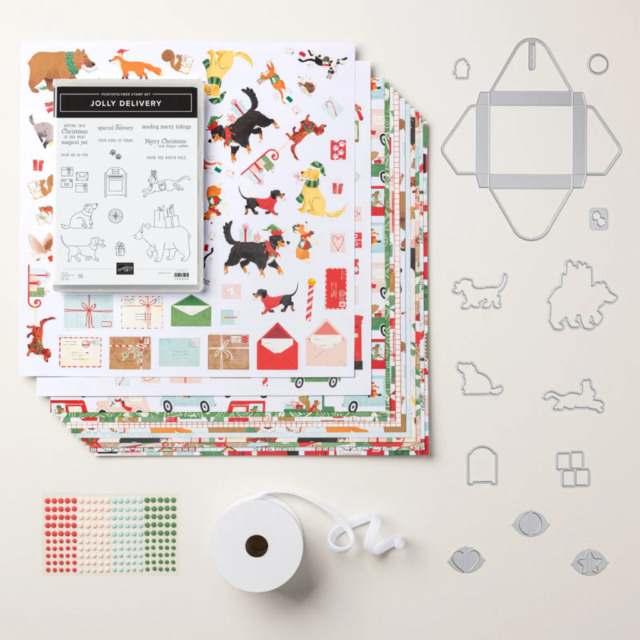
Of course, I had to get a cute Christmas critters set of products. This Jolly Delivery Suite fit the bill perfectly:
Last Chance Stamping Write Markers!
While you are shopping, make sure you pick up the Last Chance Stamping Write Markers! These markers, including the 2025 – 2027 In Color markers, are being discontinued. I love using these markers when sending cards because I can coordinate the card with the writing color. Therefore, I have all the available sets ready and waiting in my SU! cart.
If you live in the U.S. and don’t already have a Stampin’ UP! demo from whom you order, I would be honored to work with you. You can reach me at my justpeachystamping@gmail.com.
Welcome to Just Peachy Stamping by Sue Jackson: an independent Stampin' Up demonstrator.
Through Stampin' Up!, I happily share my love of papercrafting through sales, classes, small stamping group meet-ups and workshops. I think that being a teacher in my "real life", I have a unique approach to sharing my fantastic hobby. I look forward to connecting with you!