
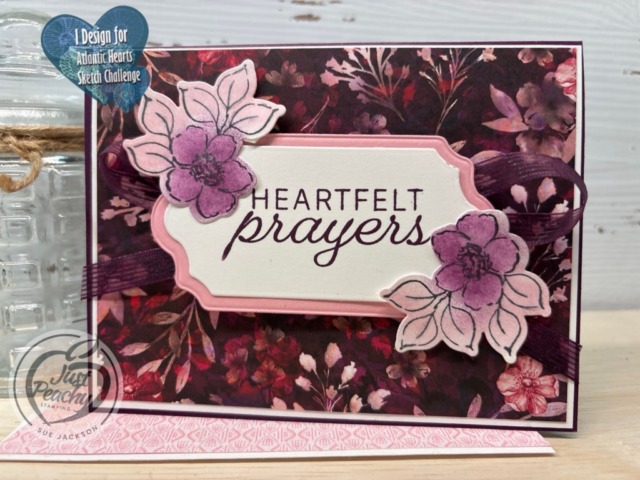
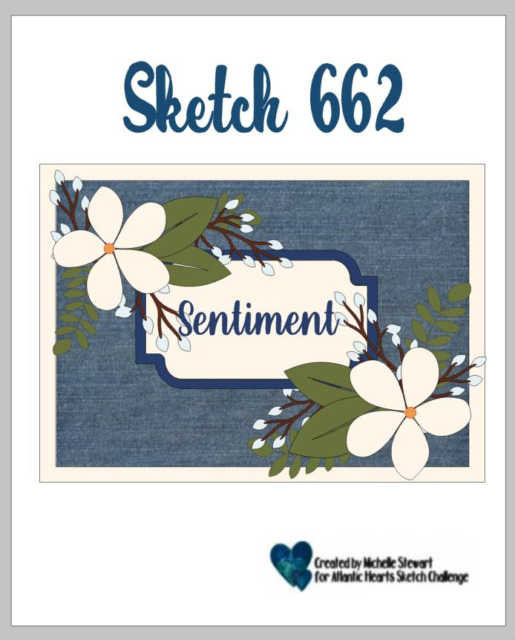
Welcome to the weekly Atlantic Hearts Sketch Challenge! Challenge #656 is for Team B, which is my team. I love getting kickstarted with a sketch, then just letting the card come together. Sometimes, I know exactly what I want to do. Other times, like for this week’s challenge, the card evolves. Everyone on Team A and Team B would love for you to play along with the sketches and then post your creations to the challenge gallery. Don’t forget to come back tomorrow to see the creations of the design team. We hope our projects inspire you to play along with us.
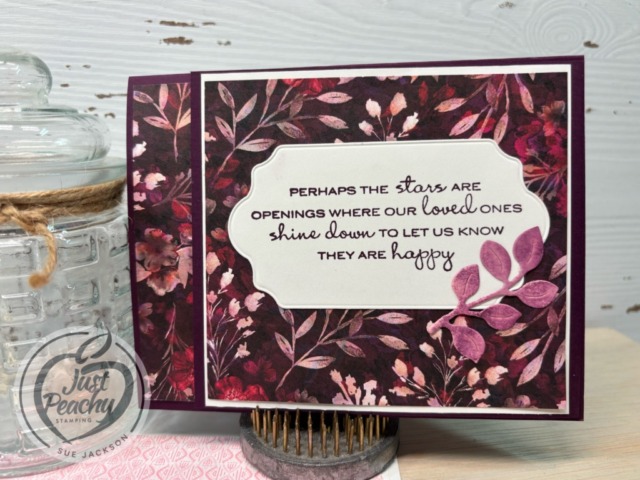
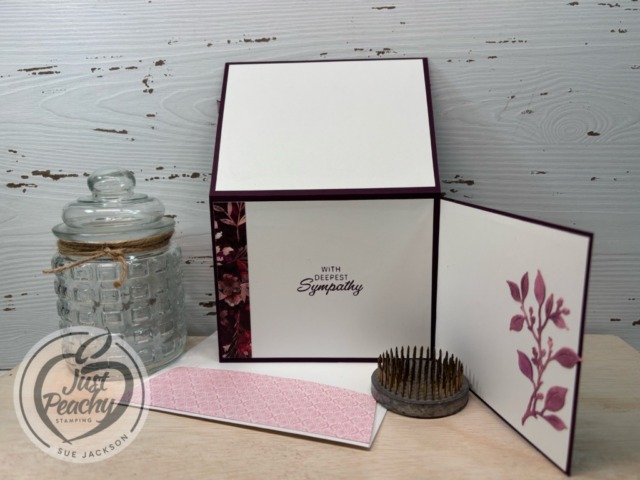
Sadly, a coworker’s brother passed away 10 days before Christmas. Therefore, I needed a card which our whole department can sign for her when we go back to school. Here’s my card:
Here’s the Atlantic Hearts Sketch Challenge banner:
Measurements:
- Trim a piece of Blackberry Bliss cardstock to 8-1/2 by 5-1/2, scored at 4-1/4 to create a tent fold
- You will need an additional piece of Blackberry Bliss to 5-3/8 by 4-1/8 and score on the long side at 3/4 of an inch for the side flap
- Trim two pieces of white cardstock to 5-1/4 by 4 for the inside of the card
- You will need another piece of white cardstock measuring 4-1/2 by 4 inches for the side flap
- The white cardstock for the front measures 4-1/8 by 5-3/8 inches, and I cropped out the center banner using the Peace on Earth die from the center of that piece
- Next, I used a piece of white cardstock measuring 4-3/8 by 4-1/8 for the front of the flap
- I cropped another sentiment label for the flap from the center of the white cardstock mat
- There are three pieces of trimmed Regal Winter DSP which measure 4 by 5-1/4 inches, 4-1/4 by 3-7/8 inches, and 3/4 by 4 inches
- Since I started with just one 6 by 12 inch piece of this DSP, I trimmed a piece of Pretty in Pink 6 x 6 inch DSP to 2-1/2 by 6 inches for the envelope flap
- Don’t forget to punch a 1-inch circle from the DSP used on the card and run it through your XYRON create-a-sticker for the envelope seal
- I used scraps of Pretty in Pink for the mat layer of the sentiment panel and the leaves/branches cropped for the right flap
- The flowers were stamped on scraps of white cardstock and I used daubers to add ink to the flowers and leaves for a soft look
What I Did:
- Unless otherwise noted, I used multipurpose liquid glue to adhere pieces together
- After burnishing all the score lines, I adhered the 3/4 inch piece of the flap to the right side of the inside of the card
- Adhere all three white pieces of cardstock
- Next, adhere all the pieces of DSP as shown
- Stamp the sentiments on the two white banners and the inside of the card using Blackberry Bliss ink
- Adhere the flap sentiment
- Adhere the front sentiment to the Pretty in Pink banner mat
- Using ribbon, create a loopy loop bow (directions below) and secure and adhere with mini-glue dots
- Add dimensionals to the back of the Pretty in Pink banner so that they will straddle the ribbon pieces and adhere on the front
- Use dimensionals and liquid glue to adhere the flowers to the opposite corners of the sentiment banner
- As a complete after-thought, I will probably go back when I am finished here and add some dot embellishments to the front of the card when I am finished here
The Loopy Loop Bow:
I was able to watch Mary Deatherage’s, from Stamps -n- Lingers, Perfectly Pears tutorial. In that video, she showed her loopy-loop bow. That’s what I used for the front of my card. I’m bow-challenged and this technique allows me to relatively easily add ribbon without adding the bulk of a tied bow. If you’ve never seen her videos, you owe it to yourself to watch them. I think she’s the Queen of the Collage. Gorgeous cards!!
Thank you for stopping by today!
Have a Peachy Day!
Sue
Colors Used:
Supplies Used:
Coming Soon to a SU! Shopping Cart Near You!

It’s time for one of our favorite promotions—BONUS DAYS! Because do you know what’s a great deal? Getting rewarded for all the crafting supplies you’re already going to buy! When you shop between January 6 and February 2 and spend $50 USD | $60 CAD, you will earn a $5 USD | $6 CAD coupon! Make sure you save all your coupons because you can redeem them (and we mean ALL of them) between February 3 and 28. And don’t forget—each purchase earns you Stampin’ Rewards, so that’s even more bang for your buck!
There’s no limit to how many coupons you can earn! I already have a pretty substantial order in my cart, and knowing that I will earn Rewards and coupons on it makes me so happy!


