
Welcome to my one card, two challenges post. As always, the theme for The Creative Crafters challenge # 94 is Anything Goes. This month I have a Christmas card made with the Modern Christmas suite collection. I used the SSC373 sketch for my card, so I will upload this card to that gallery. I hope you will visit the design team members’ blogs for some gorgeous inspiration! We can’t wait to see what you create, so please remember to upload your creation to our gallery.
Here’s my card:


Here’s the Sunday Stamps sketch banner:
When I purchased the Peace on Earth suite collection I told myself that I could make all the Christmas cards I needed with that suite. Then I saw the Modern Christmas suite and knew I “had” to have it! This is the first card I’ve made with the products, and I can’t wait to keep playing with them, although the DSP (designer series paper) is almost too beautiful to cut up!
Measurements:
- Trim a piece of black cardstock to 8-1/2 by 5-1/2 inches, and score at 4-1/4 inches to create a tent card
- Choose a background DSP and trim it to 4-1/8 by 5-3/8 inches
- You will need a strip of DSP for the bottom, and I trimmed that piece to 1 by 5-3/8 inches
- I find it easier to adhere strips like this over the bottom of the background DSP rather than try to fuss with measurements to create the size I need
- Trim a piece of coordinating DSP to 1 by 5-3/8 inches for the bottom of the inside of the card
- I trimmed a piece of the fa la la DSP to 6 by 2-1/2 inches for the envelope flap
- Then I punched a 1-inch circle of the striped DSP and ran it through my XYRON create-a-sticker for the envelope seal
- Trim a piece of white cardstock to 4 by 5-1/4 inches for the inside of the card
- I used scraps of black and white cardstock for the tree and the sentiment on the front of the card
A Quick Card:
Once I figured out what DSP patterns I was going to use, the rest of the card fell into place. I love that the simple sketch was enhanced by the DSP, which does all the work on this card.
- Both the tree and the sentiment on the front are heat embossed
- First, make sure you rub your embossing buddy over the cardstock to be stamped and embossed
- After cleaning the cardstock with the embossing buddy, stamp your images using VersaMark ink
- Cover the ink with WOW! embossing powders, and flick off the extra, or use the brush from the embossing additions kit to remove any excess powder
- Heat set with your heat tool
- Make sure you allow the embossing images to dry before trying to crop them
- Crop the sentiment using one of the rounded rectangles from the Nested Essentials die set
- Crop the tree using the Ornamental Christmas tree die
- Unless otherwise noted, I adhere the pieces together with multipurpose liquid glue
- Adhere the strip on the bottom of the front piece of DSP
- At this point, I pulled out my gold Wink of Stella brush and outlined the tree, sentiment, and the DSP background of the front of the card
- Using the gold and white baker’s twine from the suite, wrap it around the line where the two pieces of cardstock come together
- I used tear-&-tape to adhere the ends on the back of the card
- Use another length of baker’s twine to tie a square knot around the wrapped pieces
- I wanted to use a bow, but I am completely bow-challenged at the present time
- Adhere the DSP to the front of the base of the card
- Add dimensionals behind the tree and adhere it to the front of the card
- Add dimensionals to the back of the sentiment so that it fits over the tree, then use liquid glue to adhere the corner to the tree
- Adhere the tree and sentiment to the front of the card
- Crop a star from the gold foil DSP, add a mini-dimensional to the back of it and adhere it to the top of the tree
- Stamp the inside sentiment using Momento Tuxedo Black
- Add the 1-inch strip along the bottom of the white cardstock and adhere to the inside of the card
- With that, I’d finished this coordinated card, envelope, and envelope seal set
Thank you for stopping by today!
Have a Peachy Day!
Sue
Colors Used:
Supplies Used:
Kits Make Crafting Simple, Fun, and Just Simply Fun!
Here’s a look at the two new kits available:
First, it’s the Everyday Beauty Kit, which retails for $25 USD.
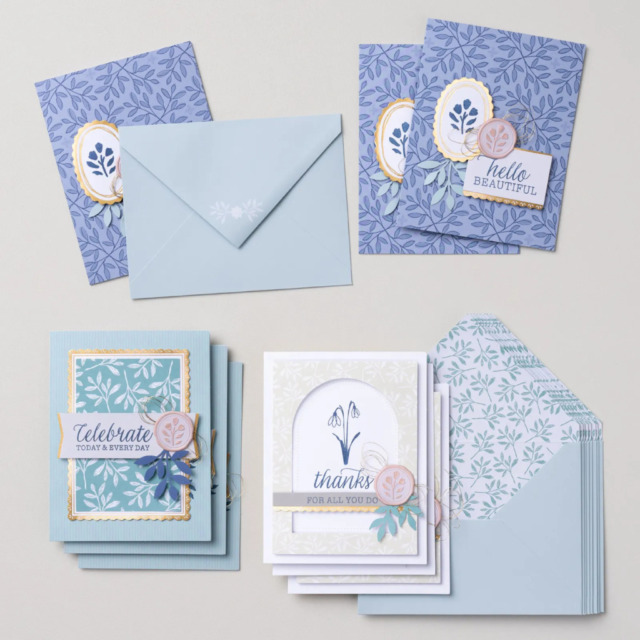
Create the perfect card for any occasion using the all-inclusive Everyday Beauty Kit. This kit comes with everything you need to make three unique card designs: printed card bases and coordinating envelopes with lovely botanical patterns, precut paper pieces, timeless faux wax seals, shimmering metallic thread, and a versatile stamp set that you can use on countless other projects.
DETAILS
– Makes 9 cards: 3 each of 3 designs
– Folded card size: 5-1/2″ x 4-1/4″ (14 x 10.8 cm)
– Colors: Basic Beige, gold, Gray Granite, Lost Lagoon, Night of Navy, Petal Pink
– Also available in French
Kit includes one of each item listed below.
– Everyday Beauty Photopolymer Stamp Set
– Clear stamp block
– Night of Navy Classic Stampin’ Spot
– Step-by-step instructions
– 9 printed envelopes
– Faux wax seal stickers
– Metallic thread
– Adhesive
The second kit is the Adventure Awaits kit, which retails for $14 USD.
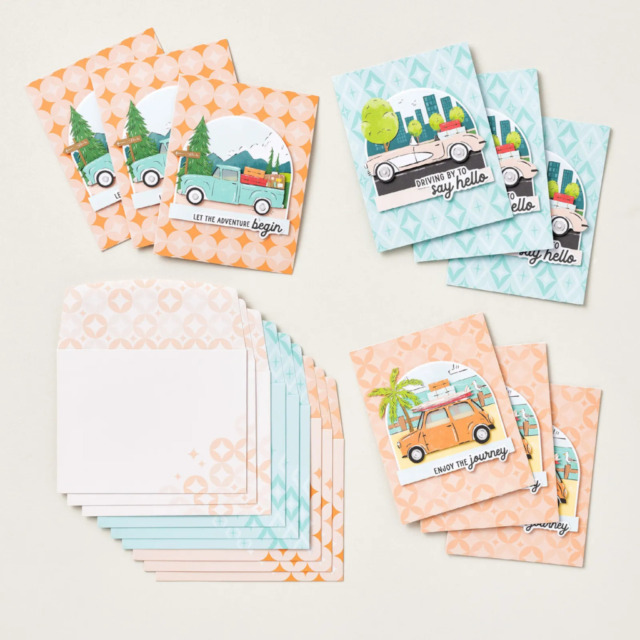
Let your creativity take the driver’s seat with the Adventure Awaits Kit. Coast in the retro colours and hand-drawn artwork that can be either feminine or masculine. With printed sentiments, precut paper, and vellum details, this kit comes with everything you need to make nine cute cards.
DETAILS
– Makes 9 cards: 3 each of 3 designs
– Folded card size: 5-1/2″ x 4-1/4″ (14 x 10.8 cm)
– Colors: Basic Black, Coastal Cabana, Crushed Curry, Garden Green, Granny Apple Green, Pecan Pie, Petal Pink, Poppy Parade, Pretty Peacock, Timid Tiger
– Sentiments printed in English, French, and German
Kit includes one of each item listed below.
– Step-by-step instructions
– 9 printed envelopes
– Vellum
– Adhesive


