
Welcome to the September, 2025 edition of the Sparkles Christmas Challenge # 176! Our host for this month’s challenge, Deb, chose Let’s See Some Holly for the theme. When you get finished here, I hope you will visit the challenge site to view the creations from the very talented members of our design team. After you’ve created your own themed card, please don’t forget to upload it to our gallery.
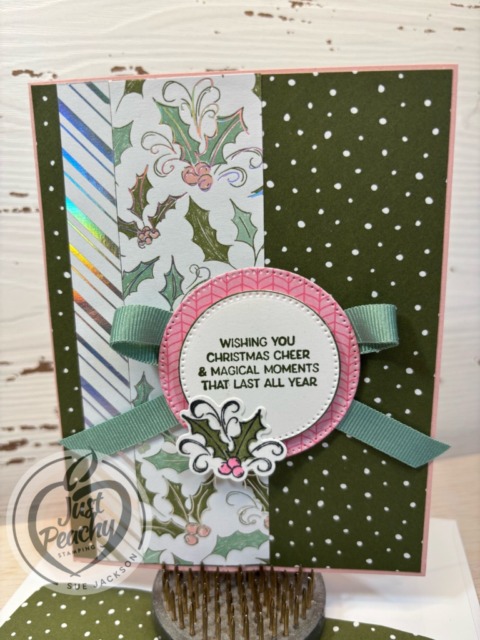
Here’s my holly card:
I am posting this a couple of days late. In the U.S. we just finished a three day holiday weekend to celebrate Labor Day for the workers who keep us going in so many, many different ways. You think I would’ve had something click because my birthday was Labor Day, September 1st. I always thought it was kind of ironic that I was born on Labor Day, so my birthday rolls around on the holiday weekend every 6 years or so. Anyway, I am 2 days late. This whole post is going to be short and sweet because I used retired products as they are the only things I had with holly. I am going to have to rectify that situation.
Measurements and More:
- The card base measures 8-1/2 by 5-1/2 inches, scored at 4-1/4 inches
- The Mossy Meadow DSP (designer series paper) for the background measures 4-1/8 by 5-3/8 inches
- Trim a piece of the Mossy Meadow DSP to 6 by 2-1/2 inches for the envelope flap
- I trimmed the diagonal silver and white DSP to 5-3/8 by 1/2 inch
- The holly DSP measures 1-1/2 by 5-3/8 inches
- I cropped the sentiment circle and the mat circle using the Stylish Shapes die set, the pink DSP is the reverse side of the holly DSP
- Next, I punched a 1 -inch circle of the pink DSP for the envelope seal and ran it through my XYRON create-a-sticker
- I stamped the holly leaves and berries using black ink on scraps of white cardstock for the front of the card
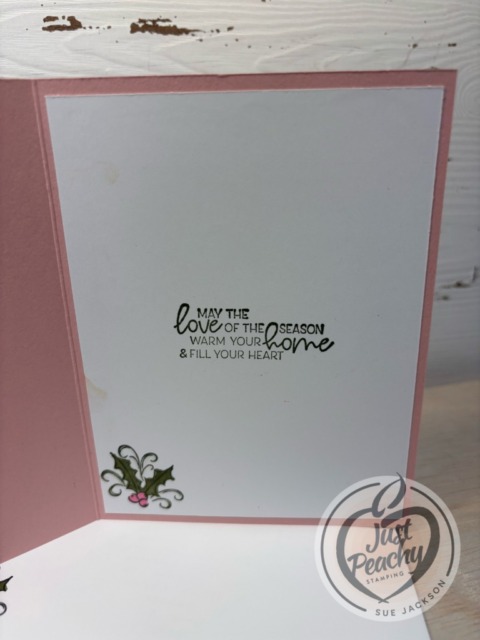
- After trimming a piece of white cardstock to 5-1/4 by 4 inches for the inside, I stamped the sentiment in Mossy Meadow and the holly leaves & berries using black ink
- I colored the leaves using the light Mossy Meadow blend and the berries with the light Polished Pink blend and a clear Wink of Stella brush
- The loopy-loop Mint Macaron ribbon is retired, but I love using the loopy-loop so I couldn’t resist
- I used glue dots for the loopy loop bow
- Next, I added dimensionals to the back of the sentiment circle and the pink mat circle as well as the holly and berry piece
- I used multipurpose liquid glue to adhere the rest of the pieces
With that, I’d finished this coordinated card, envelope, and envelope seal set.
I told you this post would be short and sweet!


