
Welcome back to the bi-weekly Cardz 4 Galz # 246! Thank you so much to all of you who played along with my Love challenge #245. It was so difficult to chose the winners and honorable mention entries.
Our host for #246,Billie A. , chose Stitching, Faux or Real, for the theme. When you finish here, please visit the challenge site to see what the rest of the very talented design team members created. Then, don’t forget to upload your creations to our gallery. We look forward to seeing your creations there!
For my card, I use my new Darling Dino bundle available in the current January – April mini-catalog. A dear friend at school tells the kids that I am so old I went to high school with the dinosaurs and taught Moses, for whom I edited the Ten Commandments. It’s all in fun, and I love it when the kids play along with their own comments. I could really write a book. Obviously, this card is for my friend.
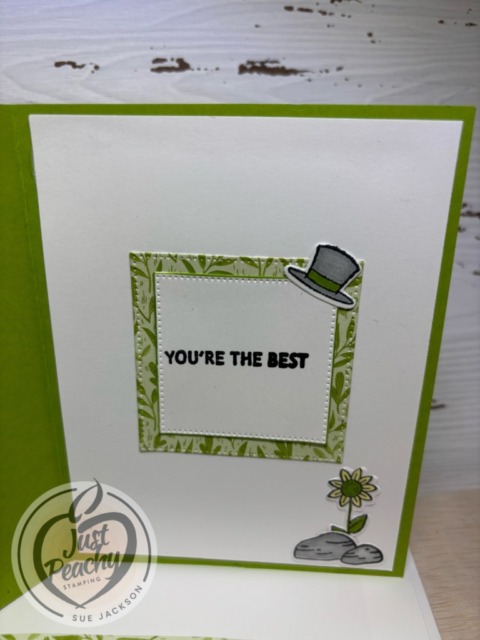
Anyway, I was able to include faux stitching when cropping all the squares on the outside and inside of the card.
Here’s my faux stitching card:
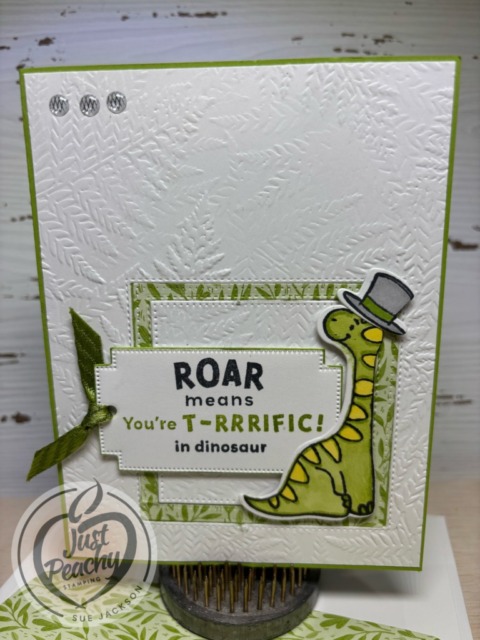
While you can’t really see it in the pictures, the band on the hats are colored with theGranny Apple Green light blend. Since I have said that my Prom date was a t-rex, this cutie is perfect!
I am also entering this in the Double Trouble Challenge #185 for the Thing 1 part of the challenge, which is the only required part of this challenge. Here’s the challenge banner:
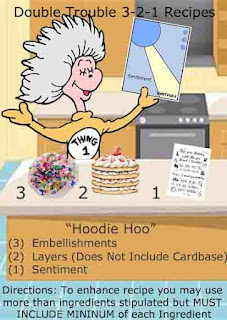
I have more than 3 embellishments, layers with the inside and outside squares, and one sentiment on the front.
Measurements:
- The Granny Apple Green base measures 8-1/2 by 5-1/2 inches, scored at 4-1/4 inches
- AFTER running a piece of white cardstock through my Cut & Emboss machine using the Ferns embossing folder, I trimmed it to 4-1/8 by 5-3/8 inches
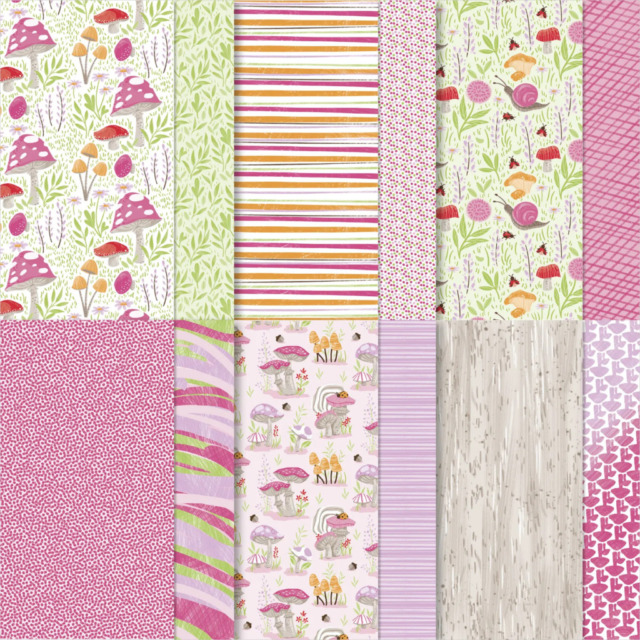
- I used a piece of the green fern Toadstool Gardens 6 x 6 inch DSP designer series paper), which is available for FREE through Sale-a-Bration with a $60 purchase, for the square in the center of the card and the one on the inside
- Here’s a close-up of this absolutely adorable DSP:
- I trimmed a piece of the fern DSP to 6 by 2-1/2 inches for the envelope flap
- I punched a 1-inch circle from another piece of the Toadstool DSP and ran it through my XYRON for the envelope seal
- Using the Stylish Shapes die set, I used two of the square dies to create a frame and inside square piece
- Then, I used the second to the largest square die to crop out a section of the white embossed cardstock
- The white cardstock for the inside measures 4 by 5-1/4 inches
- I used the inside of the fern DSP and cropped the third smallest square from white cardstock for the sentiment
- I was able to stamp and crop the sentiment banner, t-rex, hats, flower, and rocks from one piece of 4-1/4 by 5-1/2 inch cardstock
Stamping, Coloring, & Assembly:
- I stamped all the images using Momento Tuxedo Black ink and used Granny Apple Green, Lolly Lemon, and Smoky Slate blends combos to do all the coloring
- The outside sentiment is stamped in Tuxedo Black and Granny Apple Green with two stamps from the Delightful Dino stamp set; the black ink was used on one stamp, and the green ink was used on another stamp in the set
- I cropped the sentiment using one of the Greetings of the Season dies, and I will probably keep this set for a very long time
- Here’s a look at this die set, which is on the Last Chance list for $22.40:

- I colored the white diagonal ribbon with the Dark Granny Apple Green blend, threaded it through the hole in the label and tied it in a square knot
- I’ve colored other ribbons using the blends before, and you can see a couple of those posts here and here
- Unless otherwise noted, I used multipurpose liquid glue to adhere the pieces together
- Adhere the embossed white cardstock to the front of the base of the card
- Next, adhere the green leaf DSP frame inside the cropped square
- Add the white embossed square back into the frame
- Add dimensionals to the back of the sentiment label and adhere to the card
- Next, figure out where you want your t-rex to live and add dimensionals making sure to keep clear of the sentiment label
- Add one mini-dimensional to the hat and adhere
- I added three ribboned enamel dots to the top left of the card to help balance out the weight on the bottom of the card; these dots also allowed me to have three embellishments on the card
- Stamp the inside sentiment on a small cropped square of white cardstock using Tuxedo Black ink and adhere to the square of green leaf DSP
- Adhere to the card
- After coloring the rocks using Smoky Slate blends, the flower using Granny Apple Green blends, and the petals using the light Lemon Lolly blend, adhere them to the inside of the card
- With that, I’d finished this coordinated this card, envelope, and envelope seal set
I’m so thankful to have my domain issues with my blog figured out after more than a week of being without access.
Thank you for stopping by today!
Have a Peachy Day!
Sue
Colors Used:
Supplies Used:
Sale-a-Bration ends on Friday, 02/28/2025!
So many new items have been added since Sale-a-Bration started. Be sure to check them out!
For every $60 and $120 you spend, you’ll earn an exclusive Sale-A-Bration item for FREE! Depending on the amount you spend, you’ll be able to mix and match the Sale-A-Bration items you earn, and we have a stunning variety of stamp sets and Designer Series Paper for you to choose from! Shop now through February 28.


Oh my, your card is adorable. Love the embossed background and framing for your cute dinasaur. Thanks for sharing your enhanced DTC 3-2-1 Recipe ingredients with us at Double Trouble.