Welcome to the Cardz 4 Guyz #378 challenge! Pamela, our host for this challenge, chose Autumn or Fall for the theme. When you finish here, please visit the challenge site to see what the rest of the talented design team members created. Then, don’t forget to upload your creations to our gallery. We look forward to seeing your creations there!
I live in Central Florida and we don’t really have a fall season. I grew up on Long Island, and I loved everything about fall – cooler, sweater weather, changing colors, the smell of leaves when they are raked – and I miss it all. Well, maybe not raking, but definitely miss the smell.
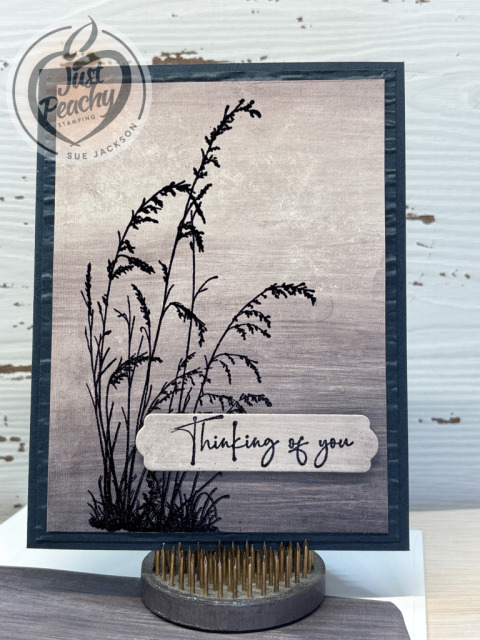
I do live on a small lake, and the sunsets over the lake are stunning. They will get darker now, and much earlier, but I still love the sunsets. I purchased the Prairie Grass stamp set specifically for this reason – seeing the silhouettes during sunset over the lake. So, that’s how my card relates to my Autumn and Fall.
Here’s my clean & simple fall card for a guy:
Since this is an all-occasion card, I haven’t stamped a sentiment on the inside yet. When I figure out the purpose of this card, I will go back and stamp it using black ink. In the meantime, the 4 by 5-1/4 piece of Basic Beige is being held in place with removable tape.
Clean & Simple:
Trim a piece of Secret Sea cardstock to 8-1/2 by 5-1/2 inches, scored at 4-1/4 inches
Trim another piece of Secret Sea cardstock to 4-1/4 by 5-1/2 inches
I used a piece of the Beautiful Gallery 6 x 6 inch DSP (designer series paper) trimmed to 4 by 5-1/4 inches
The sentiment on the outside, which is from The Right Words stamp set, was stamped and cropped from a scrap piece of Basic Beige cardstock
Trim a piece of Beautiful Gallery DSP to 6 by 2-1/2 inches for the envelope flap
Then, punch a 1-inch circle from coordinating cardstock and run it through the XYRON create-a-sticker for the envelope seal
After running the single piece of Secret Sea cardstock through the Cut & Emboss Machine using the Birch Wood 3D embossing folder trim it to 4-1/8 by 5-3/8 inches
Unless otherwise specified, I used multipurpose liquid glue to adhere pieces together
After running your embossing buddy over the piece of DSP, stamp the prairie grass image in VersaMark ink
Cover the image with black embossing powder, flick the back of the DSP to remove excess powder and heat set your image with your heat tool
Run the embossing buddy over your scrap piece of Basic Beige cardstock, then stamp the sentiment in VersaMark ink
Flick the back of the cardstock to remove excess powder and heat set with your heat tool
Make sure you let the sentiment cool so it thoroughly sets before cropping it out using a banner die from the Beautiful Butterflies dies
Add dimensionals to the back of the sentiment and adhere to the DSP
Adhere the DSP to the embossed cardstock, then adhere the embossed cardstock to the base of the card
That’s all there is to creating this coordinated card, envelope, and envelope seal set
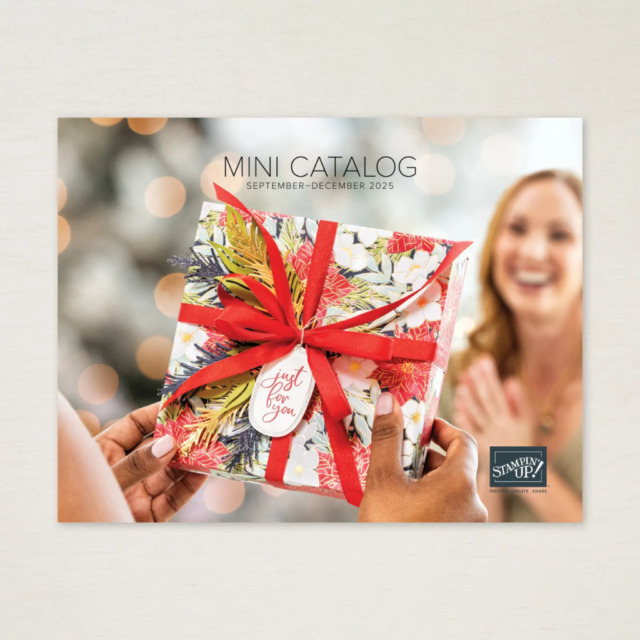
The September – December 2025 Mini-Catalog is now available!
Of course, this means there are new Online Exclusives as well! Here are some examples:
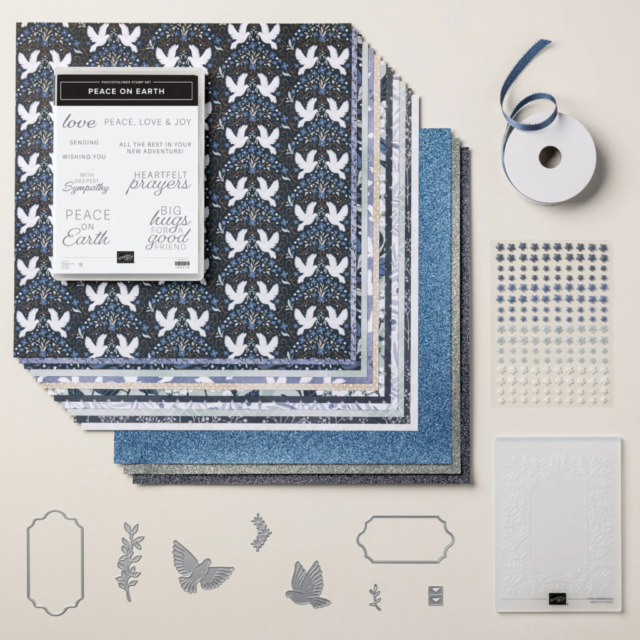
This Peaceful Garden Suite Collection is beautiful, and I love non-traditional colors for Christmas. I thought I would be able to use this suite for all my Christmas cards.
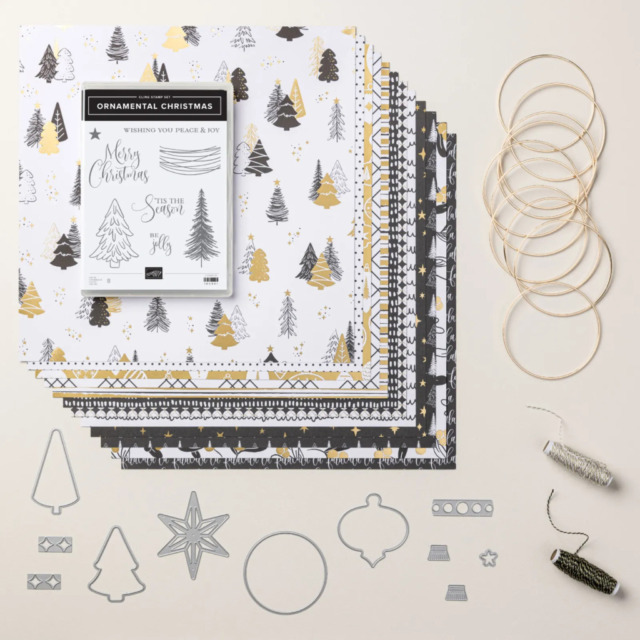
This Modern Christmas Suite Collection is absolutely gorgeous! I told myself that I wouldn’t need anything other than the Peaceful Garden Suite Collection. I was wrong. This suite is already in my cart:
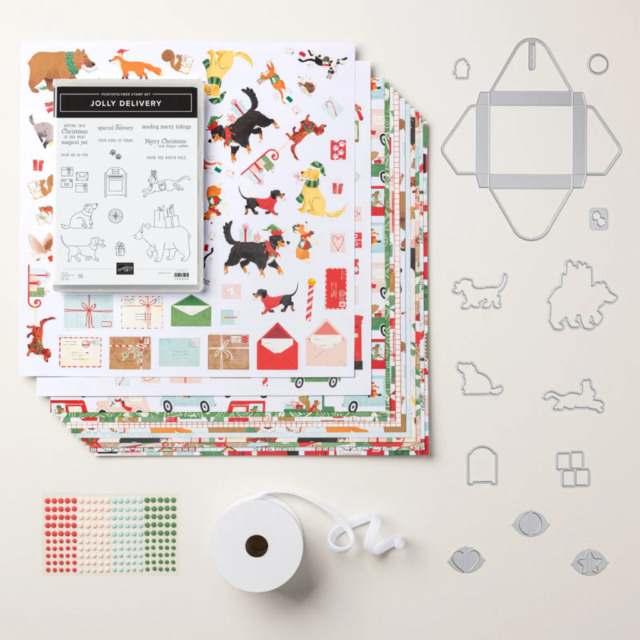
Of course, I had to get a cute Christmas critters set of products. This Jolly Delivery Suite fit the bill perfectly:
Last Chance Stamping Write Markers!
While you are shopping, make sure you pick up the Last Chance Stamping Write Markers! These markers, including the 2025 – 2027 In Color markers, are being discontinued. I love using these markers when sending cards because I can coordinate the card with the writing color. Therefore, I have all the available sets ready and waiting in my SU! cart.
If you live in the U.S. and don’t already have a Stampin’ UP! demo from whom you order, I would be honored to work with you. You can reach me at my [email protected].
Welcome to the newest Make My Monday bi-weekly challenge #256. Thank you to everyone who posted in the challenge gallery for my Summer Fun challenge #255! Our host for #256, Billie A., chose Wet or Dry Embossing for the theme. When you finish here, please visit the challenge site to see what the rest of the very talented design team members created. Then, don’t forget to upload your creations to our gallery. We look forward to seeing your creations there!
I wound up going down the rabbit hole watching videos about all kinds of things and stumbled across using a “black ice” technique with the SU! Sunflowers 3D embossing folder. Gorgeous!! Of course, I can’t find the original video I watched.
Here’s my “black ice” card using ink on the debossed (reverse) side:
In comparison, here’s the same technique using the embossed/raised side:
I’ve seen video tutorials using this embossing folder and quickly decided all of the Thanksgiving cards I need (around 25 or so) will be done with this embossing folder. This embossing folder is 8-1/2 by 6 inches, so you can get different parts of the pattern for your cards. I’ve used two different portions of the folder for each of my cards.
Easy-Peasy Black Ice card:
The card base measures 4-1/4 by 11 inches, scored at 5-1/2 inches
AFTER running your white cardstock through the Cut & Emboss machine, trim the cardstock to 4-1/8 by 5-3/8 inches
HINT: If you trim your white cardstock first, you won’t have the same size paper after embossing since this folder is a deep 3D pattern
Stamp the front sentiment on scrap white cardstock and crop using the Textured Notes dies and add dimensionals under the panel
Trim a piece of white cardstock for the inside to 4 by 5-1/4 inches
Wrap a length of ribbon around the white embossed cardstock and tie in a square knot
Emboss the envelope flap using the sunflower embossing folder
HINT: I did the two flaps at the same time because I was concerned that the deep emboss of the sunflowers would tear just one of the envelopes
You can see the results of the embossed envelope flap below:
To layer the black ink on the embossed or de-bossed side, use an ink pad and swipe it lightly along the the sunflowers
To add more color, lightly swipe until you get the look you want
I used just a corner of the ink pad to get color on the leaves
I punched 2 1-inch circles from Basic Gray 6 x 6 inch DSP for the envelope seals and ran them through the XYRON create-a-sticker
I haven’t stamped a sentiment on the inside of either card yet and will do so when I know the purpose of the cards
With that, I’ve finished this coordinated card, envelope, and envelope seal set.
Serve up a slice of celebration with the Birthday Fancy Kit! With layered cakes, teacups, florals, and doily details in soft pastels, these 12 cards (4 each of 3 designs) are like a birthday party in an envelope. Whether you’re crafting for birthdays or other sweet occasions, each design makes it easy to create something charming and full of cheer.
DETAILS – Makes 12 cards: 4 each of 3 designs – Folded card size: 5-1/2″ x 4-1/4″ (14 x 10.8 cm) – Colors: Darling Duckling, Fresh Freesia, gold, Lost Lagoon, Petal Pink, Strawberry Slush – Also available in French
Kit includes one of each item listed below. – Birthday Fancy Photopolymer Stamp Set – Clear stamp block – Lost Lagoon Classic Stampin’ Spot – Step-by-step instructions – 12 printed envelopes – Gold foil accents – Adhesive
Here’s the Stampin’ Up! video for the Birthday Fancy Kit:
Sweet & Spooky Kit:
Make Halloween gifting extra special with the Sweet & Spooky Kit! This kit makes 15 treat boxes (5 each of 3 playful designs) featuring cute ghosts, bats, pumpkins, and more in a fun palette of black, pink, orange, and iridescent. With matching tags and ribbon included, these sweet boxes are perfect for party favors, classroom treats, or spooky surprises.
DETAILS – Makes 15 treat boxes: 5 each of 3 designs – Colors: Basic Black, Bubble Bath, Fresh Freesia, iridescent, Pumpkin Pie
Kit includes one of each item listed below. – Step-by-step instructions – Printed and iridescent-foil precut pieces – Paper clips – Pressed wood picks – Baker’s twine – Adhesive-backed holographic stars – Adhesive
Here’s the Sweet & Spooky video from Stampin’ Up!:
If you live in the U.S. and don’t already have a Stampin’ UP! demo from whom you order, I would be honored to work with you.
Welcome back to the bi-weekly Cardz 4 Galz # 243! Our host, Debbie, chose Polka Dots for the theme. When you finish here, please visit the challenge site to see what the rest of the very talented design team members created. Then, don’t forget to upload your creations to our gallery. We look forward to seeing your creations there!
Here’s my easel fold Polka Dot card:
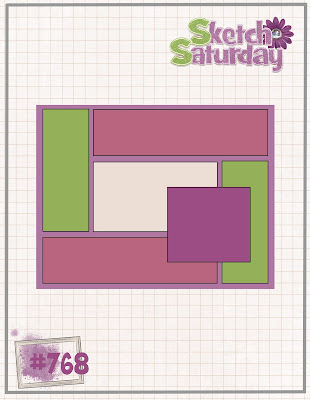
I was able to combine this C4Galz challenge with Sketch Saturday #768 and the current Creative Creases Challenge #99. I used the new Terrific Toadstool bundle and the Sale-a-Bration Toadstool Gardens DSP (designer series paper), which is FREE with a $60 purchase.
Here are the challenge banners:
.
Measurements:
The Melon Mambo base measures 5-1/2 by 8-1/2 inches, scored at 2-1/8 and 4-1/4 inches
It took me a bit to figure out the measurements for the Toadstool DSP, so I made a template so I wouldn’t have to figure it out again. Here’s my template:
I used a strip of the same DSP as the easel stop and it measures 5-3/8 inches by 1/2 inch
Trim a piece of DSP to 6 by 2-1/2 inches for the envelope flap
Punch a 1-inch circle of DSP for the envelope seal and run it through your XYRON create-a-sticker
Trim a piece of white cardstock to 5-3/8 by 4-1/8 inches for the inside of the card
Stamping, Cropping, & Assembly:
Using the sentiments from the Terrific Toadstool bundle, stamp the inside sentiment on the trimmed white cardstock in Early Espresso ink
Stamp the outside sentiment on white cardstock in Early Espresso ink and crop using a Greetings of the Season die set, and outline using Granny Apple Green ink
Stamp the adorable ladybug in Melon Mambo ink and use a black Stamping Write Marker to add the face, legs, and antennae
Stamp the mushroom cap on a piece of scrap white cardstock and punch it out
Punch the stem from DSP
Stamp the stems & mushrooms using Granny Apple Green and Pumpkin Pie ink
Color a piece of the white diagonal ribbon using the dark Pumpkin Pie blend marker, thread it through the hole on the label and tie in a square knot
I used multipurpose liquid glue to adhere the pieces unless otherwise noted
Adhere the pieces on the front of the card and the white cardstock on the inside
Adhere the mushroom pieces to the label
Add dimensionals to the back of the sentiment label and add to the front of the card and the mushroom cap to adhere to the card
Add dimensionals to the stop strip to the top of the inside of the card and adhere
With that, I’d finished this coordinated card, envelope, and envelope seal set
Have you checked out the Otterly Amazing Online Exclusive Suite of Products?
I finally had the opportunity to play around with this set! You can see that card here
However, in case you haven’t seen this amazingly adorable suite, here’s a photo and the SU! video introducing this suite.
Of course, I need to include SALE-a-BRATION!
For every $60 and $120 you spend, you’ll earn an exclusive Sale-A-Bration item for FREE! Depending on the amount you spend, you’ll be able to mix and match the Sale-A-Bration items you earn, and we have a stunning variety of stamp sets and Designer Series Paper for you to choose from! Shop now through February 28.
There’s also a new JOIN PROMOTION:
If you live in the U.S. and don’t already have a Stampin’ UP! demo from whom you order, I would be honored to work with you.
When ordering, please enter the following HOST CODE when prompted:
Welcome to the newest Make My Monday bi-weekly challenge #244. Our host for this challenge, Claudia, chose Gnomes for the theme. When you finish here, please visit the challenge site to see what the rest of the very talented design team members created. Then, don’t forget to upload your creations to our gallery. We look forward to seeing your creations there!
I wanted to combine some of the retired products, including the Kindest Gnomes stamp set with current products. Here’s my card:
This gnome is my husband’s favorite out of the stamp set, so I’m always ready to use it.
Measurements:
The Balmy Blue base measures 5-1/2 by 8-1/2 inches, scored at 4-1/4 inches
The Basic Black mat measures 4-1/8 by 5-3/8 inches
HiNT: When I just need a mat, I crop the center out to use in other projects. No one will see the ugly since it’s covered up. Just don’t do this for a mat on the inside because it will cause problems when trying to write on uneven cardstock layers.
This Balmy Blue Beautiful Bokeh DSP (designer series paper) can be found in the January – April 2025 mini-catalog. Take a closer look at this gorgeous paper in Calypso Coral, Daffodil Delight, Balmy Blue, Fresh Freesia, and Berry Burst:
The DSP piece measures 4 by 5-1/4 inches
I trimmed a piece of Balmy Blue 6 x 6 inch DSP to 6 by 2-1/2 inches for the envelope flap, which is trimmed after adhering it to the flap
Then, I punched a 1-inch circle from coordinating DSP and ran it through my XYRON create-a-sticker for the envelope seal
A scrap piece of Balmy Blue cardstock was used for the sentiment, which comes from the retired Biggest Wish stamp set, which I will keep for a few years because it’s fabulous
Use a Greetings of the Season die for the sentiment
I used a length of the Balmy Blue twine from the Baker’s Twine Trio to wrap around the front of the card and tied it in a double bow
While I haven’t stamped anything on the inside yet for the all occasion card, I did trim a piece of white cardstock to 4 by 5-1/4 inches for the inside
Stamping, Coloring, and Assembly:
Unless otherwise noted, I used multipurpose liquid glue to adhere the pieces
Adhere the Bohek DSP to the black cardstock mat
Wrap Balmy Blue baker’s twine around the mat/DSP layer and tie in a bow
Adhere the mat/DSP layer to the base of the card
Stamp the gnome using Tuxedo Black ink and color him using blends combos
Crop the gnome
Stamp the black “Hello” sentiment in Tuxedo Black ink
Rub down the scrap for the sentiment using your embossing buddy
Stamp the cursive “hello” on top of the stamped sentiment using VersaMark ink
After covering the ink in white embossing powder, heat set it
After the embossed sentiment cools, crop it using the Greetings of the Season die
Outline the cropped sentiment using a Basic Black Stamping Write Marker
I adhered the gnome on top of the tiny ribbon hole in the cropped label
Add dimensionals to the back of the sentiment and adhere
I thought I needed to add something, so I used three retired black matte dots
With that, I’d finished this coordinated card, envelope, and envelope seal set
Welcome to the newest Cardz 4 Guyz challenge #361! I am hosting this two-week challenge and chose Grateful, Thankful, &/or Blessed for the theme. When you finish here, please visit the challenge site to see what the rest of the very talented design team members created. Then, don’t forget to upload your creations to our gallery. We look forward to seeing your creations there!
I have two posts going live today. The first is this one, and the second is going live at 7 am for the SU! Demos Fun Fold Blog Hop. You can find that link here after 7 am ET.
I decided to use some of my remaining May Paper Pumpkin kit for my card. When you need quick cards, kits are the perfect way to go. I have done cards from the kits by simply following the directions. However, most of the time, I do something a bit different. That’s what I did for this challenge.
Here’s my card:
I’ve made and posted a number of cards from various kits. You can see some of those posts here, here, here, and here.
What I Did:
I used an Early Espresso base, which measures 4-1/4 by 11 inches, scored at 5-1/2 inches
The Misty Moonlight background DSP is actually one of the kit’s card bases, which I trimmed down to 5-3/8 by 4-1/8 inches
The mountain paper is the size from the kit
The sentiment, from the Autumn Leaves stamp set, is stamped in Early Espresso on a banner included with the kit
The branches and the Misty Moonlight strip under the sentiment comes with the kit
I added dimensionals under the strip and sentiment banner
I used multipurpose liquid glue to adhere the rest of the pieces
The white cardstock for the inside panel measures 4 by 5-1/4 inches
Since I used an envelope from the kit, I’d quickly finished this coordinated card and envelope set.
Thank you for stopping by today!
Have a Peachy Day!
Sue
Two fabulous new kits!
This new Layered Landscapes kit is absolutely fabulous! Just take a look:
Here’s the unboxing video:
Of course, this kit comes with step-by-step instructions, as seen below:
If you like to water-color, this next kit is for you!
Product Details:
Embrace your creative side with the Nature’s Paintings Kit. This unique kit includes everything you need for a fun creative experience: a coloring book, watercolor pencils, and a water painter. All you need is some imagination and water! Create lovely, picturesque images using advanced coloring techniques with this craft kit. Or make something that’s never been seen before—like green flowers with purple leaves. Keep it realistic or color outside the lines—it’s up to you. And once you’re done, you can use your finished artwork to create a one-of-a-kind card front!
Kit includes: * Predesigned projects * Line art illustrations * Step-by-step instructions * 24 watercolor paper pages, 2 each of 12 designs * 8 Watercolor Pencils * 1 Water Painter * Coloring Book: 4-1/2″ x 6″ x 1/2″ (11.4 x 15.2 x 1.3 cm) * A 9-7/8″ x 6-1/2″ x 1-3/4″ (25.1 x 16.5 x 4.4 cm) printed designer box for storage or crafting on the go
Product colors: Berry Burst, Coastal Cabana, Daffodil Delight, Early Espresso, Flirty Flamingo, Garden Green, Pumpkin Pie, Red
If you live in the U.S. and don’t already have a Stampin’ UP! demo from whom you order, I would be honored to work with you.
When ordering, please enter the following HOST CODE when prompted:
GYZSYS
Again, thank you for stopping by! Don’t forget to come back at 7 am ET for my fun fold card!
Welcome back to the bi-weekly Cardz 4 Galz challenge # 236. I’m hosting this challenge and chose Use three or More Colors: Purple, Orange, Green, or Black. Originally, I thought I’d create another Halloween card. Then, I decided to use some 6 x 6 inch DSP (designer series paper).
When you finish here, please visit the challenge site to see what the rest of the very talented design team members created. Then, don’t forget to upload your creations to our gallery. We look forward to seeing your creations there!
I chose Highland Heather, Mossy Meadow, and Pumpkin Pie.
Here’s my card:
I’ve made this fun fold before, and you can find those other card here. I’ll be posting so many more using this fold because it’s my new favorite fold for the 6 x 6 inch DSP packs.
I have no earthly idea why I didn’t save the tutorial video for this card, but I have searched my Pinterest and saved video tutorials on YouTube for more than 30 minutes and can’t find it. If you recognize the fold, please let me know so I can give credit to the original designer. I will be using this fold for many 6 x 6 inch DSP pages! The paper absolutely does all the work here!
Measurements:
I’ve made myself a template so I can easily recreate this card.
Here’s my template:
The Mossy Meadow base measures 5-1/2 x 7-1/2 inches, scored on the long side at 1 inch and 4-1/4 inches
Trim two pieces of Highland Heather cardstock to 5-3/8 X 3-1/8 inches
After running a piece of Highland Heather DSP through your Cut & Emboss machine using your favorite embossing folder, trim the piece to 1 by 5-3/8 inches
Trim a piece of the 6 x 6 inch Thoughtful Journey DSP to 5-1/8 inches and then trim the piece in half creating two 3 x 5-1/8 inch pieces
HINT: You can trim the 6 x 6 inch DSP from the top, the bottom, or a combination of both, which is what I did here.
The white cardstock piece on the inside measures 5-3/8 by 3-1/8 inches
Trim a piece of coordinating DSP to 6 by 2-1/2 inches for the envelope flap
Then, punch a `1-inch circle from contrasting DSP and run it through the XYRON create-a-sticker for the envelope seal
Using the dark Pumpkin Pie blend, color some basic pearls to coordinate with the DSP
HINT: You will need multiple layers of the blend ink to achieve a deep color. It’s easier to color a layer and let it dry completely between layers of color
Use the template to adhere the pieces together. I try not to use to many dimensionals because the card already has many layers.
Thank you for stopping by today!
Have a Peachy Day!
Sue
It’s a Promotion Duo Today!
First, it’s a KIT sale for the month of October!
Details:
ALL kits from our collection qualify for the discount.
All order types qualify for this sale. There is no limit on how many kits you can order, as long as product is available.
Orders must be opened and placed during the promotion dates. Orders opened before October 1 will not qualify for the sale.
Kits on sale will NOT qualify for the Stampin’ Rewards 50% off.
Kits can be added to a Starter Kit at their discounted rate.
Coupon codes can also be used with discounted kits.
I am especially looking forward to getting the Alpine Air Kit! It’s already on my next order.
Next up: A Starter Kit Special!
When new team members purchase their Starter Kit, they will be able to redeem $155 USD of Starter Kit eligible products for just $99 USD . That’s $56 of FREE product!!!
New demonstrators who submit their Independent Demonstrator Agreement (IDA) before October 1 or after October 31 will not be eligible for this offer.
If you decide being a demonstrator is not for you (but really, the discount is DEFINITELY worth being a continuing demonstrator), you can cancel.
Hobbyist demonstrators are very welcome because who doesn’t love a 20% discount, opportunities to see and pre-order from the new catalogs and specials
Please contact me if you are interested in joining my team! I’d love to connect with you!
If you live in the U.S. and don’t already have a Stampin’ UP! demo from whom you order, I would be honored to work with you.
When ordering, please enter the following HOST CODE when prompted:
Welcome to Just Peachy Stamping by Sue Jackson: an independent Stampin' Up demonstrator.
Through Stampin' Up!, I happily share my love of papercrafting through sales, classes, small stamping group meet-ups and workshops. I think that being a teacher in my "real life", I have a unique approach to sharing my fantastic hobby. I look forward to connecting with you!