Welcome back to the bi-weekly Cardz 4 Galz challenge # 220. Our host, Billie A, picked Use Some Green for the theme. When you finish here, please visit the challenge site to see what the rest of the very talented design team members created. Then, don’t forget to upload your creations to our gallery. We look forward to seeing your creations there!
This week another coworker asked if I could make her daughter a stadium wave Fluffiest Friends birthday card. Turns out, her daughter’s favorite color is green. Perfect timing! You can see my previous wave card here.
Here’s my Fluffiest Friends stadium wave card:
Truly, if you can trim and score cardstock, you can create this card!
Once again, I used a video by Stamp with Tami for the directions. I followed her measurements and scoring lines to a T. This card is pretty darn easy and I could do the majority of this card without help, including scoring the base. I also knew the size of the cardstock for the wave mechanism is 8 by 7-3/4 inches and just used her scoring measurements. Then it’s just a matter of trimming on the 8-inch side in 1-inch increments. Tami’s video is easy to follow and she’s very open about this being a new-to-her fold. I am still amazed that she worked out the measurements and directions after watching a video by a Dutch card maker, and she did it without the help of translations.
Minor Changes to Tami’s Video:
While making and adjusting this version of the Stadium Wave Fluffiest Friends birthday card, there are a few changes I made or will make next time.
After coloring and adhering all these adorable Friends, I attached them to the wave mechanism. Then, I realized how ugly the backs of the critters looked. That’s when I cropped another set of critters using the die set. Next, I had to carefully trim as necessary to adhere the white cardstock to the back of the colored critters.
Before and After:
It is necessary to adhere the white cardstock on the inside before adhering the wave mechanism. Thankfully, I remembered this detail in time.
Once again, I used ribbon instead of a belly band to keep the card closed. I have an idea for the next card, and if it works, I’ll update this post with a link to the new card.
This time, I adhered the ribbon before I adhered the white cardstock on the inside. I only had the end of the roll of this faux suede ribbon, so I trimmed it in half and used tear & tape to adhere the ends under the white cardstock.
I used more of the tabs than just the first two critters. The tabs measure 1/4 by 1 inch and raise the critters above the next wave.
This wave card definitely has more of an impact when opened from the backside of the card. Next time, I will make the card so that it opens down, if that makes sense. I’ll be sure to update this post with a link to the new version of the card.
Tami didn’t use dimensionals, and I didn’t either. Even though both of my stadium wave cards will be hand-delivered, there’s already enough bulk. Dimensionals might make it difficult to fit inside a medium white envelope.
I hope you watch Tami’s video and create your own stadium wave card. It’s so much fun to create and looks amazing!
I’ve already ordered some of these products and have more on the way. I can’t wait to start playing with them! Take a look at just some of the new products available!
I love the script used for these sentiments. I’ve used the birthday one, and it fits so well on a landscape 5-1/2 by 4-1/4 inch card!
The stamps for these adorable critters are two sided stamps: the outline image is on one side and the animal is on the other. The sample card uses the animal stamp.
Personally, I think this background stamp is gorgeous! Don’t delay in ordering as it just came back in stock. I’ve got an order on its way to me, but this stamp might just be worth paying shipping for just this item.
I had previously ordered the natural polka dot ribbon, and now have the rest of the suite of products on the way. This suite would be suitable to masculine or feminine cards, and I can’t wait to get my hands on it!
Shopping in the current mini-catalog is a wonderful way to shop!
Click on the image/link below to browse and download the mini-catalog!
Welcome back to the bi-weekly Cardz 4 Galz challenge # 219. Our host, Johanna, picked Seascape for the theme. When you finish here, please visit the challenge site to see what the rest of the very talented design team members created. Then, don’t forget to upload your creations to our gallery. We look forward to seeing your creations there!
I didn’t strictly follow the Seascape theme. Instead, I was inspired by it, and here’s the card I created for challenge #219:
I used the retired 6 x 6 inch By the Bay DSP for this card, along with the deckled rectangles die set and the Sale-a-Bration Heartfelt Hellos stamp set. The finishing touches include the Night of Navy ribbon and three Petal Pink adhesive Milky Dots. The result is this easy-peasy seascape inspired card.
Measurements and More:
The Night of Navy base measures 4-1/4 by 11 inches, scored at 5-1/2 inches to create a tent fold card.
The white cardstock base measures 4-1/8 by 5-3/8 inches. The piece for the inside measures 4 by 5-1/4 inches.
After stamping the sentiment from the Heartfelt Hellos in Night of Navy ink, I cropped it from the white cardstock mat using a deckled rectangle die.
Then, I outlined the sentiment panel using a blue marker and added dimensionals underneath it.
The background By the Bay DSP measures 4 by 5-1/4 inches.
Trim a piece of the background DSP to 6 by 2-1/2 inches for the envelope flap.
Punch a 1-inch circle from the focal panel DSP for the envelope seal, and run it through your XYRON create-a-sticker.
Next, I cropped the DSP focal panel using a deckled rectangle die.
Wrap a length of Night of Navy ribbon around the focal DSP and tie it in a bow.
Adhere all the layers of the front of the card using multipurpose liquid glue.
Adhere the sentiment panel with the dimensionals.
Finally, add three Petal Pink milky dots.
I didn’t add a sentiment to the inside yet. The sentiment on the front is an all-occasion sentiment, so I will stamp one in Night of Navy ink when I know the reason for the card.
With that, I’d finished this coordinated card, envelope, and envelope seal set.
The dragonfly punch is in the current catalog, but I thoroughly enjoyed getting it for free!
My next Sale-a-Bration item will be the set of the new colors markers. I already have that set of markers but I want an extra set of them. Getting them for FREE with a qualifying purchase is a WIN-WIN!
The Sale-a-Bration Jungle Pals dies and stamp set are fabulous! I’ve already posted cards for which I’ve used those items and you can see them here and here. Of course, there are other fabulous items as well!
Shopping in the current mini-catalog is a wonderful way to earn FREE products!
Click on the image/link below to browse and download the mini-catalog!
In addition, there’s a great promotion going on during Sale-a-Bration for joining the Stampin’ UP! community!
Customers who join our fun crafting community as a new demonstrator can get $125 USD | $165 CAD worth of product PLUS our Stampin’ Glass Mat Studio* (a $60 USD | $82 CAD value) for just $99 USD | $135 CAD!
STAMPIN’ GLASS MAT STUDIO:
The Stampin’ Glass Mat Studio is a paper crafter’s dream! The heavy-duty glass mat comes printed with a ruler and grid lines for easy measuring, while the large surface space gives ample room for spreading out while paper crafting. The safety-tempered glass has a heat and scratch resistant surface that wipes clean with the included cloth and water—no chemicals needed. The reusable cloth also cleans ink off your stamps! The nonslip, heat resistant, waterproof silicone mat features four palette squares for mixing custom ink colors or for holding small ink spots in place while crafting. Each component can be used separately or you can use all three items together for a multipurpose paper crafting studio that’s both functional and elegant.
The Stampin’ Glass Mat Studio includes:
GLASS MAT * 5 mm thick * 17″ x 14″ (43.2 x 35.6 cm) * Safety-tempered * Heat and scratch resistant * Wipes clean with water or alcohol
SILICONE MAT * 8-3/8″ x 6″ (21.3 x 15.2 cm) * Multiuse, nonslip * Waterproof, heat resistant * 4 palette squares for custom-color mixing or holding Stampin’ Spots * Product color: white
CLEANING CLOTH * 8-1/4″ x 8-1/4″ (21 x 21 cm) * Durable, reusable * Lint free * Cleans stamps and other surfaces with only water * Product color: dark gray
If you live in the U.S. and don’t already have a Stampin’ UP! demo from whom you order, I would be honored to work with you.
When prompted, please enter the following HOST CODE:
Welcome back to the Cardz 4 Galz challenge #218! Dawn, our host for this bi-weekly challenge period chose using sequins for the theme. When you finish here, I hope you will visit the challenge site to see how the rest of the design team members used sequins in their projects. We always love it when you play along with our themes, so please remember to upload your project to our gallery.
Here’s my Fresh as a Daisy DSP card:
Measurements:
The Moody Mauve base measures 11 by 4-1/4 inches, scored at 5-1/2 inches to create a tent card.
Next, I trimmed a piece of Bubble Bath cardstock to 4-1/8 by 5-3/8 inches and outlined it with a Bubble Bath Stamping Write Marker.
The Fresh as a Daisy DSP (designer series paper) measures 4 by 5-1/4 inches. I outlined it using the Moody Mauve Stamping Write Marker.
Then I trimmed a piece of the same DSP to 6 by 2-1/2 inches for the envelope flap.
I punched a 1-inch circle from Bubble Bath 6 x 6 inch DSP for the envelope seal and ran it through my XYRON create-a-sticker.
The white cardstock for the inside of the card measures 5-1/4 by 4 inches.
Assembly:
Before adhering the Bubble Bath cardstock to the card base, I cropped the solid daisy pieces using the Cheerful Daisy dies. Since this piece of cardstock will mostly be covered by the DSP, no one will see the ugly in the cardstock.
I used my Bubble Bath Stamping Write Marker to outline each of the daisy solid backgrounds to make them stand out from the DSP.
Next, I cropped the white cardstock daisies from a 4-1/4 by 5-1/2 inch piece of cardstock.
I was also able to crop the sentiment block after I stamped it in Moody Mauve. The sentiment comes from the Cheerful Daisies stamp set and I used the second smallest Countryside Corners die to crop it.
I adhered the Bubble Bath cardstock to the base using multipurpose liquid glue.
Next, I wrapped a piece of Bubble Bath ribbon around the DSP and tied it in a square knot.
Using multipurpose liquid glue, I adhered the DSP to the cardstock.
Again using liquid glue, I adhered the Bubble Bath solid daisy backings to the white cardstock daisies.
I added dimensionals to the back of the daisies and the leaves. I needed to cut some mini-dimensionals in half for the leaves.
After adhering the daisies to the DSP, I needed to use a double layer of dimensionals under the sentiment.
Finally, I added sequins to the sentiment, the daisy centers, and randomly on daisy centers on the DSP.
You Made My Day can easily be an all-occasion sentiment. Therefore, I haven’t stamped anything on the inside of the card yet. I will do that when I decide how I am going to use this card.
With that, I’d finished this coordinated card, envelope, and envelope seal set.
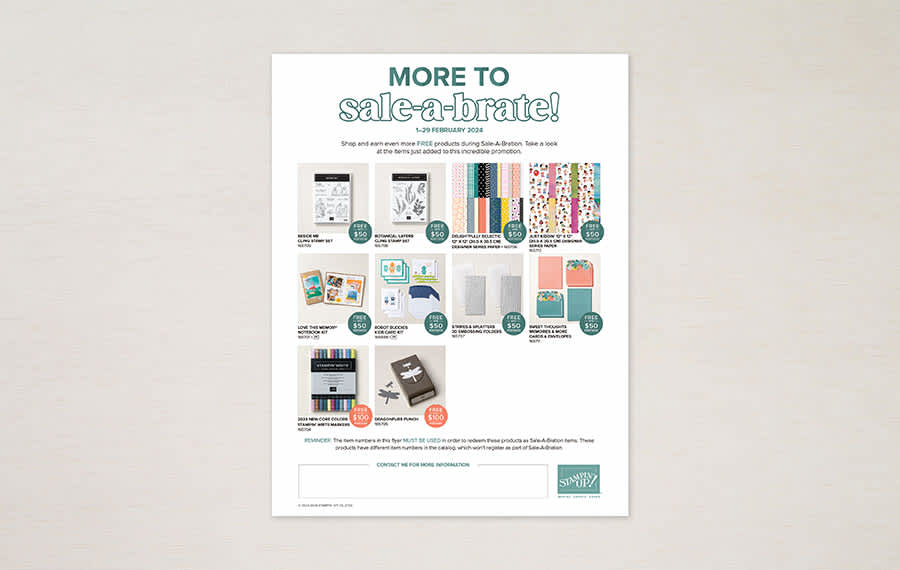
The following items are FREE with a qualifying $50 purchase (before tax and shipping). The top row are some new additions to the Sale-a-Brate FREE items.
The following items are FREE with a qualifying $100 purchase (before tax and shipping.
The Jungle Pals dies and stamp set are fabulous! I’ve already posted cards for which I’ve used those items and you can see them here and here. Of course, there are other fabulous items as well!
Shopping in the current mini-catalog is a wonderful way to earn FREE products!
Click on the image/link below to browse and download the mini-catalog!
In addition, there’s a great promotion going on during Sale-a-Bration for joining the Stampin’ UP! community!
In addition, there’s a great promotion going on during Sale-a-Bration for joining the Stampin’ UP! community!
Customers who join our fun crafting community as a new demonstrator can get $125 USD | $165 CAD worth of product PLUS our Stampin’ Glass Mat Studio* (a $60 USD | $82 CAD value) for just $99 USD | $135 CAD!
STAMPIN’ GLASS MAT STUDIO:
The Stampin’ Glass Mat Studio is a paper crafter’s dream! The heavy-duty glass mat comes printed with a ruler and grid lines for easy measuring, while the large surface space gives ample room for spreading out while paper crafting. The safety-tempered glass has a heat and scratch resistant surface that wipes clean with the included cloth and water—no chemicals needed. The reusable cloth also cleans ink off your stamps! The nonslip, heat resistant, waterproof silicone mat features four palette squares for mixing custom ink colors or for holding small ink spots in place while crafting. Each component can be used separately or you can use all three items together for a multipurpose paper crafting studio that’s both functional and elegant.
The Stampin’ Glass Mat Studio includes:
GLASS MAT * 5 mm thick * 17″ x 14″ (43.2 x 35.6 cm) * Safety-tempered * Heat and scratch resistant * Wipes clean with water or alcohol
SILICONE MAT * 8-3/8″ x 6″ (21.3 x 15.2 cm) * Multiuse, nonslip * Waterproof, heat resistant * 4 palette squares for custom-color mixing or holding Stampin’ Spots * Product color: white
CLEANING CLOTH * 8-1/4″ x 8-1/4″ (21 x 21 cm) * Durable, reusable * Lint free * Cleans stamps and other surfaces with only water * Product color: dark gray
If you live in the U.S. and don’t already have a Stampin’ UP! demo from whom you order, I would be honored to work with you.
When prompted, please enter the following HOST CODE:
Welcome to the Cardz 4 Galz challenge #217! I’m the host for this challenge, and I chose reds and pinks for the theme. I”d be honored to have you play along with us and upload your creations to our gallery. Please don’t forget to visit the challenge website to see the fabulous creations from the rest of the design team members.
Here’s my card:
Measurements:
The Poppy Parade base measures 5-1/2 inches by 8-1/2 inches, scored at 4-1/4 inches.
The white cardstock mat measures 4-1/8 by 5-3/8 inches.
AFTER I ran a piece of Poppy Parade through my Cut & Emboss machine using the 3D exposed brick embossing folder, I trimmed it to 4 by 5-1/4 inches.
The white mat under the DSP (designer series paper) measures 2-5/8 inches by 4-7/8 inches.
I trimmed a piece of Garden Walk DSP to 2-1/2 by 4-3/4 inches.
Trim a coordinating piece of DSP to 6 by 2-1/2 inches for the envelope flap.
Next, punch a piece of DSP using a 1-inch whole punch and run it through the XYRON create-a-sticker for the envelope flap.
I used a piece of scrap Poppy Parade cardstock for the sentiment label.
The white cardstock for the inside measures 4 by 5-1/4 inches.
You’ll need another piece of white cardstock for the daisies. Don’t tell anyone, but I cropped the daisies from the white cardstock mat under the embossed Poppy Parade cardstock. No one will know and you can be frugal with your cardstock.
Assembly:
Adhere the white cardstock mat to the base of the card using multipurpose liquid glue.
Center the dry-embossed Poppy Parade cardstock on the white cardstock mat and adhere using liquid glue.
After adhering the Garden Walk DSP to the white cardstock mat, wrap a piece of white ribbon around the layers and tie in a square knot.
Add glue dots to the corners of the white cardstock layer and then apply liquid glue. Adhere to the dry-embossed piece of Poppy Parade.
HINT: I added glue dots to the corners and also used liquid glue so I wouldn’t need to use dimensionals to accommodate the ribbon.
After cropping the daisies using the Cheerful Daisy dies, I ran it through my Cut & Emboss machine using one of the basics embossing folders. The set of three basics embossing folders are available in the online exclusives products.
Wipe a piece of Poppy Parade cardstock using your embossing buddy, and then stamp the sentiment using VersaMark ink.
After adding white embossing powder to the ink, heat set it with your heat tool.
Crop the sentiment using the label die from Cheerful Daisies die set.
Add dimensionals under the daisies and adhere to the front of the card.
Use liquid glue to adhere the sentiment to the top of the daisies.
Stamp your sentiment for the inside on the white cardstock using Poppy Parade ink.
After you stamp your sentiment, adhere the inside white cardstock using liquid glue.
HINT: I’ve learned that I need to stamp the sentiment before I adhere the inside cardstock. Cardstock has two sides for a reason, and if you stamp before you adhere, you can easily try again on the back of the cardstock. Trust me on this.
With that, I’d completed this easy-peasy coordinated birthday card, envelope, and envelope seal set.
In addition, there’s a great promotion going on during Sale-a-Bration for joining the Stampin’ UP! community!
In addition, there’s a great promotion going on during Sale-a-Bration for joining the Stampin’ UP! community!
Customers who join our fun crafting community as a new demonstrator can get $125 USD | $165 CAD worth of product PLUS our Stampin’ Glass Mat Studio* (a $60 USD | $82 CAD value) for just $99 USD | $135 CAD!
STAMPIN’ GLASS MAT STUDIO:
The Stampin’ Glass Mat Studio is a paper crafter’s dream! The heavy-duty glass mat comes printed with a ruler and grid lines for easy measuring, while the large surface space gives ample room for spreading out while paper crafting. The safety-tempered glass has a heat and scratch resistant surface that wipes clean with the included cloth and water—no chemicals needed. The reusable cloth also cleans ink off your stamps! The nonslip, heat resistant, waterproof silicone mat features four palette squares for mixing custom ink colors or for holding small ink spots in place while crafting. Each component can be used separately or you can use all three items together for a multipurpose paper crafting studio that’s both functional and elegant.
The Stampin’ Glass Mat Studio includes:
GLASS MAT * 5 mm thick * 17″ x 14″ (43.2 x 35.6 cm) * Safety-tempered * Heat and scratch resistant * Wipes clean with water or alcohol
SILICONE MAT * 8-3/8″ x 6″ (21.3 x 15.2 cm) * Multiuse, nonslip * Waterproof, heat resistant * 4 palette squares for custom-color mixing or holding Stampin’ Spots * Product color: white
CLEANING CLOTH * 8-1/4″ x 8-1/4″ (21 x 21 cm) * Durable, reusable * Lint free * Cleans stamps and other surfaces with only water * Product color: dark gray
If you live in the U.S. and don’t already have a Stampin’ UP! demo from whom you order, I would be honored to work with you.
When prompted, please enter the following HOST CODE:
Welcome to the first bi-weekly Cardz 4 Galz challenge for 2024! Our host for this challenge, Dawn W., chose On Safari as the theme. When you finish here, I hope you will visit the challenge site to see how the rest of the design team members used sequins in their projects. We always love it when you play along with our themes, so please remember to upload your project to our gallery.
Here’s my On Safari card:
Measurements:
The Old Olive base measures 5-1/2 by 8-1/2 inches, scored at 4-1/4 inches.
The Old Olive cardstock frame piece measures 4-1/8 by 5-3/8 inches.
I used two pieces of white cardstock, each measuring 4 by 5-1/4 inches. One is under the frame on the front and the other is on the inside of the card.
I trimmed a piece of Sweet Sorbet 6 x 6 inch DSP (designer series paper) to 6 by 2-1/2 inches for the envelope flap.
Then I punched a 1-inch circle of Old Olive 6 x 6 inch DSP and ran it through my XYRON create-a-sticker.
That’s it for the measurements.
Stamping and Coloring:
After running the frame piece of Old Olive cardstock through the Cut & Emboss machine using the Stitched Greenery die, I used the Stylish Shapes dies for the banner and the four squares on the frame.
Using Pecan Pie ink, I stamped the vines and branches on the white cardstock for the front.
HINT: line up the frame piece of cardstock on top of the white cardstock. I used a pencil to very, very lightly mark the corners of each square so I knew where to stamp the vines and branches. After stamping, and letting the ink dry thoroughly, I carefully erased the corner marks. I did the same thing for the sentiment banner.
I used the Old Olive and Pecan Pie markers to color the vines and branches.
Then I stamped the sentiment in Momento Tuxedo Black ink and let it thoroughly dry before erasing the pencil marks.
Using a 4-1/4 by 5-1/2 inch piece of white cardstock, I stamped one monkey, then punched it out. Then I repeated the process three more times.
HINT: By stamping and punching one monkey at a time I was able to minimize the waste, which left me with a decent size leftover piece.
I colored the monkeys using the Crumb Cake combo blends markers. Then, I added rosy cheeks and touches of pink in the ears using the lightest natural tone blend.
Using the trio of bows die from the Playing in the Rain die set, I cropped four Sweet Sorbet bows for the monkeys. Cute!
Since the front sentiment allows this card to be an all-occasion card, I didn’t stamp a sentiment on the inside. I will do so when I decide for which occasion I will use this card.
Assembly:
I wanted to make sure that the frame didn’t collapse on itself, so I lined the frame of the Old Olive cardstock frame using foam adhesive strips.
Between the sentiment banner and the squares I added mini-dimensionals.
Next, I adhered the white cardstock to the adhesive strips on the frame.
Using multipurpose liquid glue, I adhered the white cardstock to the base of the card.
Then, I used liquid glue to adhere the adorable bows to the monkeys.
After dry-fitting the monkeys, I carefully added liquid glue to the pieces of the monkeys that would be on the outside of the frame.
I added two mini-dimensionals under each monkey to adhere it to the white cardstock.
With that, I’d finished this coordinated card, envelope, and envelope seal set.
In addition, there’s a great promotion going on during Sale-a-Bration for joining the Stampin’ UP! community!
Customers who join our fun crafting community as a new demonstrator can get $125 USD | $165 CAD worth of product PLUS our Stampin’ Glass Mat Studio* (a $60 USD | $82 CAD value) for just $99 USD | $135 CAD!
STAMPIN’ GLASS MAT STUDIO
The Stampin’ Glass Mat Studio is a paper crafter’s dream! The heavy-duty glass mat comes printed with a ruler and grid lines for easy measuring, while the large surface space gives ample room for spreading out while paper crafting. The safety-tempered glass has a heat and scratch resistant surface that wipes clean with the included cloth and water—no chemicals needed. The reusable cloth also cleans ink off your stamps! The nonslip, heat resistant, waterproof silicone mat features four palette squares for mixing custom ink colors or for holding small ink spots in place while crafting. Each component can be used separately or you can use all three items together for a multipurpose paper crafting studio that’s both functional and elegant.
The Stampin’ Glass Mat Studio includes:
GLASS MAT * 5 mm thick * 17″ x 14″ (43.2 x 35.6 cm) * Safety-tempered * Heat and scratch resistant * Wipes clean with water or alcohol
SILICONE MAT * 8-3/8″ x 6″ (21.3 x 15.2 cm) * Multiuse, nonslip * Waterproof, heat resistant * 4 palette squares for custom-color mixing or holding Stampin’ Spots * Product color: white
CLEANING CLOTH * 8-1/4″ x 8-1/4″ (21 x 21 cm) * Durable, reusable * Lint free * Cleans stamps and other surfaces with only water * Product color: dark gray
If you live in the U.S. and don’t already have a Stampin’ UP! demo from whom you order, I would be honored to work with you.
When prompted, please enter the following HOST CODE:
Welcome back to the Cardz 4 Galz bi-weekly challenge! A big shout out to those who played along with challenge #212, and we hope you will play along with #213 as well. Our host for this challlenge, Debbie, chose a Cityscape for the theme. When you finish here, please visit the challenge site to see the creations from the rest of the design team members. We’d love to see what you were inspired to create in our gallery!
Here’s my z-fold cityscape card:
I really enjoy z-fold cards and think they are one of the easy-peasy fun folds. I don’t know why I never thought to have 4 equal panels on the z-card. However, I wound up down the rabbit hole of videos (you know how you just keep clicking until you have no idea where you went) and saw this. Now, I don’t remember where. If I can find the video again, I will come back and update this post.
Easy-Peasy Does It:
The Balmy Blue base measures 8-1/2 by 5-1/2, and scored at 2-1/8 and 4-1/4 inches.
Use a bone folder to burnish the folds. This will help the card to sit flatter when closed.
The black mats under the Les Shoppes DSP (designer series paper) each measure 1-7/8 by 5-3/8 inches.
The black mat behind the single store on the front measures 3-7/8 by 2-3/8 inches.
The two white cardstock panels on the inside measure 5-3/8 by 2 inches.
The two DSP panels each measure 1-7/8 by 5-1/4 inches.
I trimmed another piece of Les Shoppes DSP to 6 by 2-1/2 inches for the envelope flap.
Then, I punched a 1-inch circle of DSP for the envelope seal and ran it through my XYRON create-a-sticker machine.
I used scrap Balmy Blue cardstock for the sentiment on the front.
Assembly:
The only place I used dimensionals was under the sentiment on the front. I used multipurpose liquid glue to adhere the rest of the pieces.
Adhere the DSP panels to the black cardstock mats.
Adhere the mats to the front panel and the right back inside panel of the card.
Adhere the single shoppe to the black cardstock piece.
Using liquid glue on just the left side of the shoppe panel, adhere it to the front flap of the card. Make sure that the shoppe will overlap about halfway.
HINT: You only want to add liquid glue to one half of the shoppe panel. If you do happen to forget that little tidbit of information, you can fix the OOPS! with another piece of black cardstock. I may, or may not, have to do that for this card.
Stamp the sentiments using Momento Tuxedo Black ink on the scrap of Balmy Blue and one of the white cardstock inside panels. I used the Charming Sentiments stamp set and coordinating dies. I’ve always wished that I could fussy cut around sentiments so they look perfect, but that’s not my strong suit. I love this stamp and die set because each sentiment has a coordinating die.
Crop the front sentiment and add dimensionals underneath it.
Adhere to the shoppe on the front.
HINT: Stamp your sentiment for the inside of the card BEFORE you adhere the cardstock to the base of the card. That way, you can easily turn the cardstock over and restamp it if necessary.
Adhere both white cardstock panels to the inside of the card.
With that, I’d finished this easy-peasy coordinated stamp, envelope, and envelope seal stamp set.
It’s time to sign up for your December Paper Pumpkin kit!
Send a wish to all your loved ones with the December Paper Pumpkin Kit! It comes with nine card fronts, three each of three designs, and nine coordinating envelopes. It has paper pieces detailed with gold foil, embellishments, an all-occasion stamp set, and an acetate box where you can store your finished cards! You can gift the kit itself or the finished product in the acetate box; either way, it’s the perfect last minute gift for any occasion.
If you live in the U.S. and don’t already have a Stampin’ UP! demo from whom you order, I would be honored to work with you.
Welcome to Just Peachy Stamping by Sue Jackson: an independent Stampin' Up demonstrator.
Through Stampin' Up!, I happily share my love of papercrafting through sales, classes, small stamping group meet-ups and workshops. I think that being a teacher in my "real life", I have a unique approach to sharing my fantastic hobby. I look forward to connecting with you!